
Implementing Paycheck Linked Lending Solutions
The guide below covers integrating paycheck linked lending into your workflow.
Overview
Follow the step-by-step guide below to use Truv in your application for paycheck linked lending.
Summary of sequence diagram
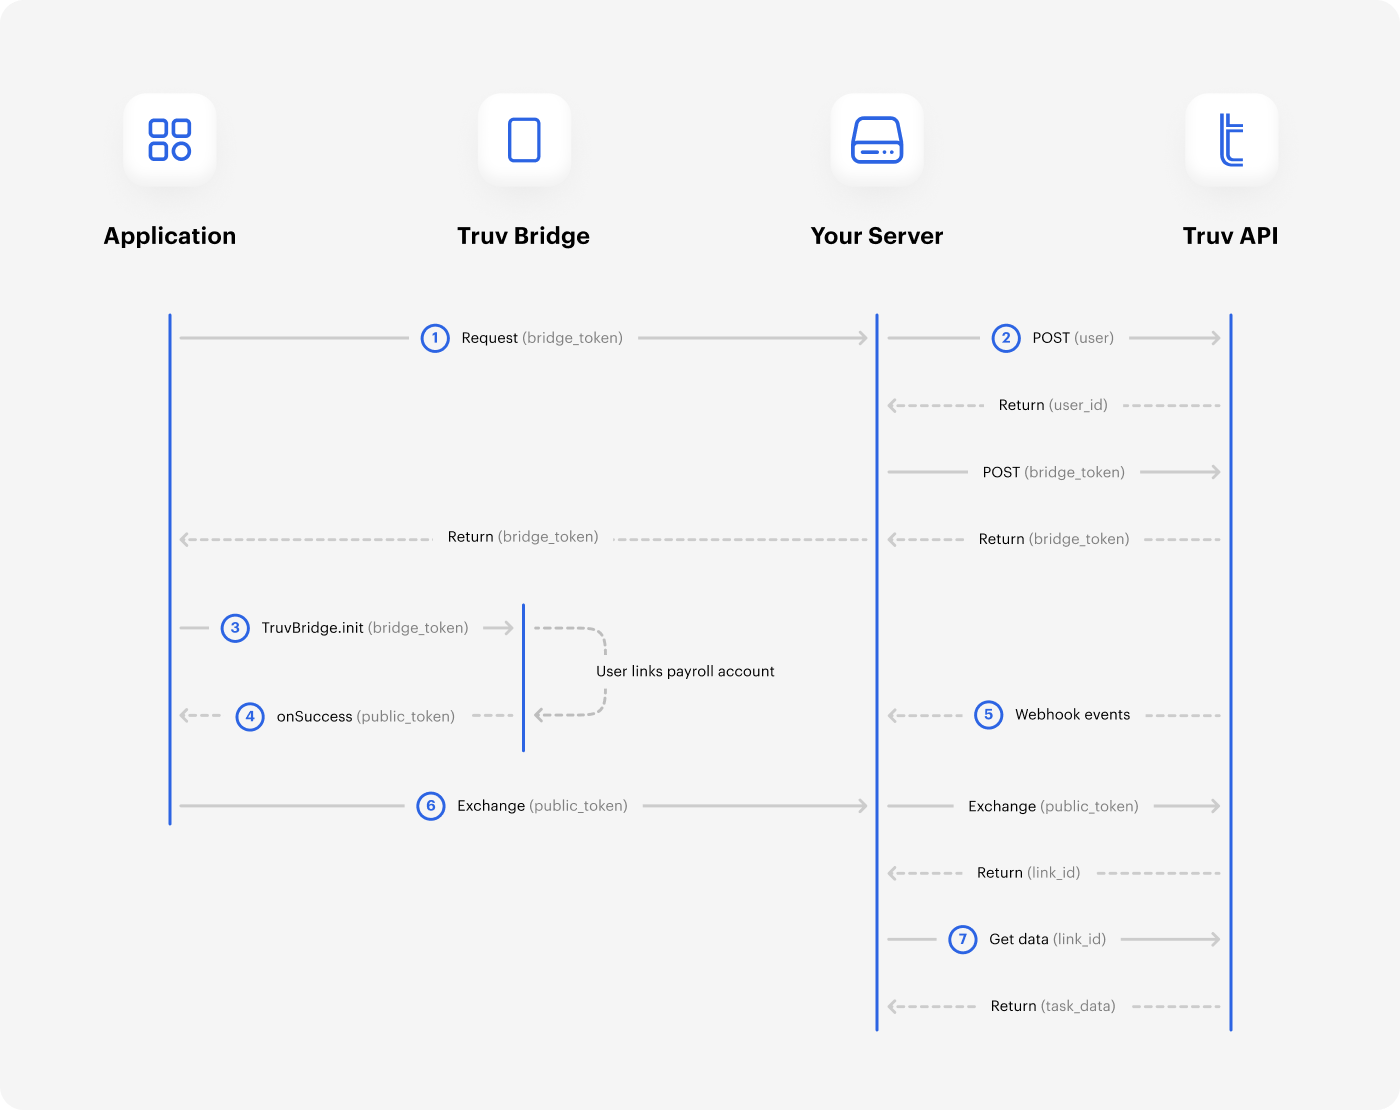
The diagram below shows the overview of token and data exchanges. The sequence covers your application, Truv Bridge, your server and backend, as well as the Truv API. View the Steps section to get started.
- Request a
bridge_tokenvalue from your backend. - On your backend server, create a user and request a bridge token from Truv's API.
- Initialize Truv Bridge in your application and pass the
bridge_tokento TruvBridge.init. - When a user successfully connects their account, it generates a
public_token. Truv Bridge hands off thepublic_tokento the client through the onSuccess callback. - After the connection status changes, webhook events begin to arrive.
- Exchange the temporary
public_tokenfor a permanentlink_id. - Make an API request to Truv to get the data.
Authentication
NoteRequests to Truv APIs must use HTTPS with TLS 1.2v encryption or higher.
All API requests require the X-Access-Client-Id and X-Access-Secret headers. These contain your Client ID and Access secret. These values are in your Truv Dashboard.
WarningThe Client ID and Access secret may allow access to sensitive information. Store these in a secure and private place.
For API requests, the base URL https://prod.truv.com/v1/ is the same in each environment. Update the access key with the prefixes below for use with their respective environments.
sandboxdevprod
Steps
The steps below cover each action for setting up your Truv workflow.
1. Create a User and request a Bridge Token
Create a User in the Truv backend to link different data providers. See the sample cURL request below.
curl --request POST \
     --url https://prod.truv.com/v1/users/ \
     --header 'X-Access-Client-Id: {{client_id}}' \
     --header 'X-Access-Secret: {{access_key}}	' \
     --header 'accept: application/json' \
     --header 'content-type: application/json' \
     --data '
{
     "external_user_id": "12345",
     "first_name": "John",
     "last_name": "Doe",
     "email": "[email protected]",
     "phone": "+14155554193",
     "ssn": "222233333"
}
'
WarningThe Truv backend only allows a single user for each account in your system. However, a User may have connected with multiple Bridge Tokens and data providers. Store Truv’s User ID and related information in your database.
Create a Bridge Token for the User and include product_type = all in the configuration. View the cURL sample below.
NoteWhen creating the
bridge_token, include the following data fields for bank account details for Truv Paycheck Linked Loans.
account_numberaccount_typerouting_numberbank_namedeposit_type
amount- fixed amount from the paycheckdeposit_value- amount in dollars
curl --request POST \
     --url https://prod.truv.com/v1/users/{user_id}/tokens/ \
     --header 'X-Access-Client-Id: {{client_id}}' \
     --header 'X-Access-Secret: {{access_key}}	' \
     --header 'accept: application/json' \
     --header 'content-type: application/json' \
     --data '
{
     "product_type": "pll",
     "tracking_info": "any data for tracking current connection",
     "account": {
          "account_number": "16002600",
          "account_type": "checking",
          "routing_number": "123456789",
          "bank_name": "TD Bank",
          "deposit_type": "amount",
          "deposit_value": "100"
     }
}
'
2. Initiate Truv Bridge
Using the Bridge Token, initialize the Truv Bridge in your user interface. Follow the example below and pass the Bridge Token to TruvBridge.init.
<script src="https://cdn.truv.com/bridge.js"></script>
<script>
  // Step 2 - Call your back end to retrieve a bridge_token from truv
  const bridgeToken = <%= Value returned by API call to acquire bridge_token %>

  // Step 3 - Initialize Bridge
  const bridge = TruvBridge.init({
        bridgeToken: bridgeToken.bridge_token,
    })
</script>
3. Test Credentials
Test your implementation using sample credentials. Refer to Testing or view the sample usernames and passwords below.
| Username | Password | Description |
|---|---|---|
| goodlogin | goodpassword | Full time current employment |
| goodlogin | mfa | User with multi factor authentication |
| error.user | login_error | Incorrect login or password |
4. Exchange tokens
When Users connect their accounts successfully, it creates a public_token. The Bridge hands off the public_token to the client. This uses the onSuccess callback after a user has successfully created a Link.
NoteThe
public_tokenexpires after six hours.
Exchange the temporary public_token for a permanent access_token with the Exchange Tokens endpoint. The public_token is invalidated after exchanging for an access_token. View the sample JSON values below.
{
  "access_token": "48427a36d43c4d5aa6324bc06c692456",
  "link_id": "24d7e80942ce4ad58a93f70ce4115f5c",
  "link_hash": "bc917458a3da4b2c8cc8282aa1707aaa"
}
5. Monitor webhooks
Webhooks to your server can help monitor and notify you of Task status changes. Use link_id or task_id to match the webhook events with Link connections.
{
    "webhook_id": "609a82aab21e4d9ba2569f35e9e8f26a",
    "event_type": "task-status-updated",
    "updated_at": "2021-04-26T13:02:20.369267+00:00",
    "task_id": "67f2924530564282bbaf6d27655e94a4",
    "link_id": "64f8e374949c4b769706028022626bf1",
    "product": "income",
    "tracking_info": "27266f35-bb54-44c3-8905-070641a0c0aa",
    "status": "login"
}
6. Retrieve data
Use the permanent access_token to generate a Paycheck Linked Loan report . For Income and Employment needs, refer to the VOIE Implementation Guide. View the sample response below.
{
  "id": "24d7e80942ce4ad58a93f70ce4115f5c",
  "status": "new",
  "finished_at": "2021-04-06T11:30:00Z",
  "completed_at": "2021-04-06 11:30:00+00:00",
  "access_token": "48427a36d43c4d5aa6324bc06c692456",
  "tracking_info": "user123456",
  "deposit_details": {
    "account_number": "16002600",
    "account_type": "checking",
    "routing_number": "123456789",
    "bank_name": "TD Bank",
    "deposit_type": "amount",
    "deposit_value": "50.00"
  },
  "initial_accounts": [
    {
      "account_number": "16001234",
      "routing_number": "55999876"
    }
  ]
Refresh or Continuous Access
Continuous Access allows you to refresh data on a fixed schedule. This reduces the need for users to re-authenticate. When new or updated data is available, Truv sends webhook events on updated information. This can include changes in bank accounts, direct deposit account allocations, employment status, income, shifts, as well as statement data.
To use continuous access for your account, contact Truv Support to get started.
NoteDepending on the payroll system, user authentication may expire. For multi-factor authentication or one-time passcode (OTP) configurations, users may need to re-authenticate before data monitoring can continue.
Trigger data refreshes from the backend with the Data Refresh endpoint. Use the Data Refresh Mode guide for more information on incomplete refreshes.
Deleting the Link also removes all associated data for a specific user when disconnecting.
Updated 2 months ago