Customize Truv Integration with ICE Encompass®
Streamline Branding, Borrower Notifications, Status update recipients, eFolder and more with Truv Encompass Integration
Overview
Truv's integration with Encompass® comes with a number customization capabilities that can help streamline workflows, saving loan officers and processors time and effort. Lenders can white label the borrower experience by business or branch, customize how documents are routed, and can selectively overwrite data in the 1003 URLA with data from the Truv Report.
Customizable features
- White labeled experience using Truv Templates
- Customize status notification recipients
- Customize documents returned using document mapping or send documents to unassigned folder
- Visualize 1003 URLA and Truv Report data side-by-side and choose which to overwrite in the 1003
White labeling using Truv Templates
Set up templates in Truv Dashboard to white label and customize the Encompass® experience whether it's relevant to your business subsidiary or branches. This is a one time set up and can be used to customize the below options -
- Branding - logo, colors, buttons, text, privacy policy etc
- Notification verbiage - Verbiage in all of your borrower facing notifications including email, text, landing, success and expired pages.
- Truv Bridge customizations - upload your popular employer list catered to your traffic, customize categories in Truv Bridge, custom success screens
- Returned documents - select custom document types to be returned to Encompass® eFolder. Truv returns a default of 6 paystubs, 3 W2's and 3 YTD paystubs. Customize these documents returned based on your business needs.
- Enable or disable fallback solutions - enable document upload solution within the Encompass® experience in case your borrower decides to not connect their payroll accounts.
Choose the template of your choice while placing the Truv order within Encompass®. This is available for selection with both ASO and Manual orders.
Refer to the detailed step-by-step guide for your customizations, a one time set up for Truv within Encompass®.
Encompass® Status updates customization
Truv allows for customize who receives updates on the loan application every step of the way. Encompass® lenders have an option to configure from the below default options:
- Loan originator and loan processor on the loan - Truv reads the loan originator and processor names associated with every loan application to ensure the right loan personnel gets notified of the updates.
- Order creator - Truv recognizes that every organization functions differently and notifications are completely customizable based on your needs. Truv provides you with the optionality to send status updates to the personnel creating the order.
- Static distribution list - Truv provides you with additional customization and the optionality to send status updates to a static distribution list. Clients have the opportunity to update and maintain this in their Account settings in Truv Dashboard.
- Custom role - Truv allows lenders to automatically send status updates to any user or role in the loan file automatically. See our full setup guide here.
cc fields - In addition to defaults set as per above, before placing every order, the order creator has the ability to add/update/delete the default status updates set for every order.
Encompass® eFolder (Document Mapping)
Take control of your Encompass® eFolder experience and customize who can view various documents retrieved in your organization with Document Mapping functionality within Encompass®.
With this feature, customize all the below documents retrieved within Encompass®
- Truv Borrower Report - used to submit to Fannie Mae D1Certainty and Freddie Mac AIM.
- Order Invoices - in case you pass the $$ to the end consumer, Truv helps you with order invoices so every branch can own their P&L.
- Paystubs, 1099 & W2's - create standalone custom folders for paystubs, 1099 & W2's based on your business needs.
- Unassigned e-Folder - send documents to unassigned e-Folder.
To set up a specific routing of the returned Truv documents in Encompass®, Lenders can customize which eFolder each Truv document type should go to via the Document Mapping page. Alternatively, lenders can also chose to send all documents to the Unassigned eFolder to be sorted later.
Document Mapping Customization Set up Guide
Each Truv document has a document type associated with it. To configure which eFolder each document should go to, first navigate to the Truv Document Mapping page.
- Log into Encompass as an administrator using Encompass Web.
- Navigate to the Admin tab at the top of the screen, select Services on the left navigation.
- Under Services Management, ensure Truv is configured following the Encompass Admin User Guide.
- Within the Truv Service tile, select the Document Mapping option
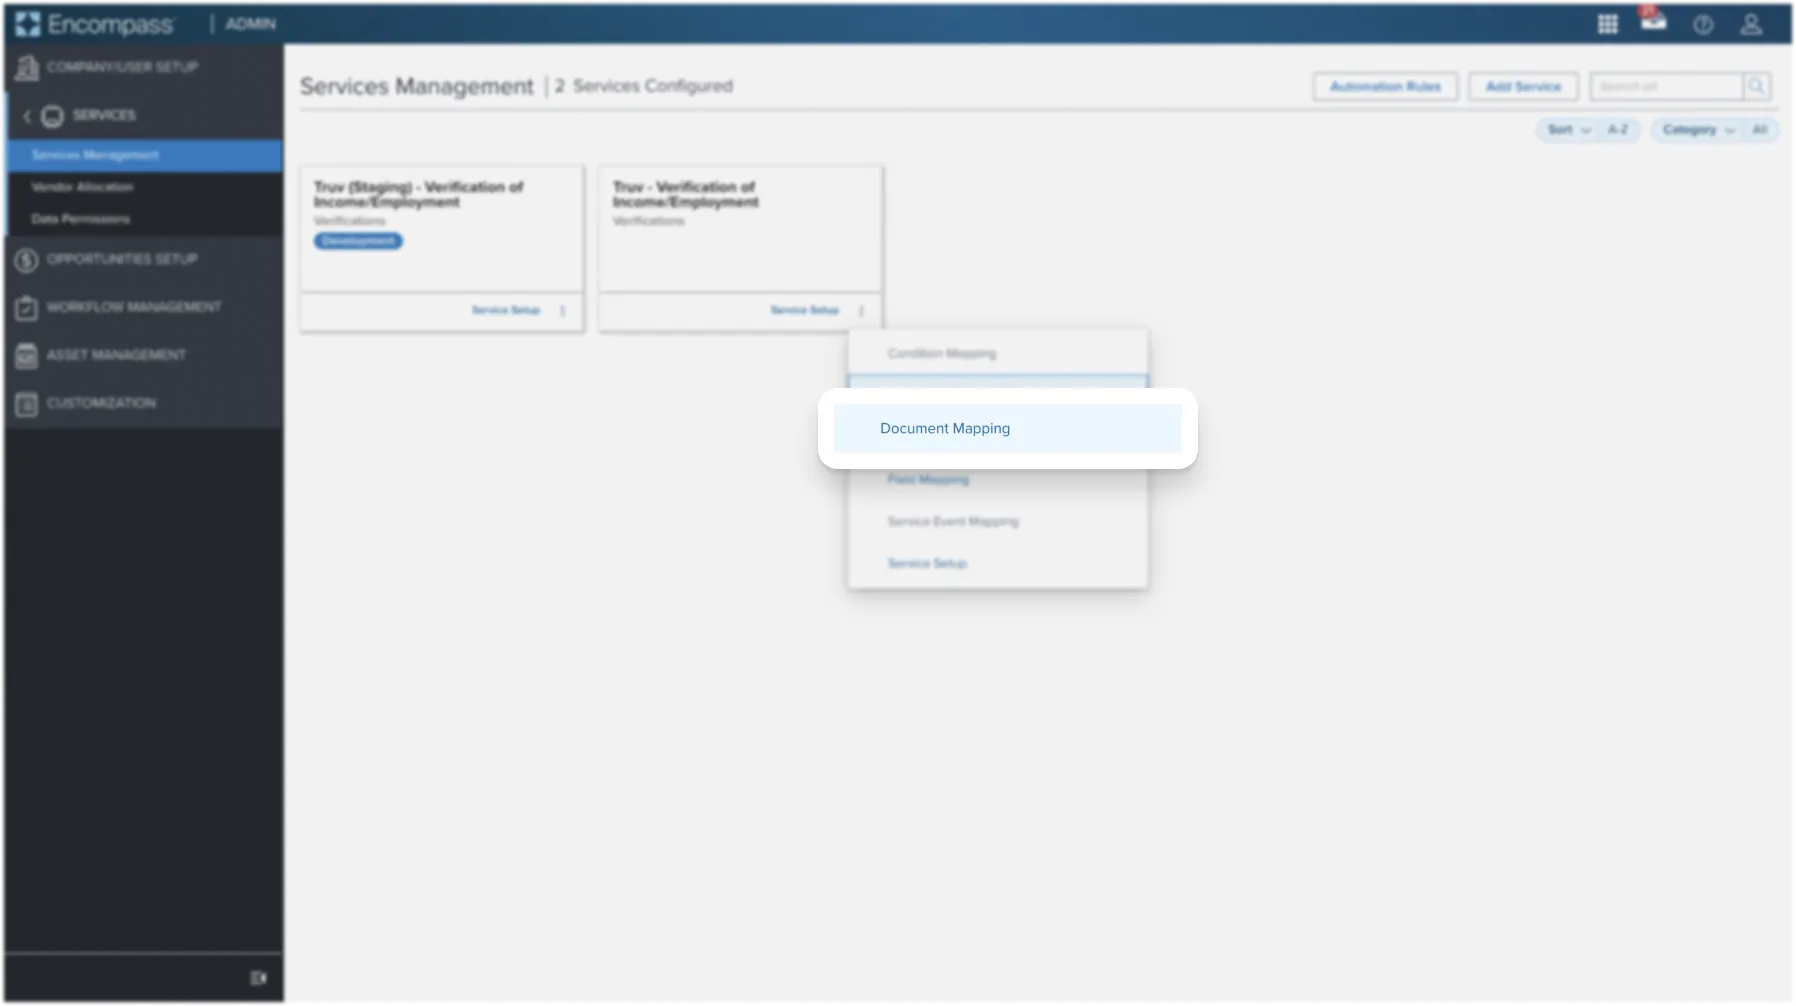
On the left side under Document Types, enter the Truv document type (see the table below for supported Document Types). On the right side under eFolder Document Folder, select the name of the eFolder you would like this document to go to.
- If the Document Type or eFolder Document Folder doesn't exist yet, entering the text will create the new value
- After creating a mapping, select ADD ANOTHER to create a new row
- After adding all the desired mappings, click the Save button on the bottom right
| Document Type | Description |
|---|---|
paystub | Paystubs documents retrieved by Truv in the order |
w2 | W-2 documents retrieved by Truv in the order |
1099 | 1099 tax statement documents retrieved by Truv in the order |
employer_report | Report summarizing employment and/or income for a specific employer or benefit source |
borrower_report | Report summarizing all employments and/or incomes for a borrower, includes Report ID for GSE submission |
invoice | Invoice itemizing costs for the Truv services used |
voa_report | Report summarizing asset, balances and transaction data for a borrower, includes Report ID for GSE submission. |
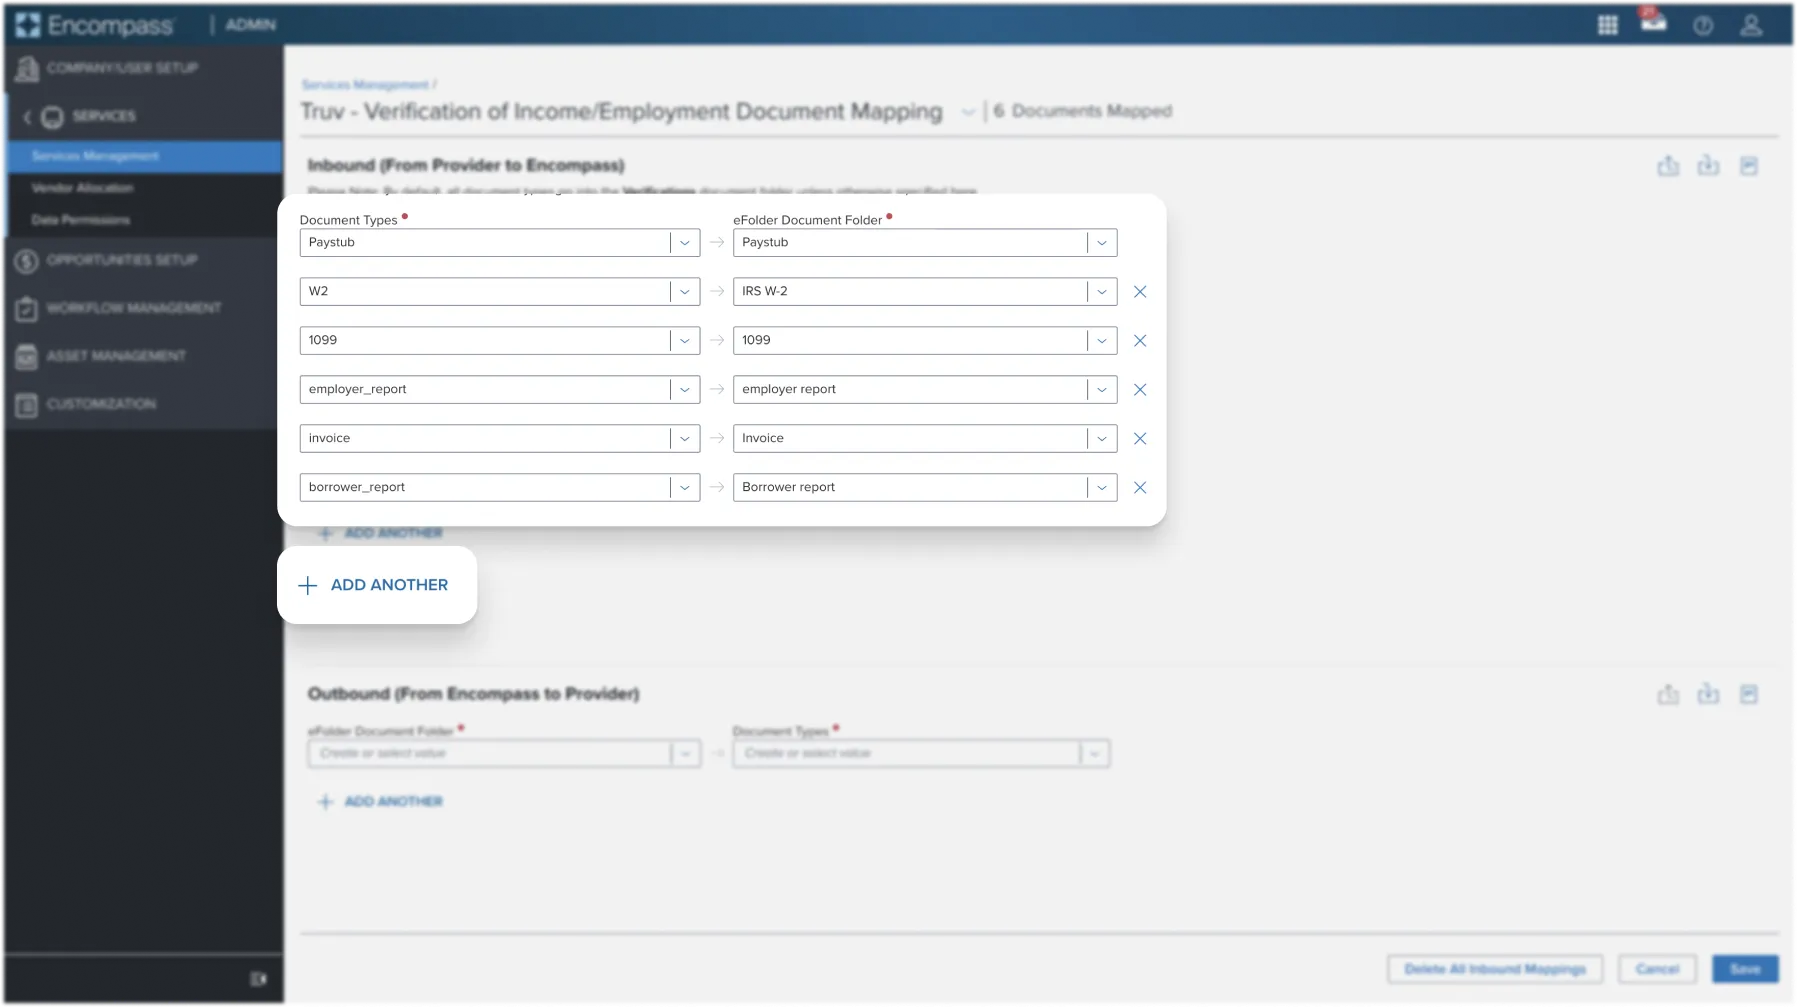
NoteDocument Type name must match the above table exactly, while the eFolder Document Folder can be customized however the lender wants
Sending Documents to Unassigned eFolder
As an additional option, lenders can request for all returned documents to be sent to the Unassigned eFolder, instead of the default Verifications eFolder or any custom mapped options. This gives lenders the ability to route documents manually to folders as they appear.
Reach out to the Truv Implementation team for assistance in configuring this option.
Compare and overwrite 1003 URLA with Truv Report data
For Income, Employment, and Asset Verifications in Encompass, lenders can see data from the 1003 URLA and Truv Verification Report side-by-side. Users can select specific fields, employers, or accounts to write the data from the Truv Report to the 1003 URLA. Reach out to Customer Success at Truv to enable this feature.
See the attached link for a video demonstration of the feature!
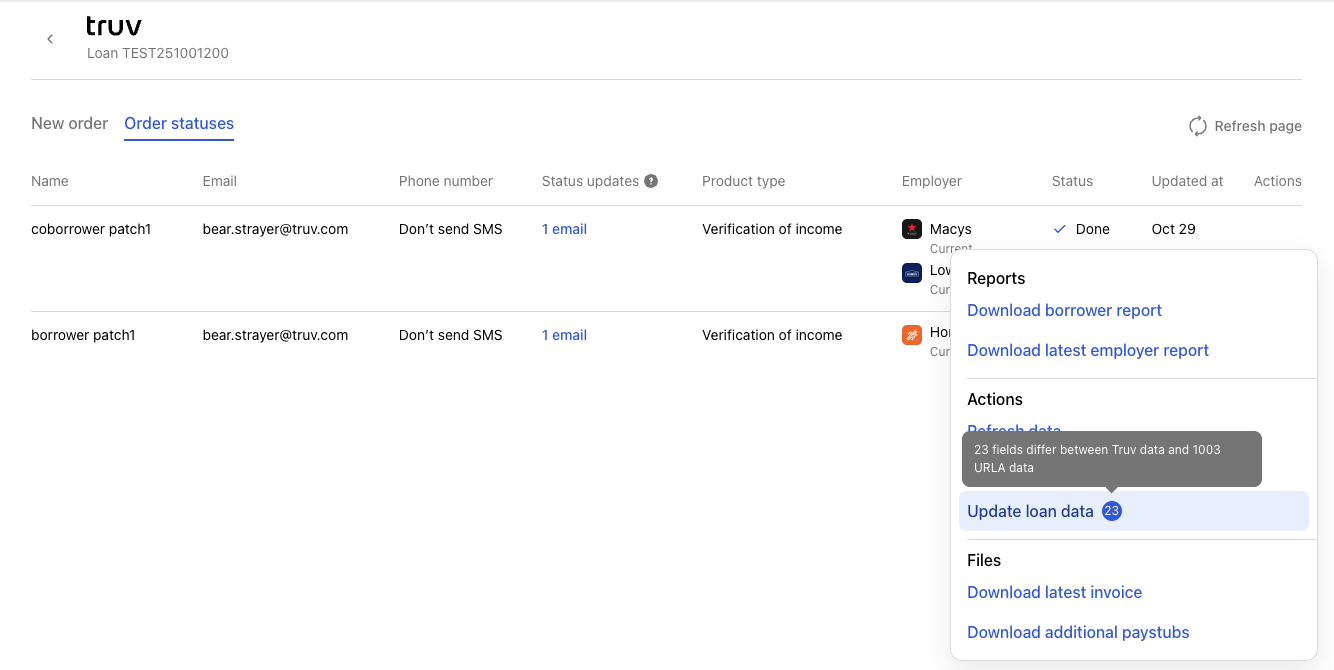
- For an order in Encompass completed in the last 30 days, open the Actions dropdown and find the Update loan data button. The number on the button will indicate the number of mismatched fields between the 1003 and report data.
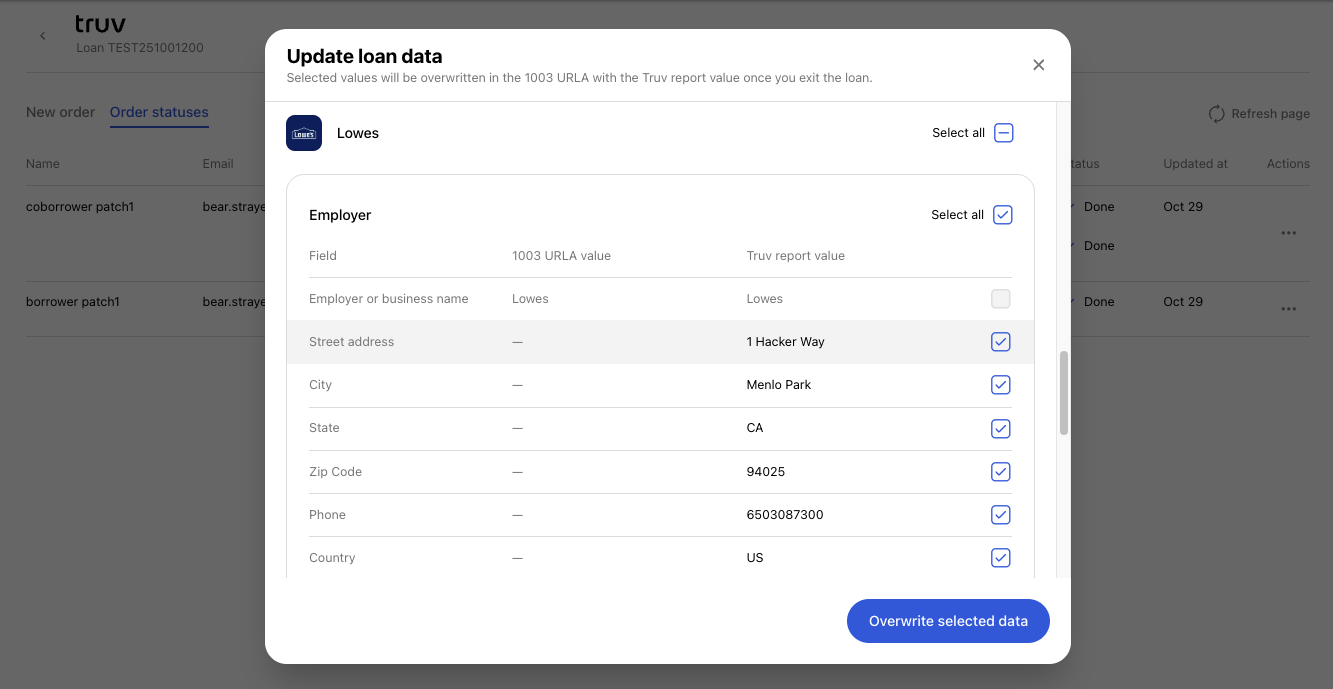
- Clicking the button will open the Update loan data pop-up.
- For Income and Employment, there will be a table comparing the 1003 URLA and Truv report data for each employer detected in the Truv Report. Users can select all or specific fields, then click Overwrite selected data to write it to Encompass
- Truv will match employers in the 1003 URLA and employers in the Truv Report based on employer name.
- If there is a match for an employer, the corresponding field values will be shown side-by-side and selected data will be overwritten in the loan.
- If there is no match for an employer, the 1003 URLA column will show all empty values "-" and a new employment entry will be created in the loan with selected fields
- For Assets, there will be a list of accounts grouped by financial institution and a table comparing the 1003 URLA and Truv report values for each.
- Truv will not match asset data in the Truv report to asset data entered manually or by another provider. If Truv previously created entries in the 1003 URLA, the Update loan data form will match by Account number and allow overriding those.
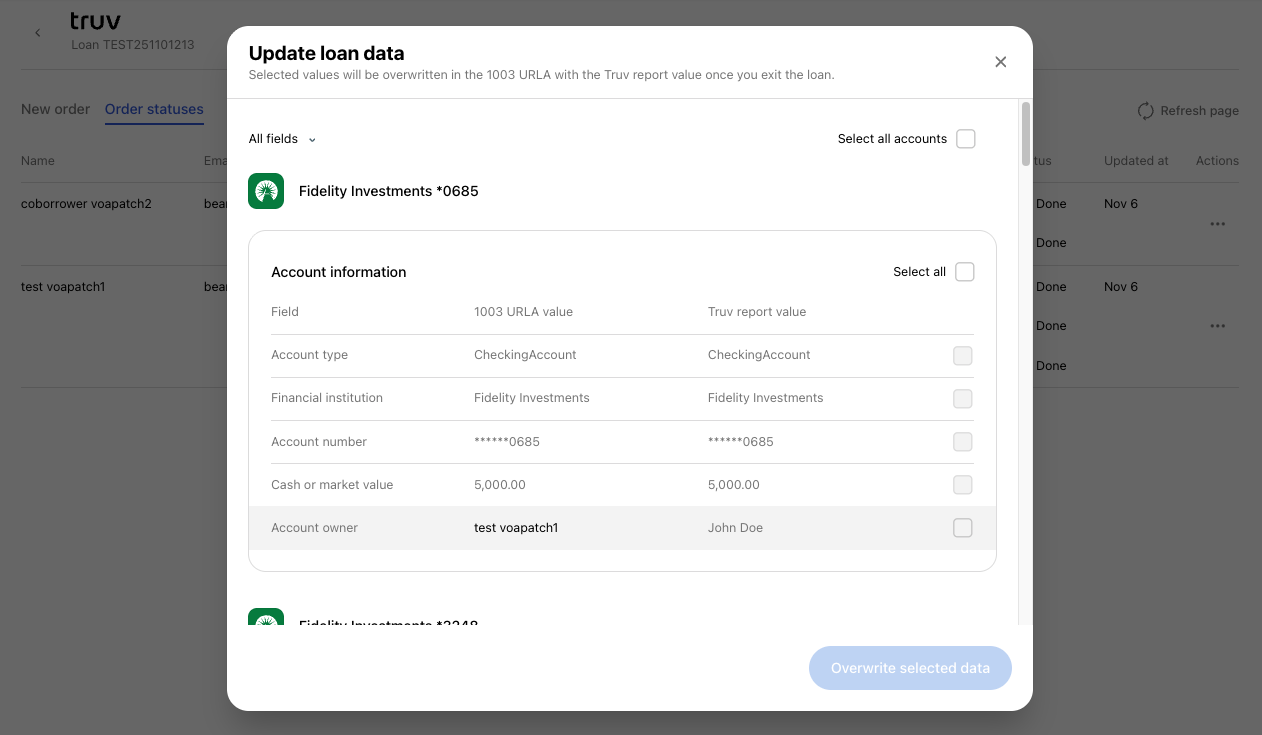
NoteDue to a limitation in Encompass, Truv can only update assets data entries it has created. If other assets data was entered manually or by another provider, Truv will be unable to update it. The Update loan data will show all new entries, however subsequent updates will apply to the same accounts.
Truv supports writing data for the following fields
The Encompass Field ID for the borrower and first entry are shown in parentheses, but Truv supports updating any number any number of entries in the loan file.
| Verification of Income | Verification of Employment | Verification of Assets |
|---|---|---|
| Employer Name (FE0102) | Employer Name (FE0102) | Name / Financial Institution (DD0102) |
| Street Address (FE0160) | Street Address (FE0160) | (1) Account Type (DD0108) |
| City (FE0105) | City (FE0105) | (1) Account In Name Of (DD0109) |
| State (FE0106) | State (FE0106) | (1) Account Number (DD0110) |
| Zip Code (FE0107) | Zip Code (FE0107) | (1) Cash or Market Value (DD0148) |
| Phone (FE0117) | Phone (FE0117) | (2) Account Type (DD0112) |
| Country (FE0179) | Country (FE0179) | (2) Account In Name Of (DD0113) |
| Position/Title (FE0110) | Position/Title (FE0110) | (2) Account Number (DD0114) |
| Current Employment (FE0109) | Current Employment (FE0109) | (2) Cash or Market Value (DD0149) |
| Date Hired (FE0151) | Date Hired (FE0151) | (3) Account Type (DD0116) |
| Date Terminated (FE0114) | Date Terminated (FE0114) | (3) Account In Name Of (DD0117) |
| Years In This Job (FE0013) | Years In This Job (FE0013) | (3) Account Number (DD0118) |
| Months In This Job (FE0033) | Months in This Job (FE0033) | (3) Cash or Market Value (DD0150) |
| Base Pay (FE0119) | (4) Account Type (DD0120) | |
| Overtime (FE0120) | (4) Account In Name Of (DD0121) | |
| Bonus (FE0121) | (4) Account Number (DD0122) | |
| Commissions (FE0122) | (4) Cash or Market Value (DD0151) | |
| Military Entitlements (FE0153) | ||
| Other (FE0123) | ||
| Total Gross Monthly Income (FE0112) | ||
| Seasonal Income (FE0176) |
Request additional paystubs
Lenders can now access and download specific historical paystubs directly in Encompass to streamline income verifications that include pay increases, bonuses, commissions, and variable income, eliminating borrower requests and processing delays. Contact Truv Customer Success to enable this feature.
- By default, Truv will upload the number of Paystubs and W2s that are set in the Template used for the Order. This can be edited in Truv Dashboard Customization -> Templates tab.
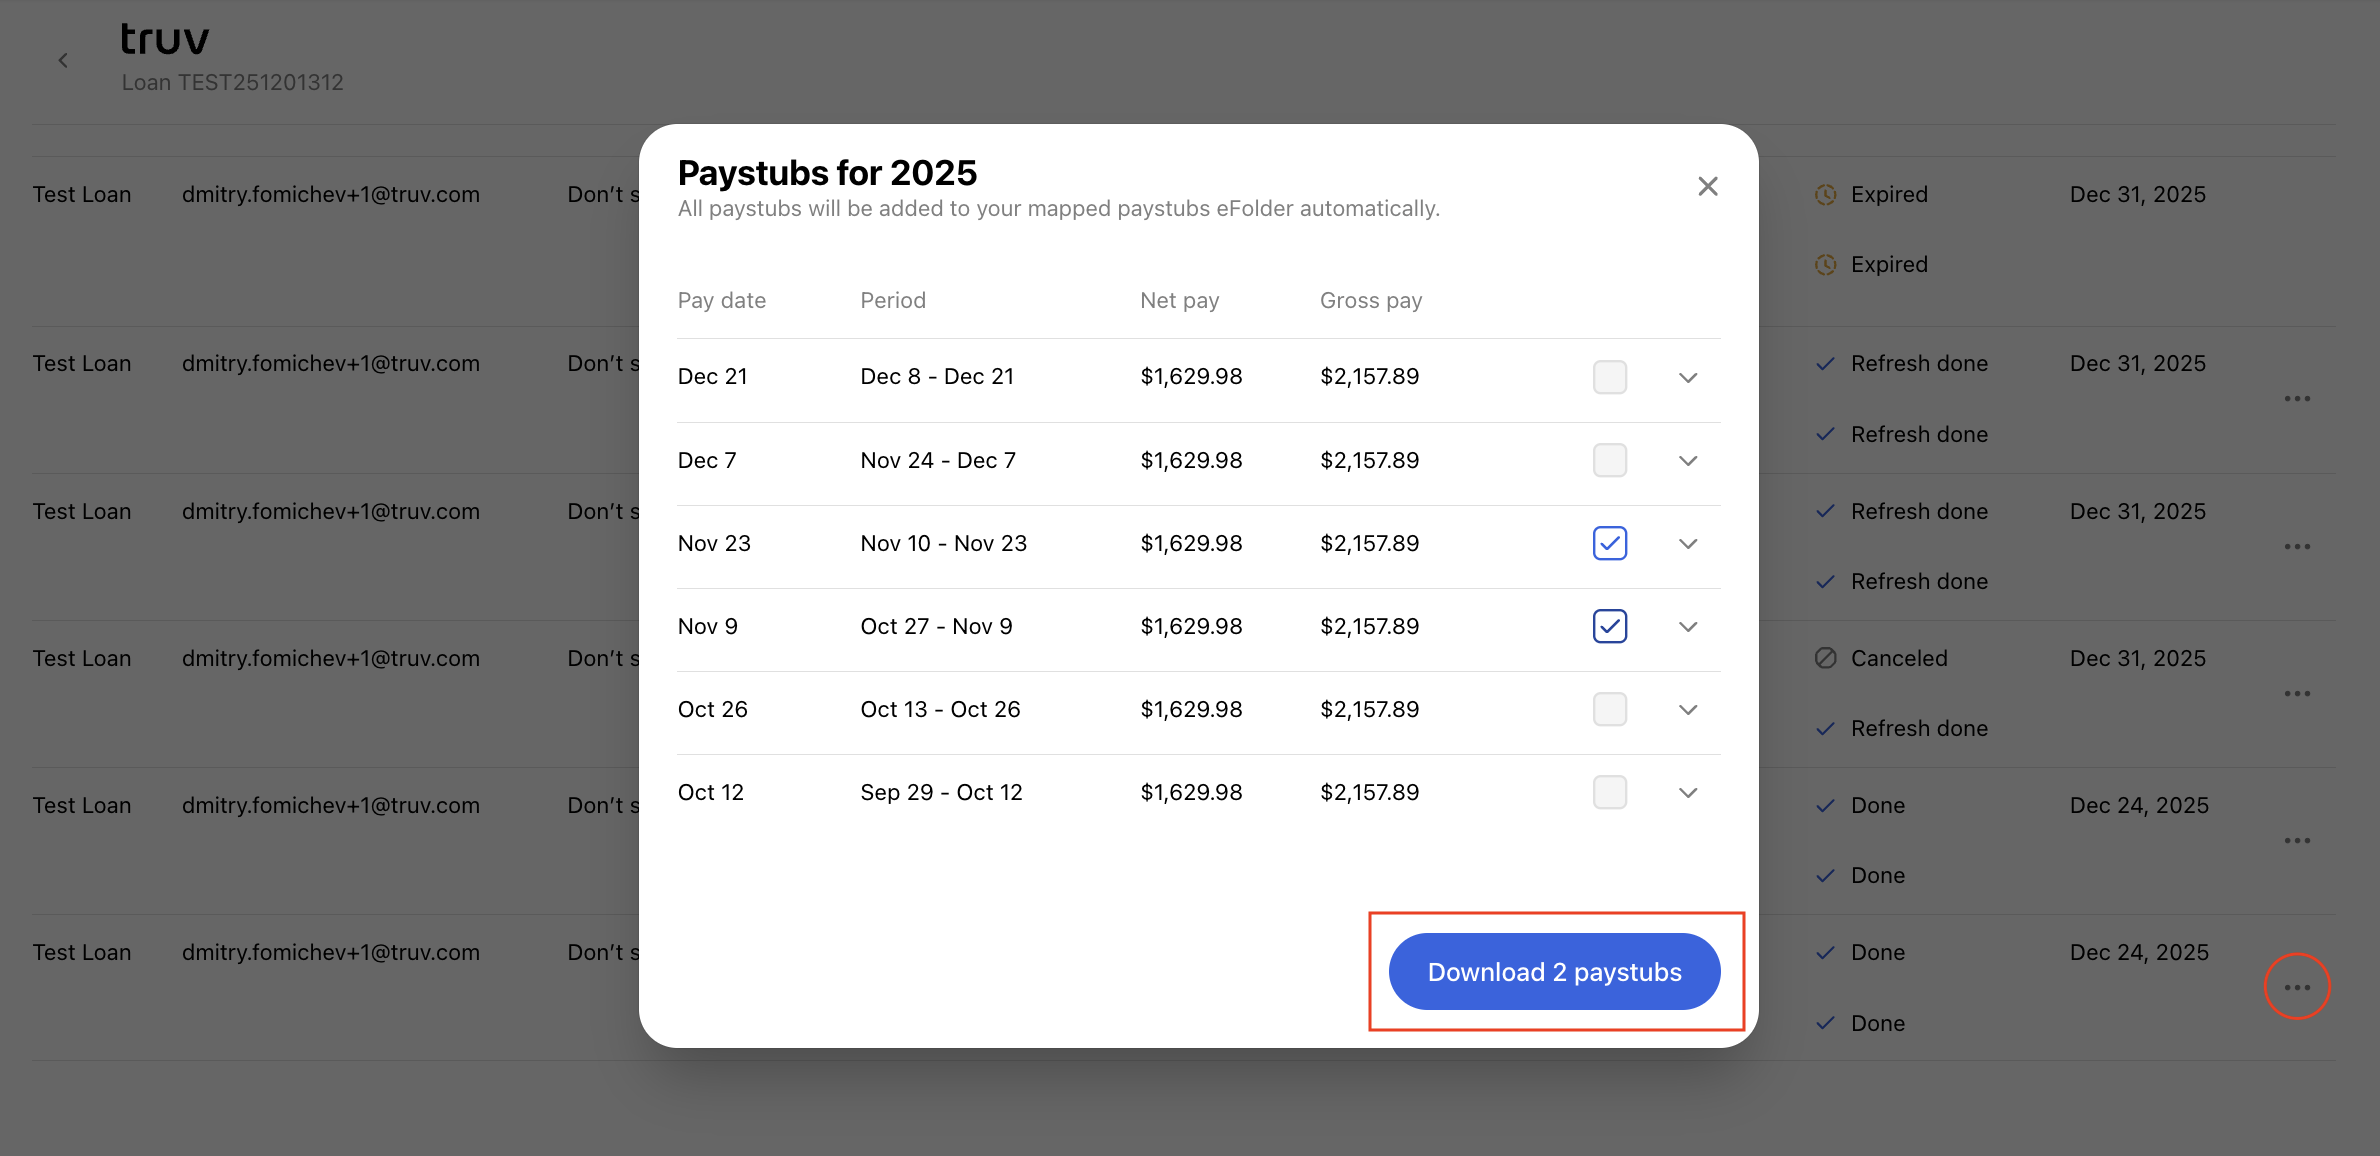
- For a completed Verification of income order, if additional paystubs are retrieved from the payroll provider and have not been uploaded to Encompass, an option to Download additional paystubs will appear in the Actions.
- Users can see the full list of available paystubs organized by year with key information like Pay date, Period, Net pay, Gross pay, as well as the actual paystub file by clicking 'See paystub'
- After selecting which paystubs are required in the checkbox, clicking 'Download paystubs' will download those files into the eFolder. If a mapped eFolder is set up for paystubs, they will go there.
See the attached link for a video demonstration of the feature!
For further assistance, please reach out to [email protected] or your Customer Success Manager.
Updated 8 days ago