Running AIM Check via Automated Service Ordering (ASO)
Setup Document Upload - Income Calculation (AIM Check) to run via Automated Service Ordering (ASO)
Overview
Lenders using Truv can enable AIM Check from Freddie Mac to receive an early view of LPA’s income assessment using digitized paystub and W-2 data from borrower-supplied documents. Lenders can receive LPAs assessment of R&W relief eligibility on income calculation, upon subsequent submission of the loan application to LPA with the Truv-generated report ID. This guide will walk lenders through the process to setup AIM Check via Automated Service Ordering (ASO) in Encompass. This guide will walk lenders through the process to setup AIM Check via Automated Service Ordering (ASO) in Encompass.
- AIM Check via Automated Service Ordering (ASO) in Encompass: ✅ Supported
- AIM Check via Manual Ordering in Encompass: ❌ Not yet supported
To learn more about the benefits of this product, check the Freddie Mac’s resource: https://learn.sf.freddiemac.com/tutorials/loan-advisor/aim4iued-dgtz-pstub-w2/story.html
Setup overview
To enable AIM Check with Truv, follow the below steps:
- Reach out to Truv Implementation to request enabling AIM Check
- Configure the Custom Field data type
- Map Truv’s aim_check_available to the Custom Field
- Configure Automation Rules
- Configure Workflow Rules
Step 1: Reach out to Truv Implementation to request enabling AIM Check
- Notify your Truv Implementation point of contact that you would like to enable Truv’s AIM Check solution in Encompass.
Step 2: Configure the Custom Field data type
In Steps 2-3, we will be setting up a Custom Field in Encompass for Truv to indicate which borrowers AIM Check is available for (aim_check_available). In this step we will pick an unused Custom Field in Encompass and set the correct data type for the indicator.
Configure the Custom Field data type
-
Go to Encompass Smart Client, then navigate to Encompass → Settings → Loan Setup → Loan Custom Fields
-
Select an unused Custom Field from the list (NONE in the Format column) and update the formatting as follows, we will use CUST01FV
- Description: Truv aim check report availability
- Format: STRING
- Max Length: 1000
 Note
NoteWe will use CUST01FV as an example for the rest of this setup, if you need to use a different Custom Field just replace CUST01FV in this guide with your field.
-
Step 3: Map Truv’s aim_check_available to the Custom Field
Map Truv’s indicator (aim_check_available) to the Custom Field configured in Step 2
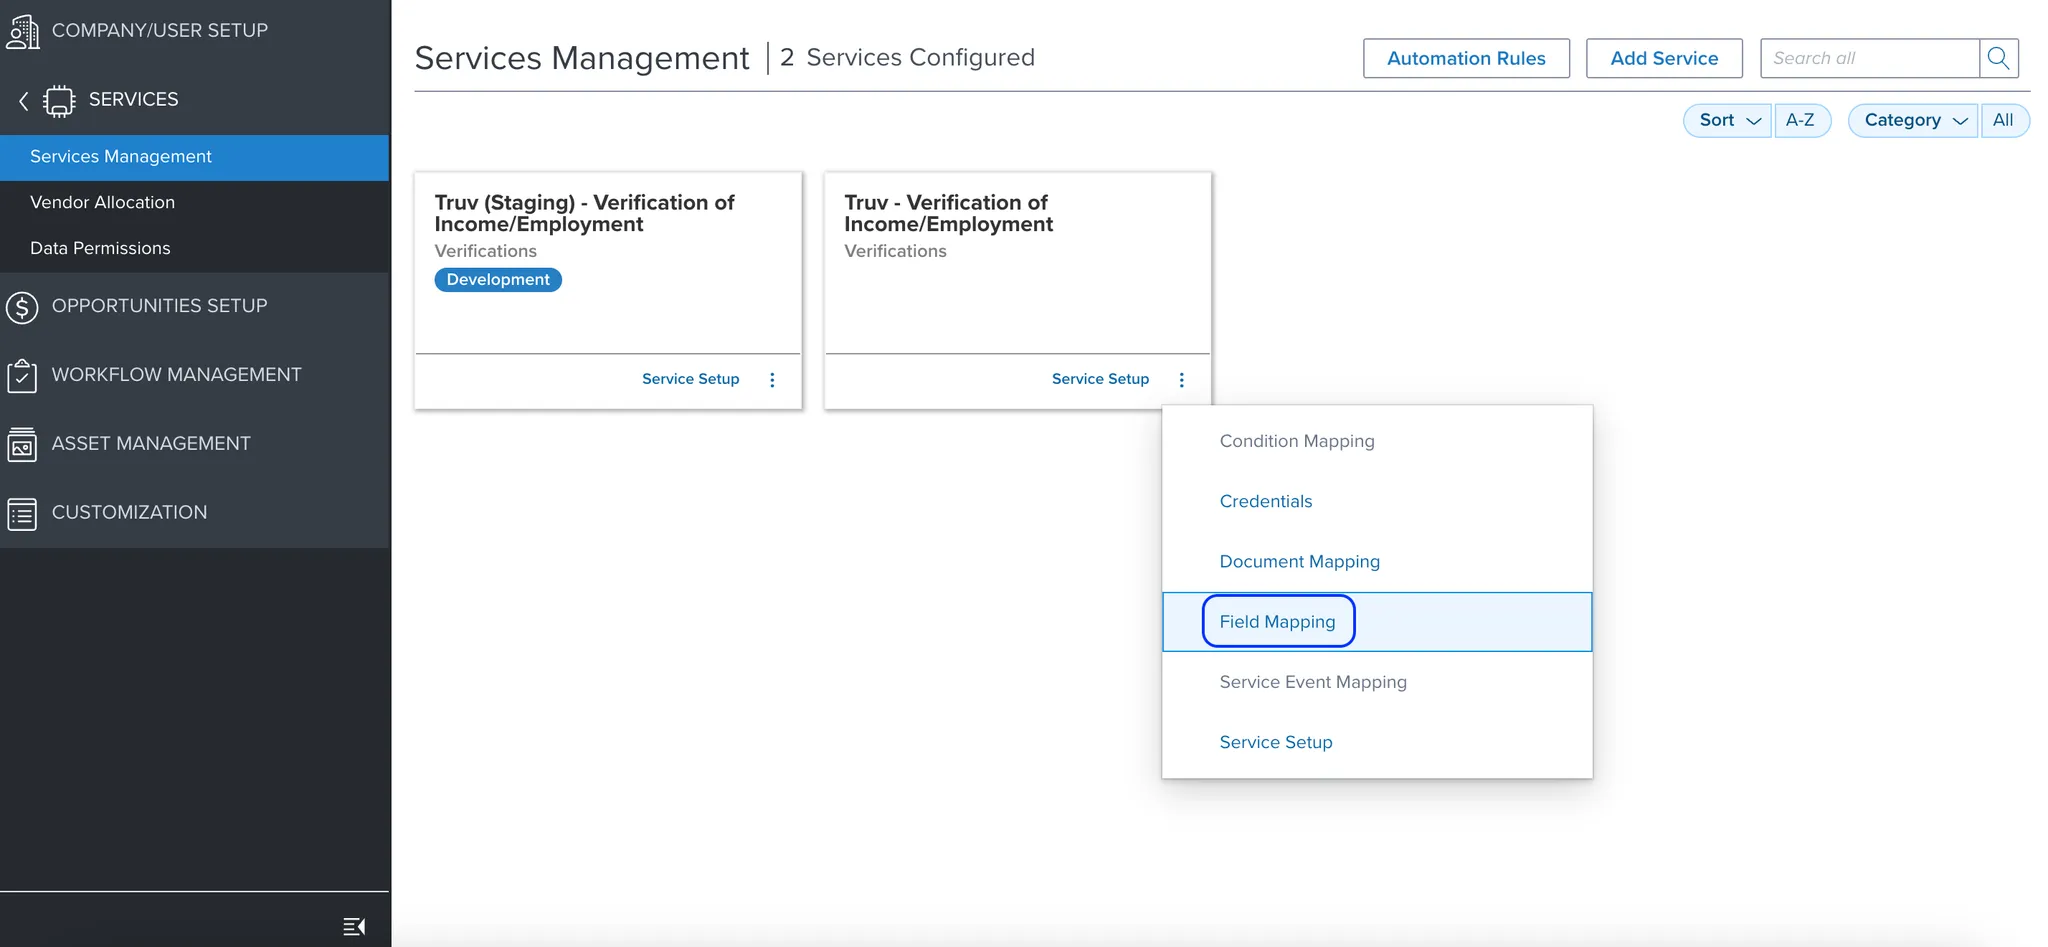
- Go to https://encompass.ice.com/admin, then navigate to Services → Services Management
- Find Truv - Verification or Income/Employment, then click the three dots on the bottom right of the panel and select Field Mapping
- On the Field Mapping page, select Add Another and enter the following options, then press Save
- Encompass Field ID: CUST01FV
- Note: if you used a different Custom Field in Step 2 it should be used here
- Mapping Type: Maps Between
- Provider Field Name: aim_check_available
- Encompass Field ID: CUST01FV
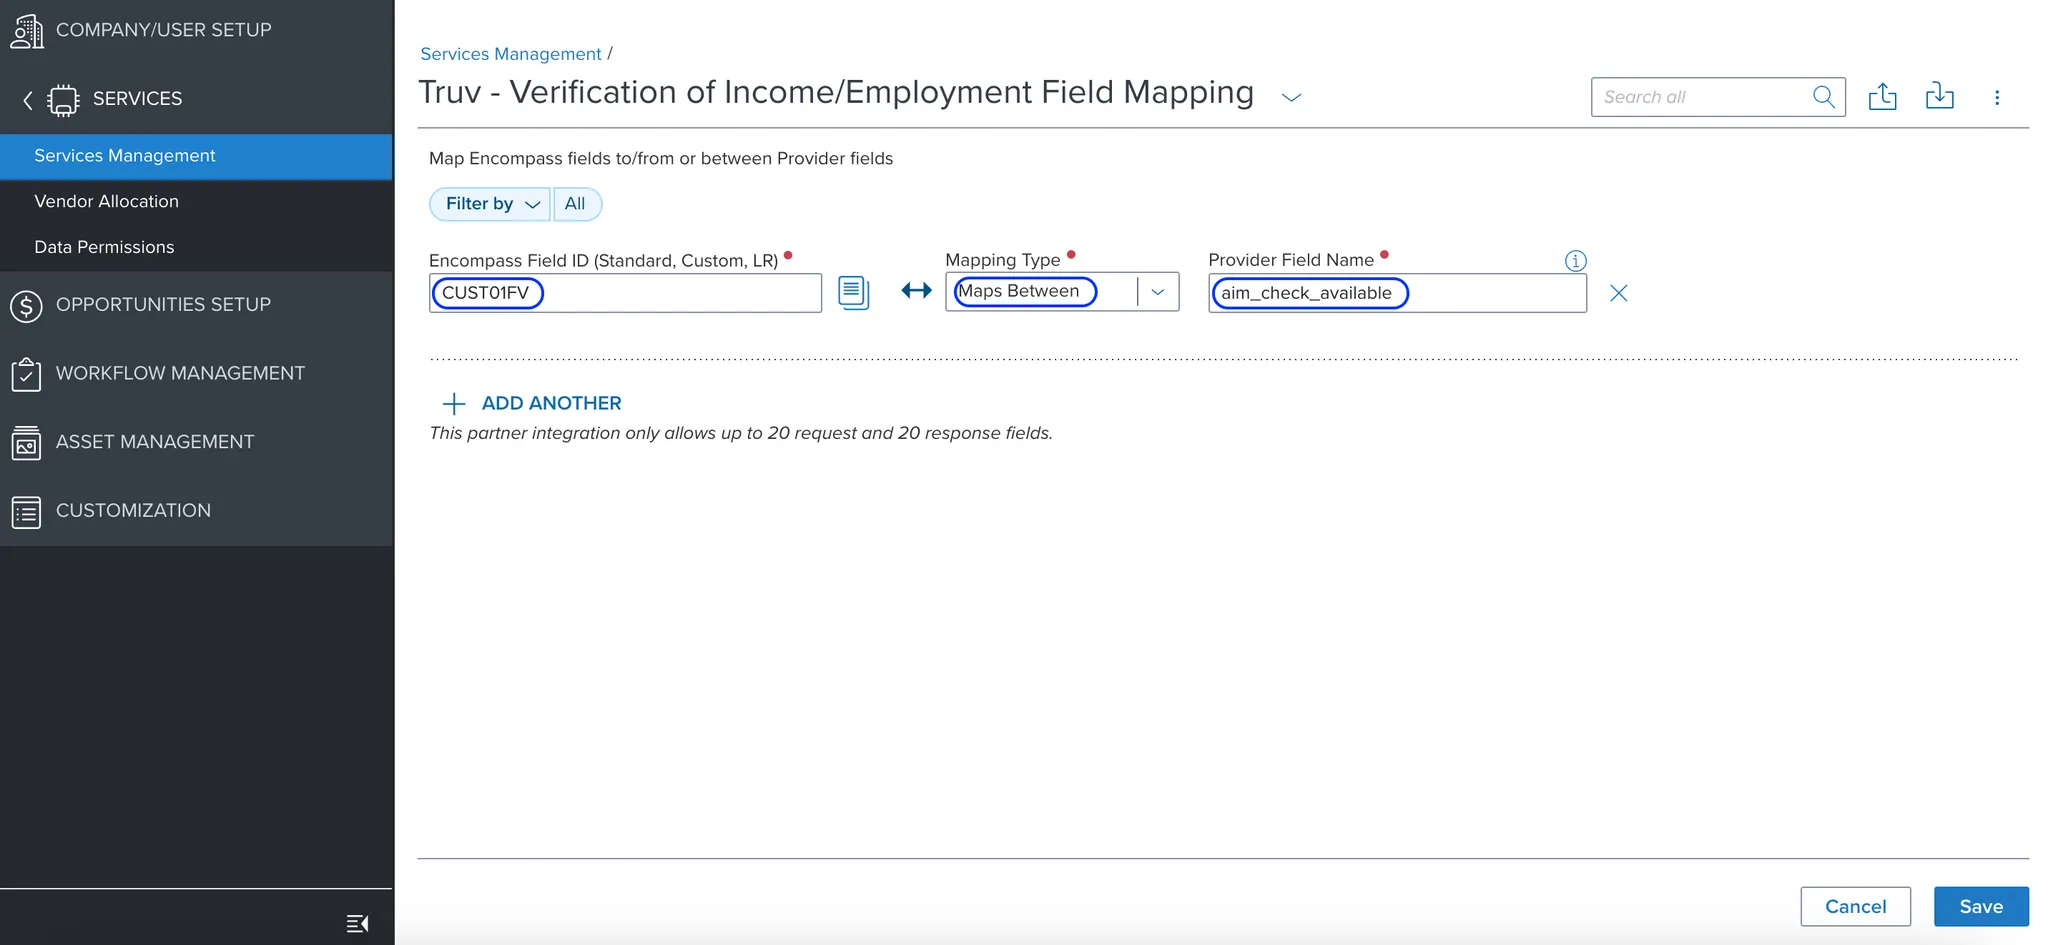
OutcomeA Custom Field configured in your Encompass instance that will map to Truv's indicator for which borrowers AIM Check is available for (aim_check_available). It should have the string data type.
Step 4: Configure Automation Rules
Setup a Service Rule to be triggered by Workflow Rules
- Go to https://encompass.ice.com/admin/services/servicesmanagement
- Navigate to Services Management → Automation Rules → Verifications → Add
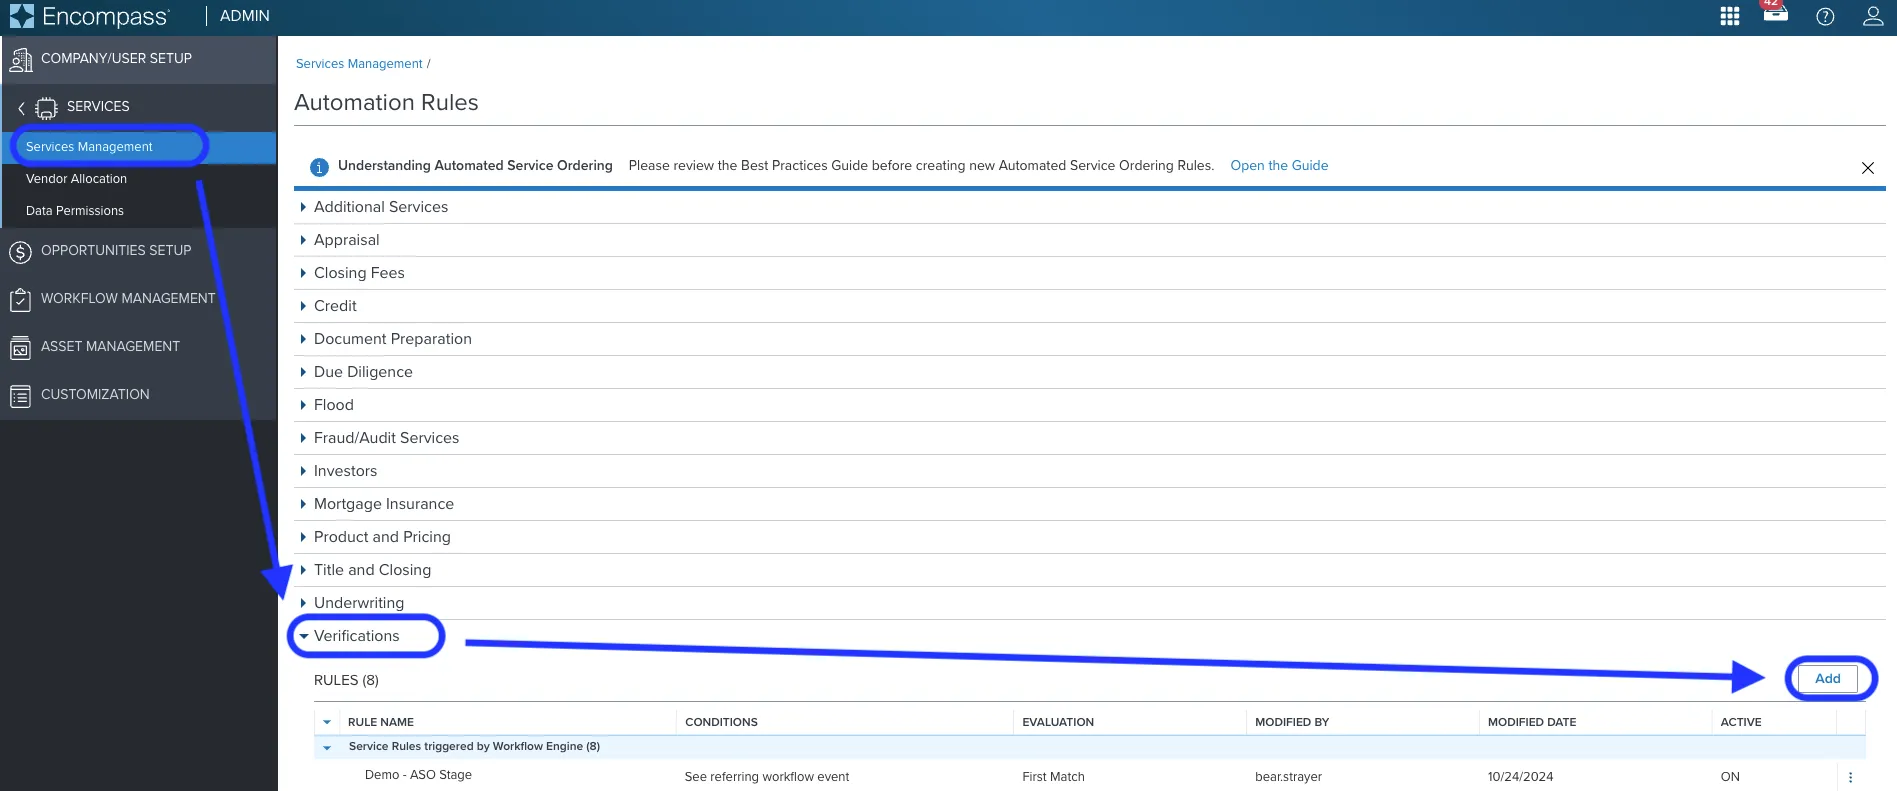
- On the Add Verifications Rule page
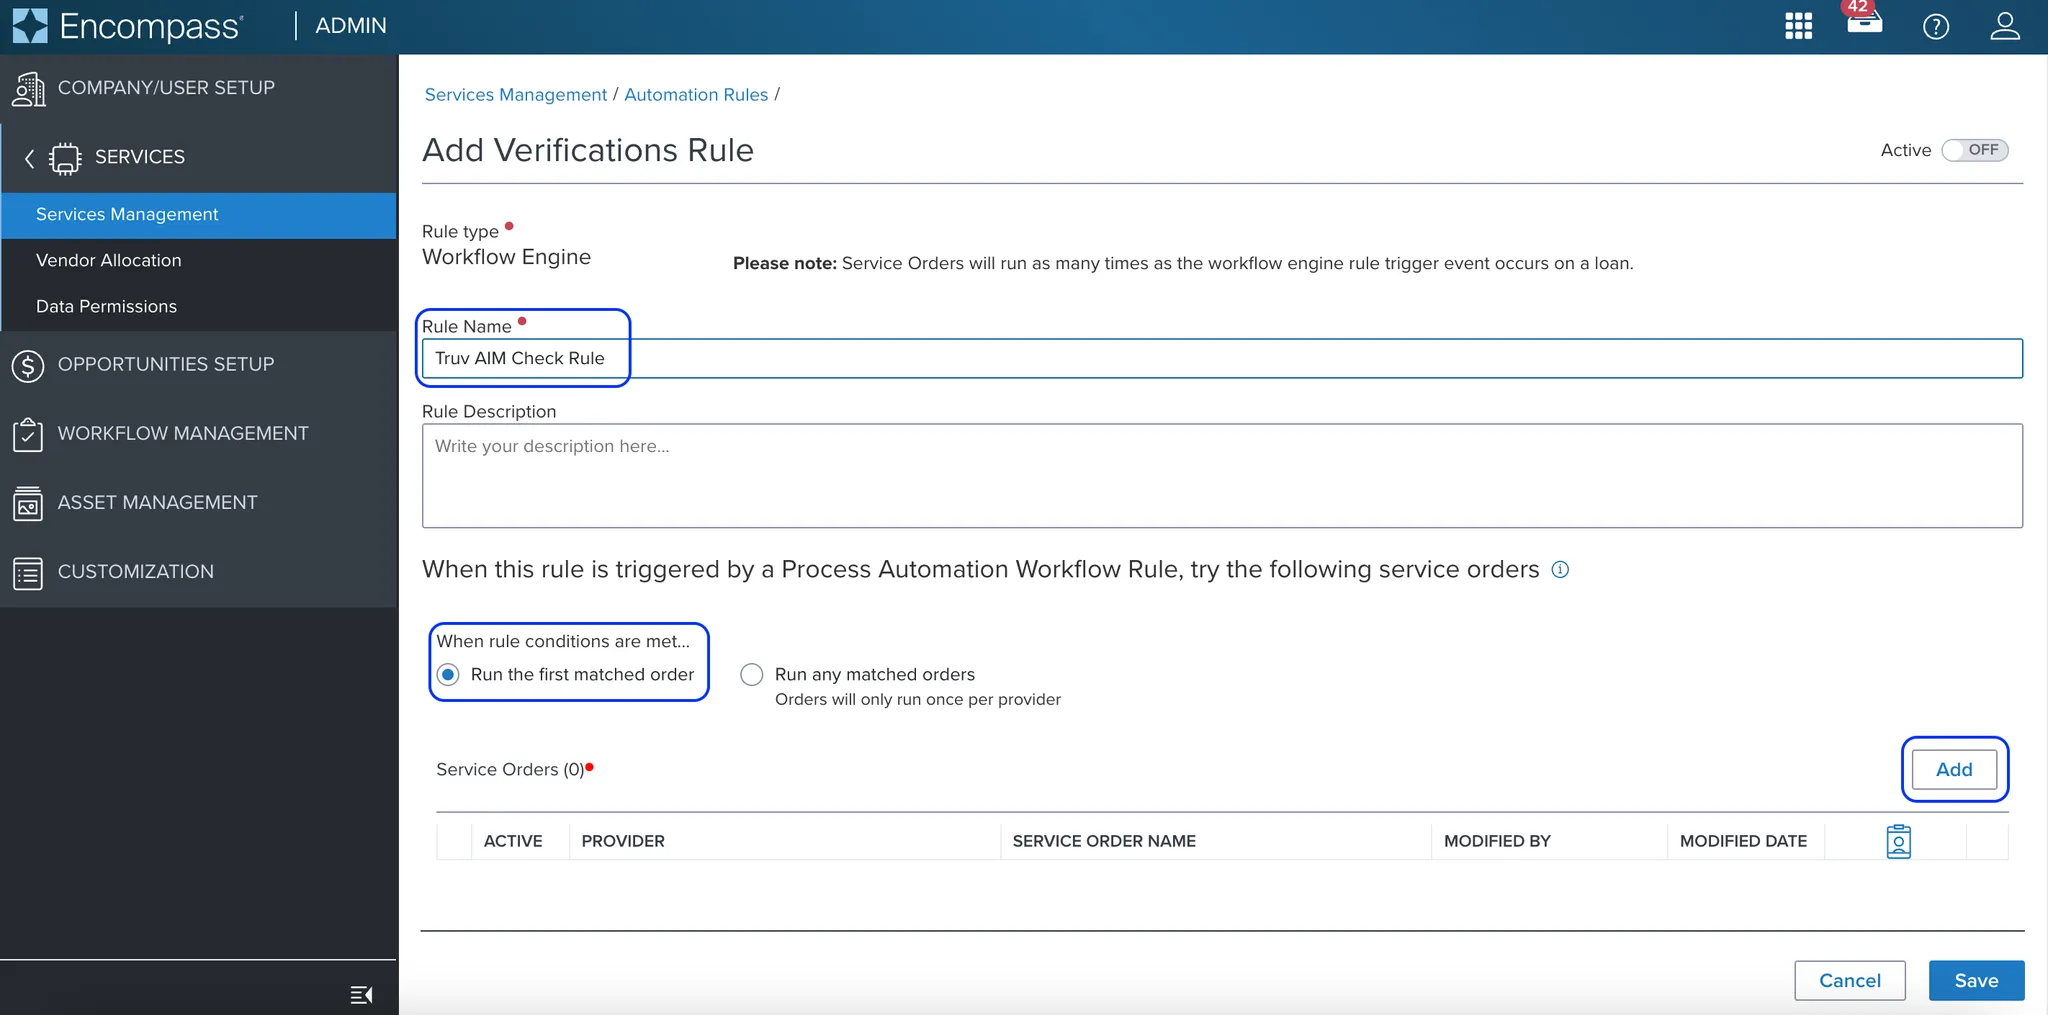
- Add a Rule Name
- Select Run the first matched order
- Add a new Service Order (continued in next section in guide)
- Once the new Service Order is added (next section), turn the Verifications rule to Active: On at the top right of the page
- Click Save
Create a new Service Order
- Select Add in the Service Orders section
- Find Provider: Truv - Verification of Income/Employment
- Press Create
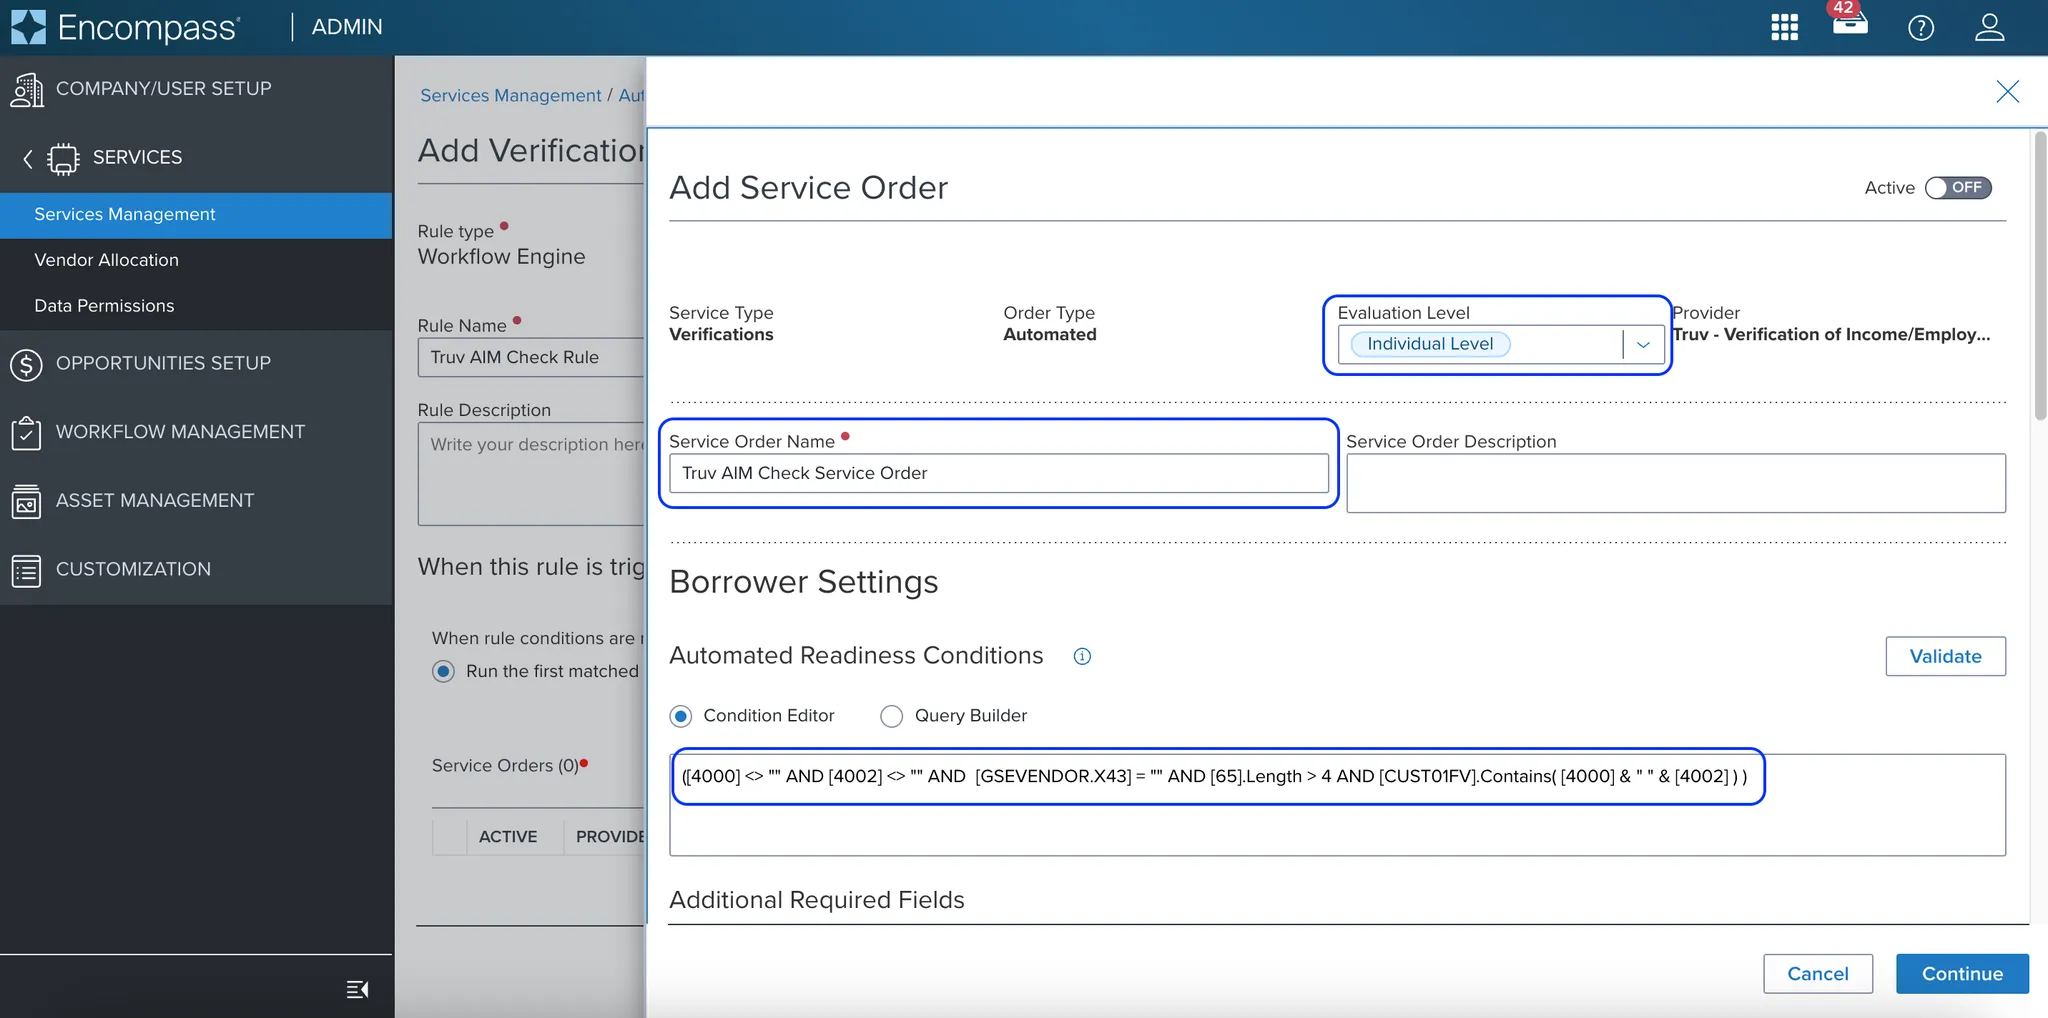
- On the Add Service Order page
- Set Evaluation Level: Individual Level
- Add a Service Order Name
- Configure Borrower Settings → Automated Readiness Conditions
- Set Automated Readiness Conditions for Borrower by copying and pasting the below conditions
- Press Validate and look for a Validation Successful confirmation to ensure no errors
- Configure Co-Borrower Settings → Automated Readiness Conditions
- Set Automated Readiness Conditions for Co-borrower by copying and pasting the below conditions
- Press Validate and look for a Validation Successful confirmation to ensure no errors
Borrower Readiness Conditions
([4000] <> "" AND [4002] <> "" AND [GSEVENDOR.X43] = "" AND [65].Length > 4 AND [CUST01FV].Contains( "," & [4000] & " " & [4002] & "," ) )Co-Borrower Readiness Conditions
([4004] <> "" AND [4006] <> "" AND [GSEVENDOR.X44] = "" AND [97].Length > 4 AND [CUST01FV].Contains( "," & [4004] & " " & [4006] & "," ) )
NoteIf you used a different Custom Field than CUST01FV in Step 2, it should be used in the above Automated Readiness Condition for Borrower and Co-Borrower
Create and assign a new Automated Option
- On the Add Service Order page, go to the Automated Options section and at the top right, click Add
- On the Create an automated option page, set an Automated option name
- Select the Product type: Income Analysis
- Click Save
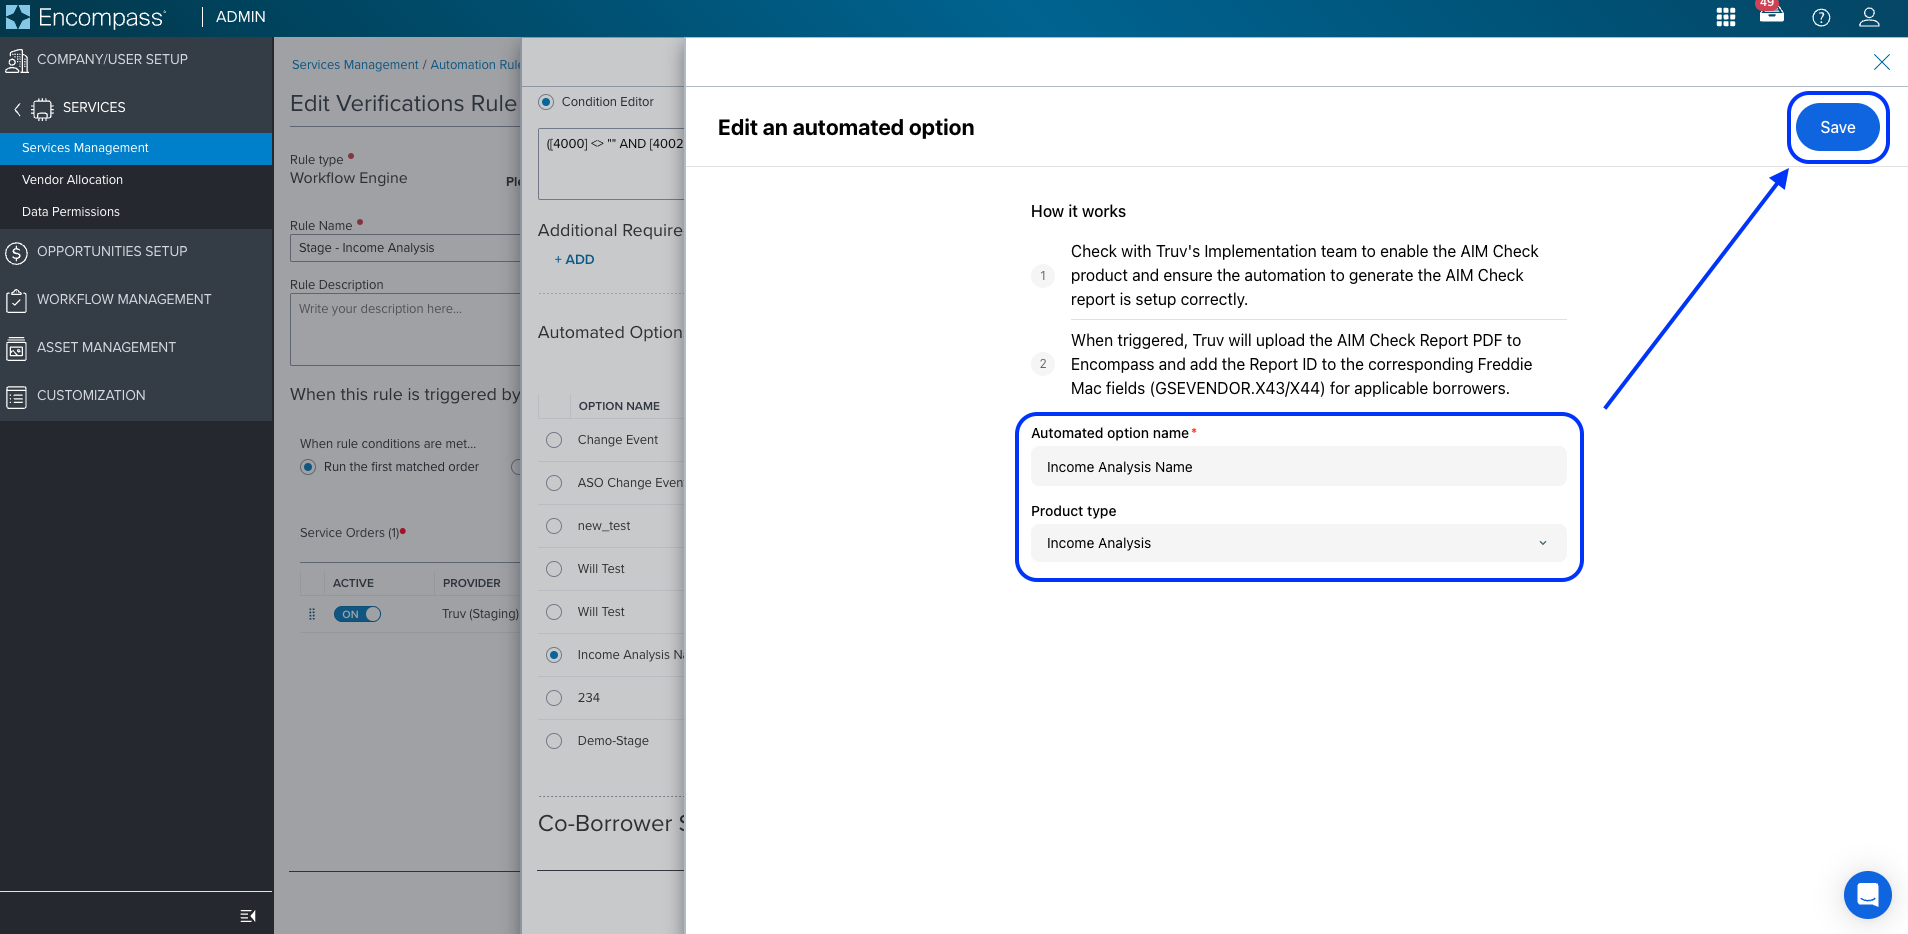
- Assign the new Automated Option to both the Borrower and Co-Borrower.
- Turn the Service Order to Active: On at the top right of the page (this will not cause the rule to start triggering yet)
- Press Continue
OutcomeAn Automated Service Ordering rule that will check whether each borrower has a first name, last name, SSN, if AIM Check is available for them, and if we have successfully run AIM Check yet or not. It will be enabled in the final step when we setup Workflow Rules.
Step 5: Configure Workflow Rules
Setup a new Workflow Rule
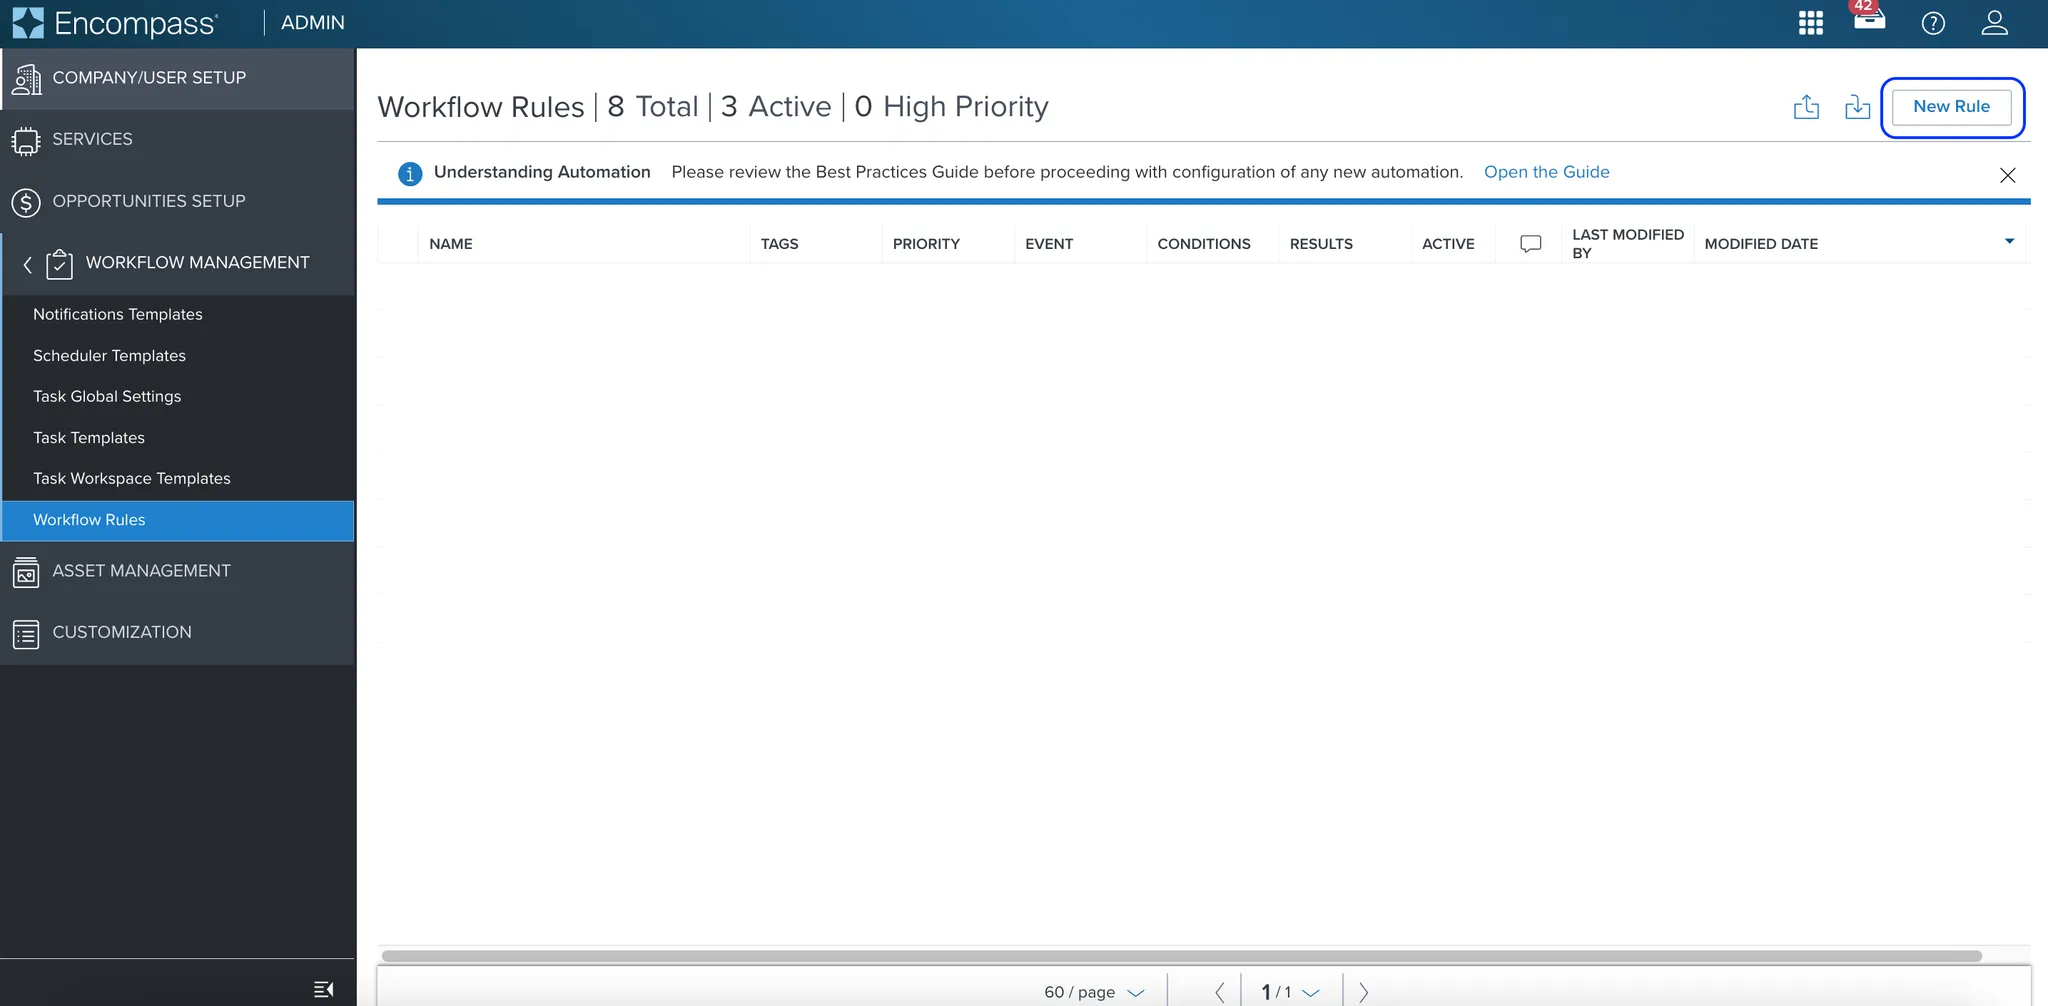
- Go to https://encompass.ice.com/admin/workflowrulessetup/rules (Workflow Management → Workflow Rules)
- Select New Rule at the top right of the page
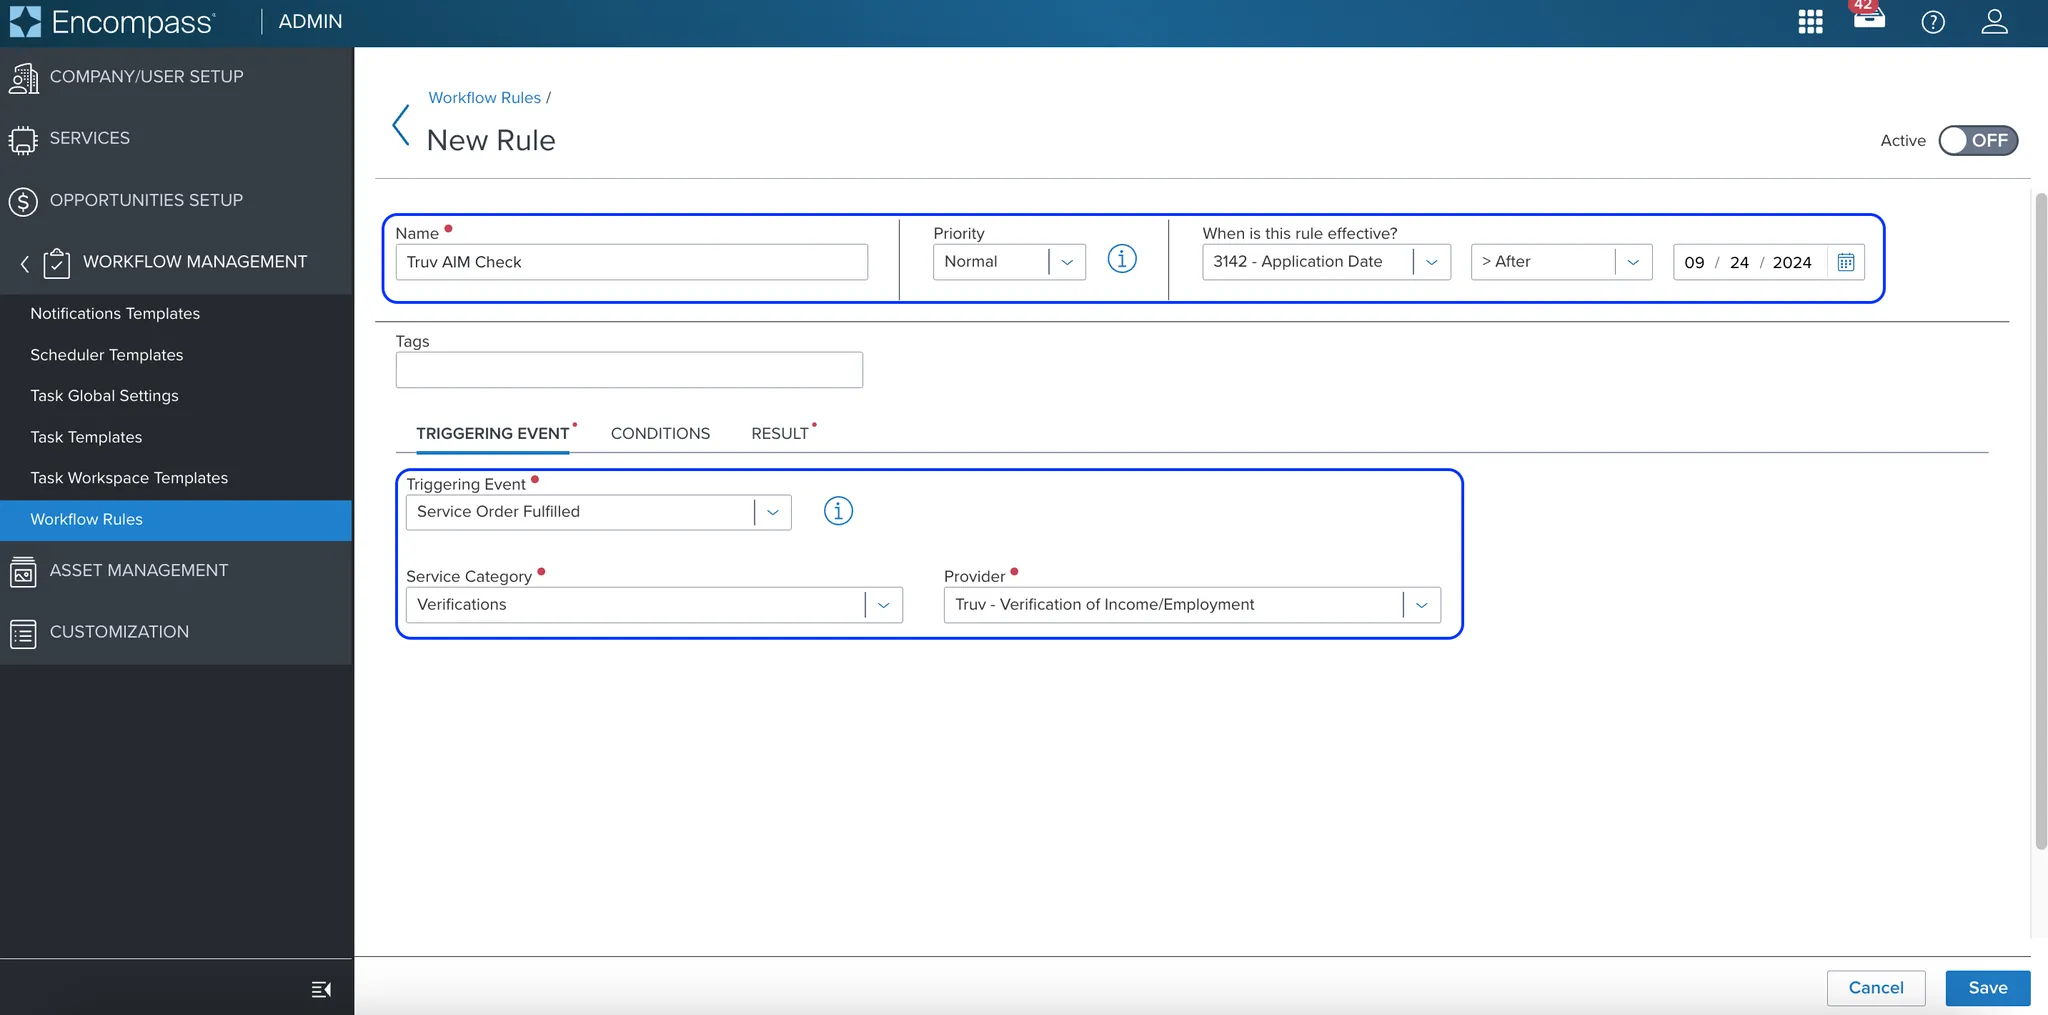
- On the New Rule page
- Add a rule Name
- Set Priority: Normal
- Set When is this rule effective? based on the date cutoff for when you’d like this to be applicable to loan files or applications.
- Set Triggering Event: Service Order Fulfilled
- Service Category: Verifications
- Provider: Truv - Verification of Income/Employment
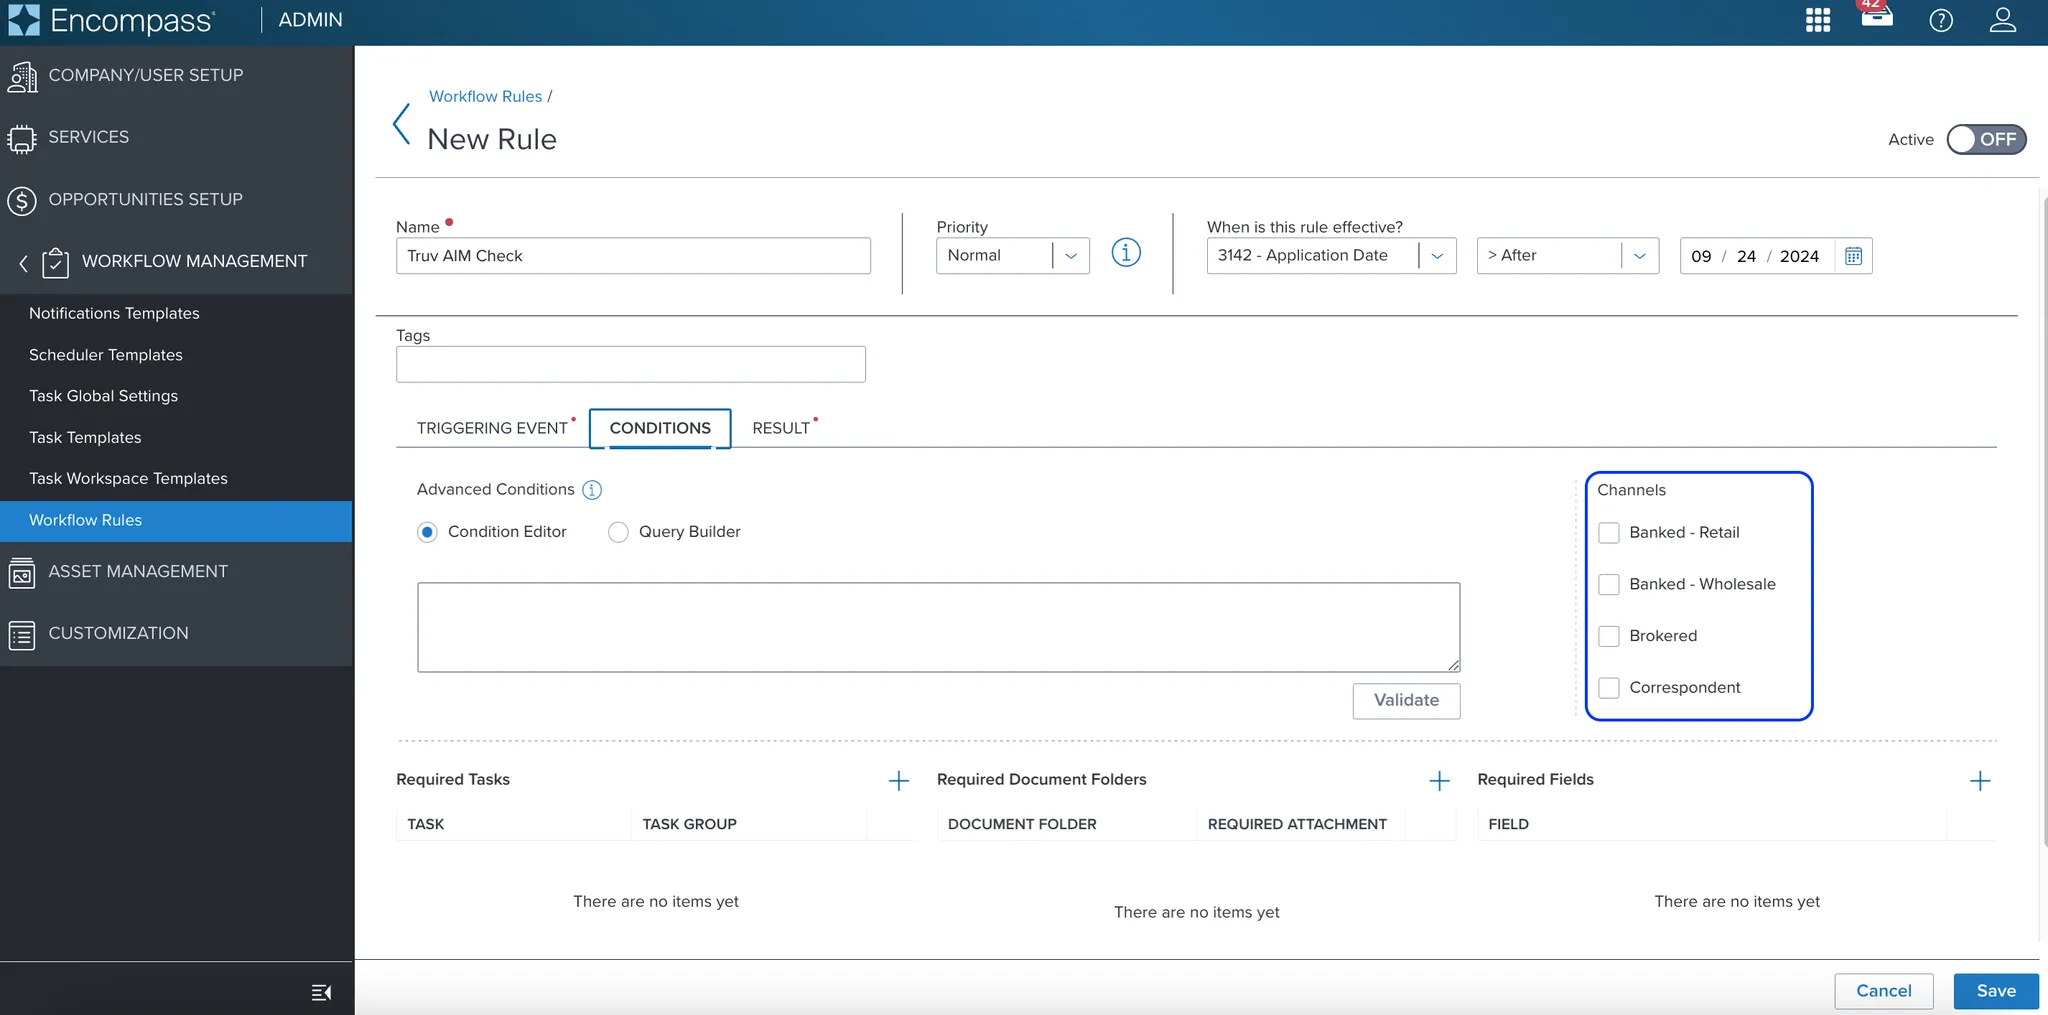
- On Conditions tab
- Add which loan Channels AIM Check should be added too
- On Result tab
- Set Resulting action: Order Service
- Press Add
- Find the Select Service Rule setting at the bottom of the page and add the Service Rule that was setup in Step 4
- Set the rule to Active: On at the top right of the page
- Click Save
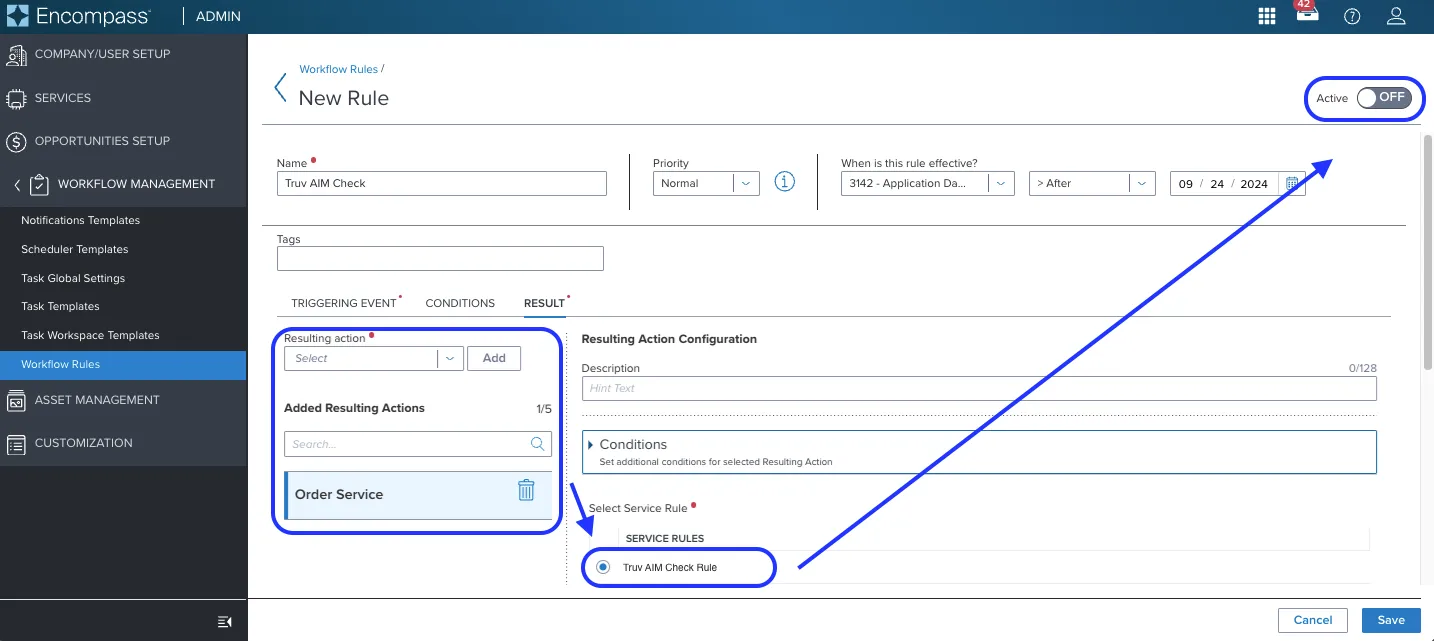
OutcomeAn Automated Service Ordering workflow rule that will run when the initial Truv Verification is fulfilled. Once the initial VOI is run from Truv, if the borrowers meet the criteria in Step 4, Encompass will automatically download the AIM Check Report from Truv into the eFolder.
Updated 7 months ago