
BYTE Software
Byte Software allows for seamless income and employment verification through Truv.
Overview
Byte Software integrates effortlessly with Truv to provide fast, efficient income and employment verifications. Streamline your verification process in just a few steps, all within your loan origination platform.
Key Benefits
- Seamless Integration: Truv integrates directly into BYTE Software, enabling a smooth transition from loan origination to verification.
- Fast and Accurate Verifications: Automate income and employment verifications, ensuring quick turnaround times and reducing errors.
- Efficient Workflow: Keep the entire verification process within BYTE Software to minimize disruptions and maximize efficiency.
- Customization Options: White-labeling and workflow customization allow you to adapt the solution to your branding and operational needs.
- Minimized Change Management: No need for complex implementation—Truv’s solution is ready to use, reducing the burden on your IT team.
How it works
The Truv integration within BYTE Software allows you to leverage automated employment and income verification directly in your existing workflow. Here’s how it works:
- Application Submission: Operations team can initiate and submit the loan application through BYTE Software.
- Request Verification: Simply navigate to the Truv verification section and input the necessary information for the applicant.
- Borrower Notification: Borrowers are notified via email and text, specified in the loan application, to complete the requested verifications. The borrower experience is completely customized through the Truv Dashboard -> Templates. Borrower is required to authenticate into the employers requested to complete the verification.
- Automated Data Retrieval: Once borrower completes the requested verification. Truv retrieves the income and employment data from connected payroll systems and the data retrieved is automatically populated in BYTE Software, allowing for a seamless continuation of the loan process.
Enabling the Integration
To enable the integration between BYTE Software and Truv:
-
Access Integration Settings: Log in to BYTE Software and navigate to the Settings menu.
-
Locate Truv Integration: Under the integration options, locate Truv and select it.
-
Authorize Integration:
-
Enable Truv in BYTE: Activate the Truv integration within your BYTE account.
-
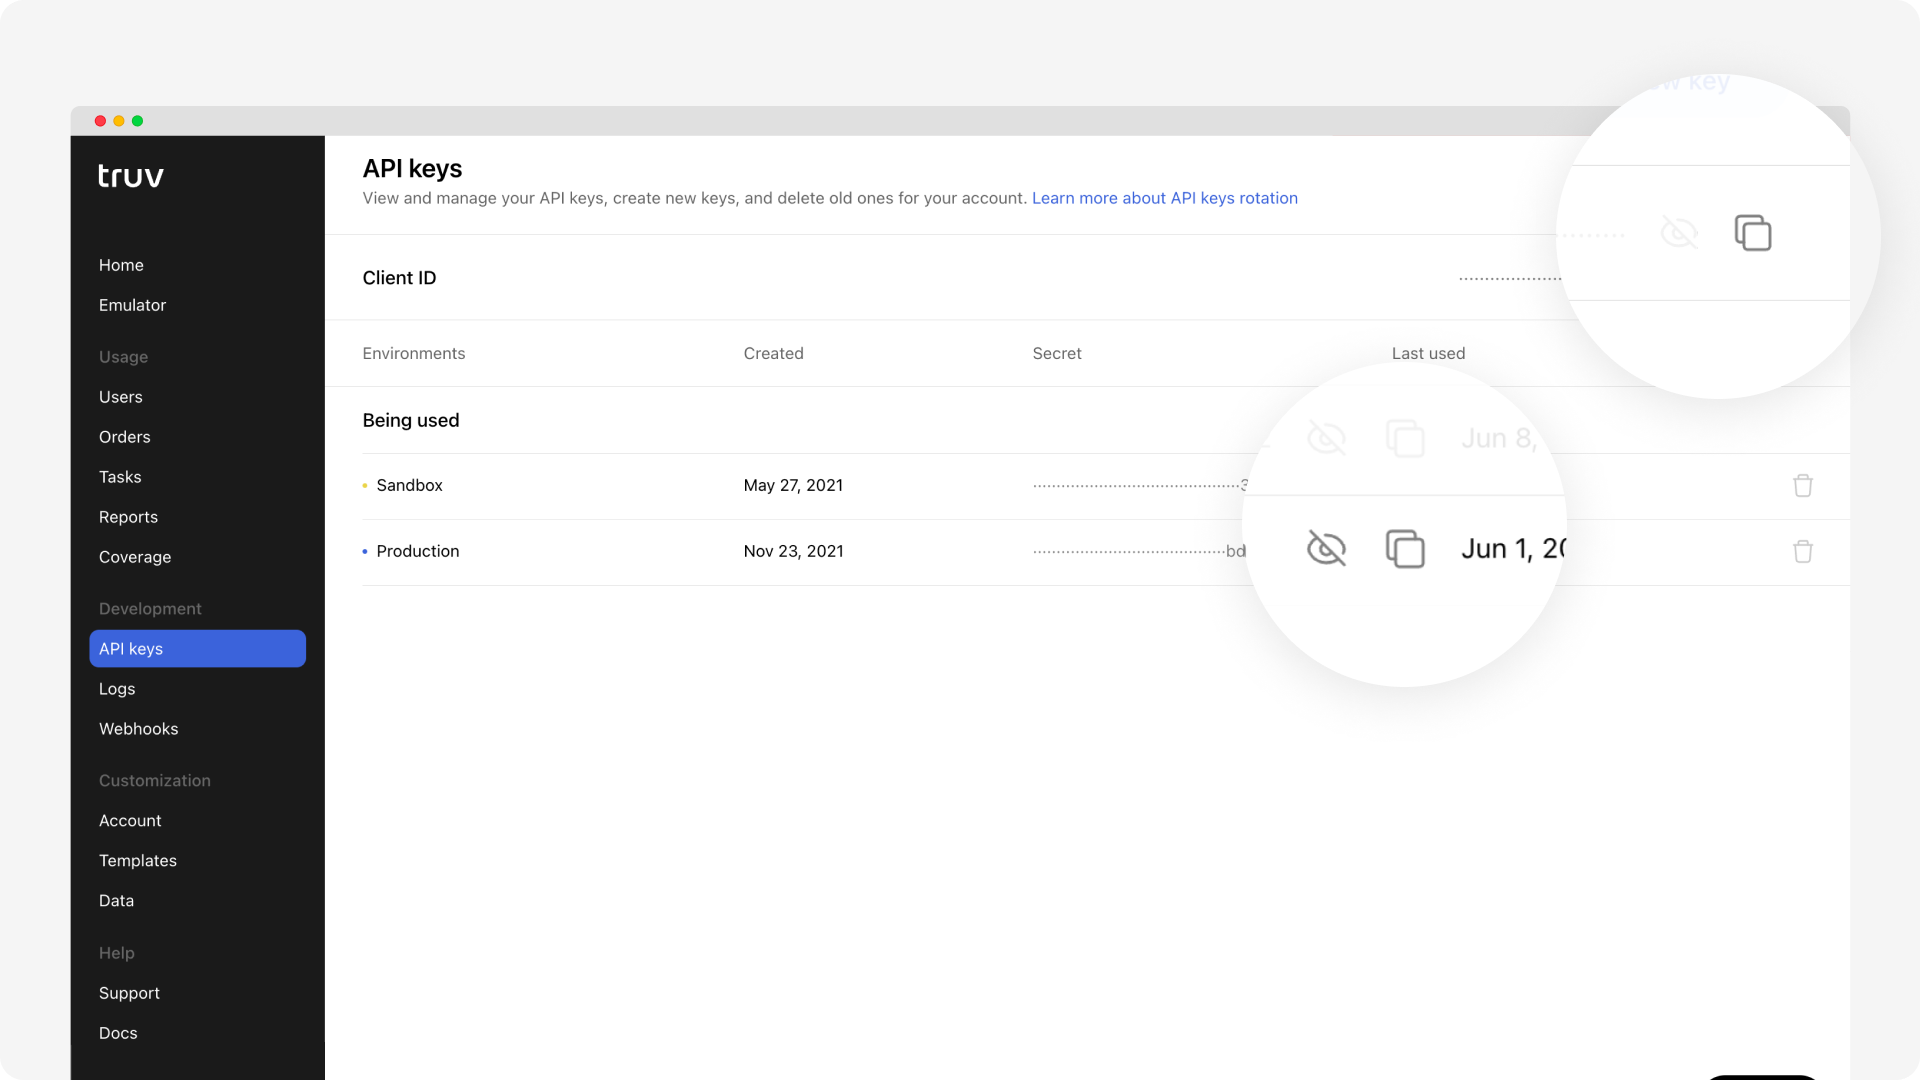
Ensure to copy credentials from Truv Dashboard. Visit Truv’s API Dashboard and select API Keys. Copy the credential values from your environment using the Copy icon.
-
Copy
Client IDfrom Truv in to API Key for Testing in BYTE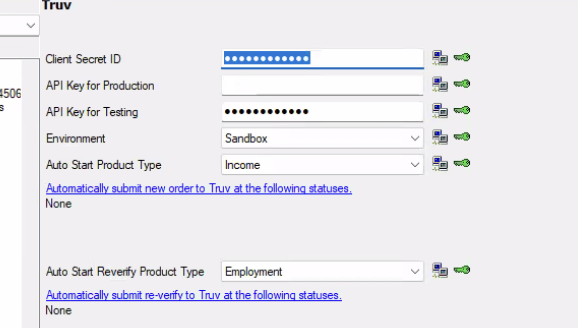
-
Client Secret ID in BYTE, paste the Secret from Truv dashboard (
sandbox-….) -
When going to production: Add the Secret from Truv dashboard in Client secret ID in BYTE (
prod-…….) -
Client IDfrom Truv Dashboard needs to be added into the API Key for Production in BYTE.
-
NOTE: This is a KNOWN bug and BYTE team is working to fix it.
-
-
-
Save and Confirm: Save the settings, and confirm that the integration is enabled. Once complete, Truv will be available as an option for income and employment verifications.
Ordering a Verification
With Byte Software, you have the option to either auto-run or place orders manually via the Byte interface.
Auto-run
Once the integration is enabled, follow these steps to order a verification:
-
Open Loan Application: Access the relevant loan application in BYTE Software.
-
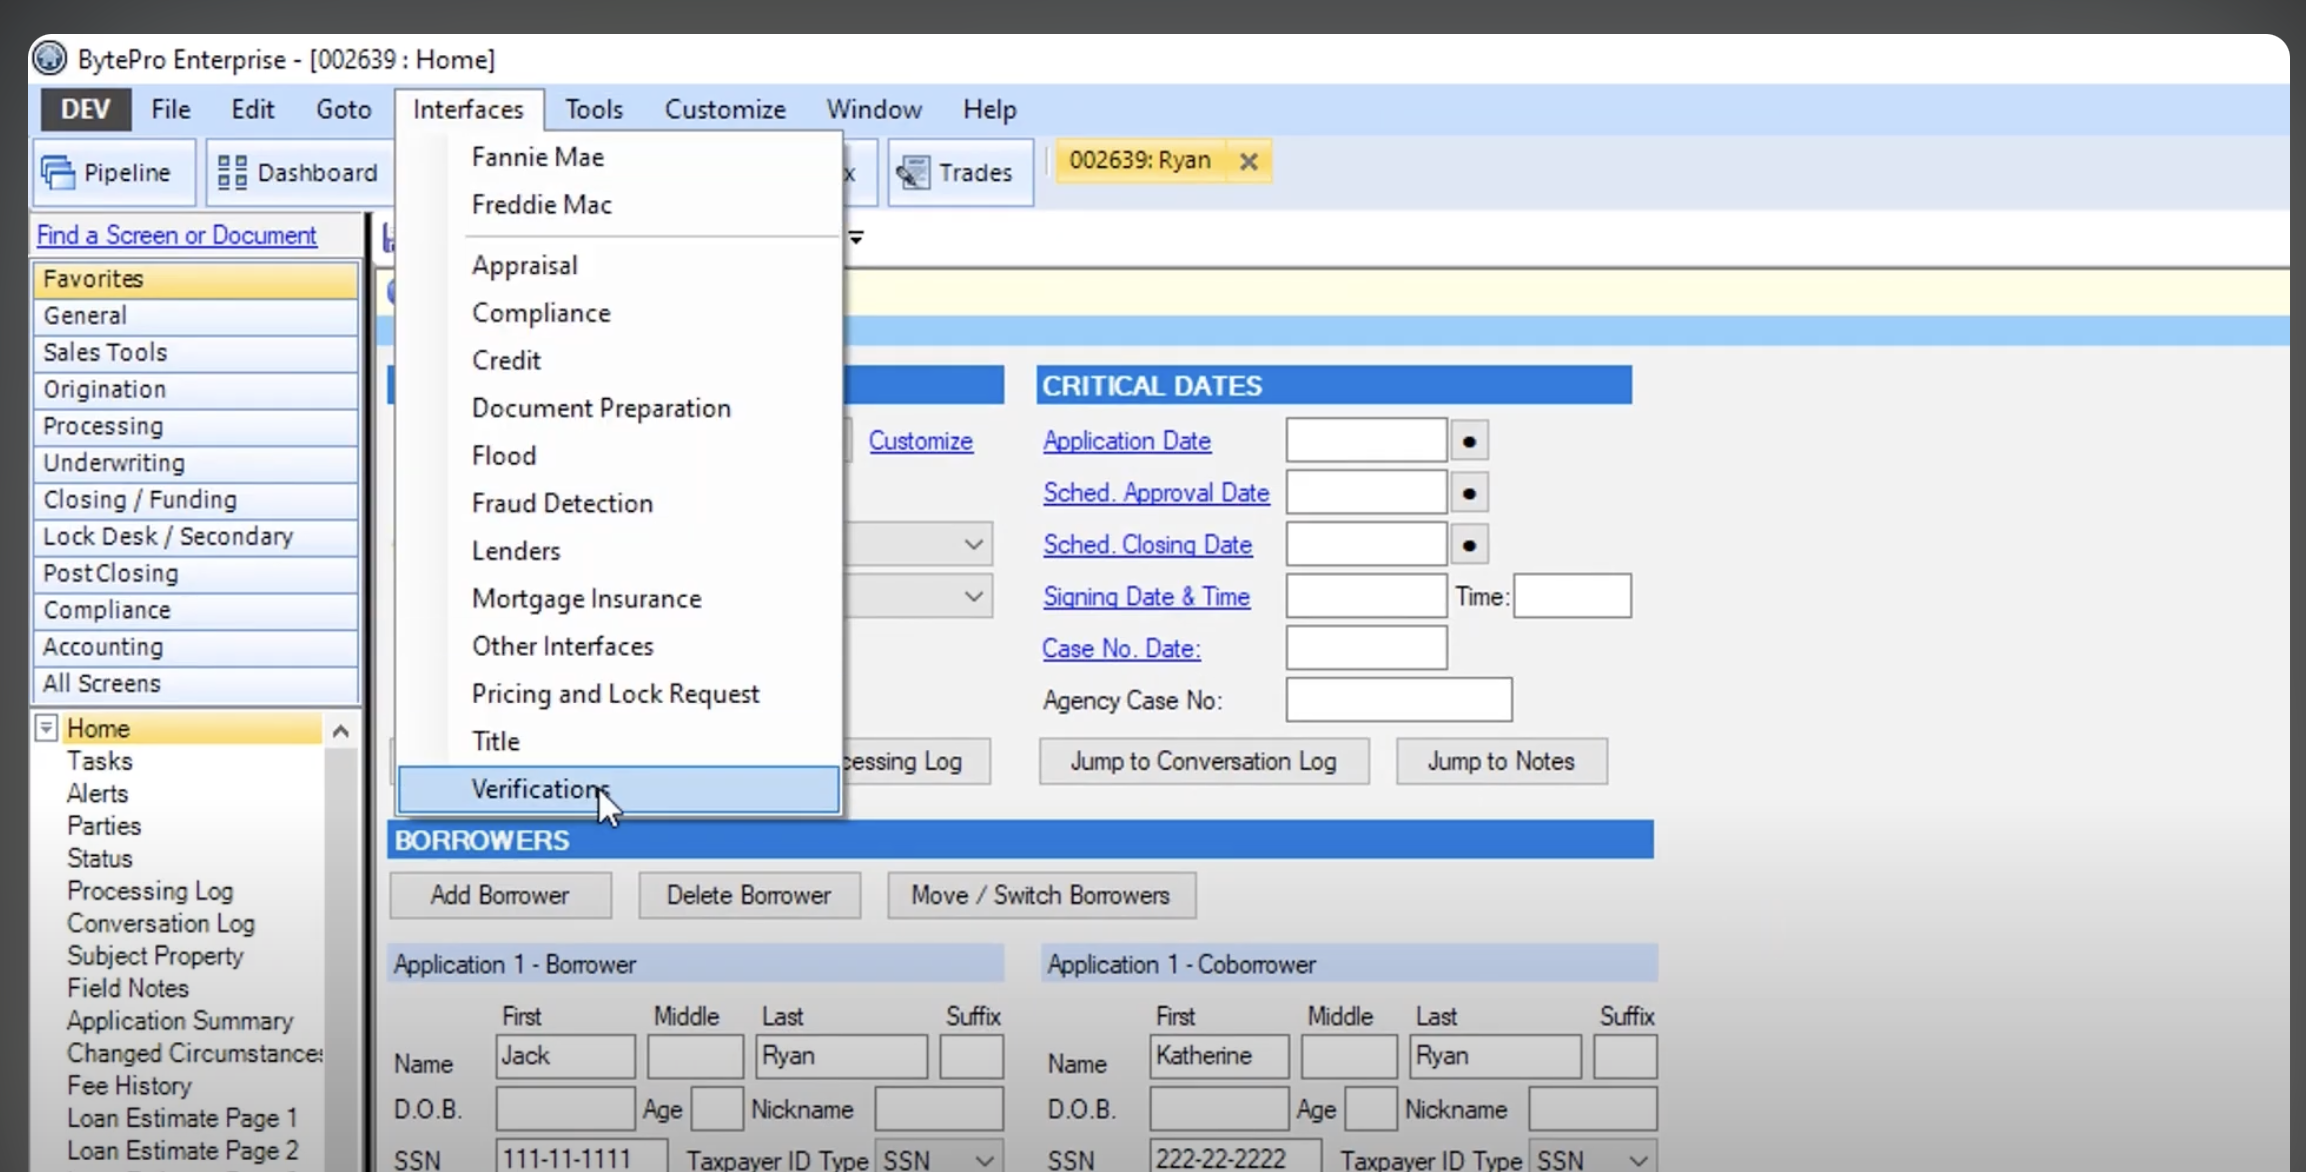
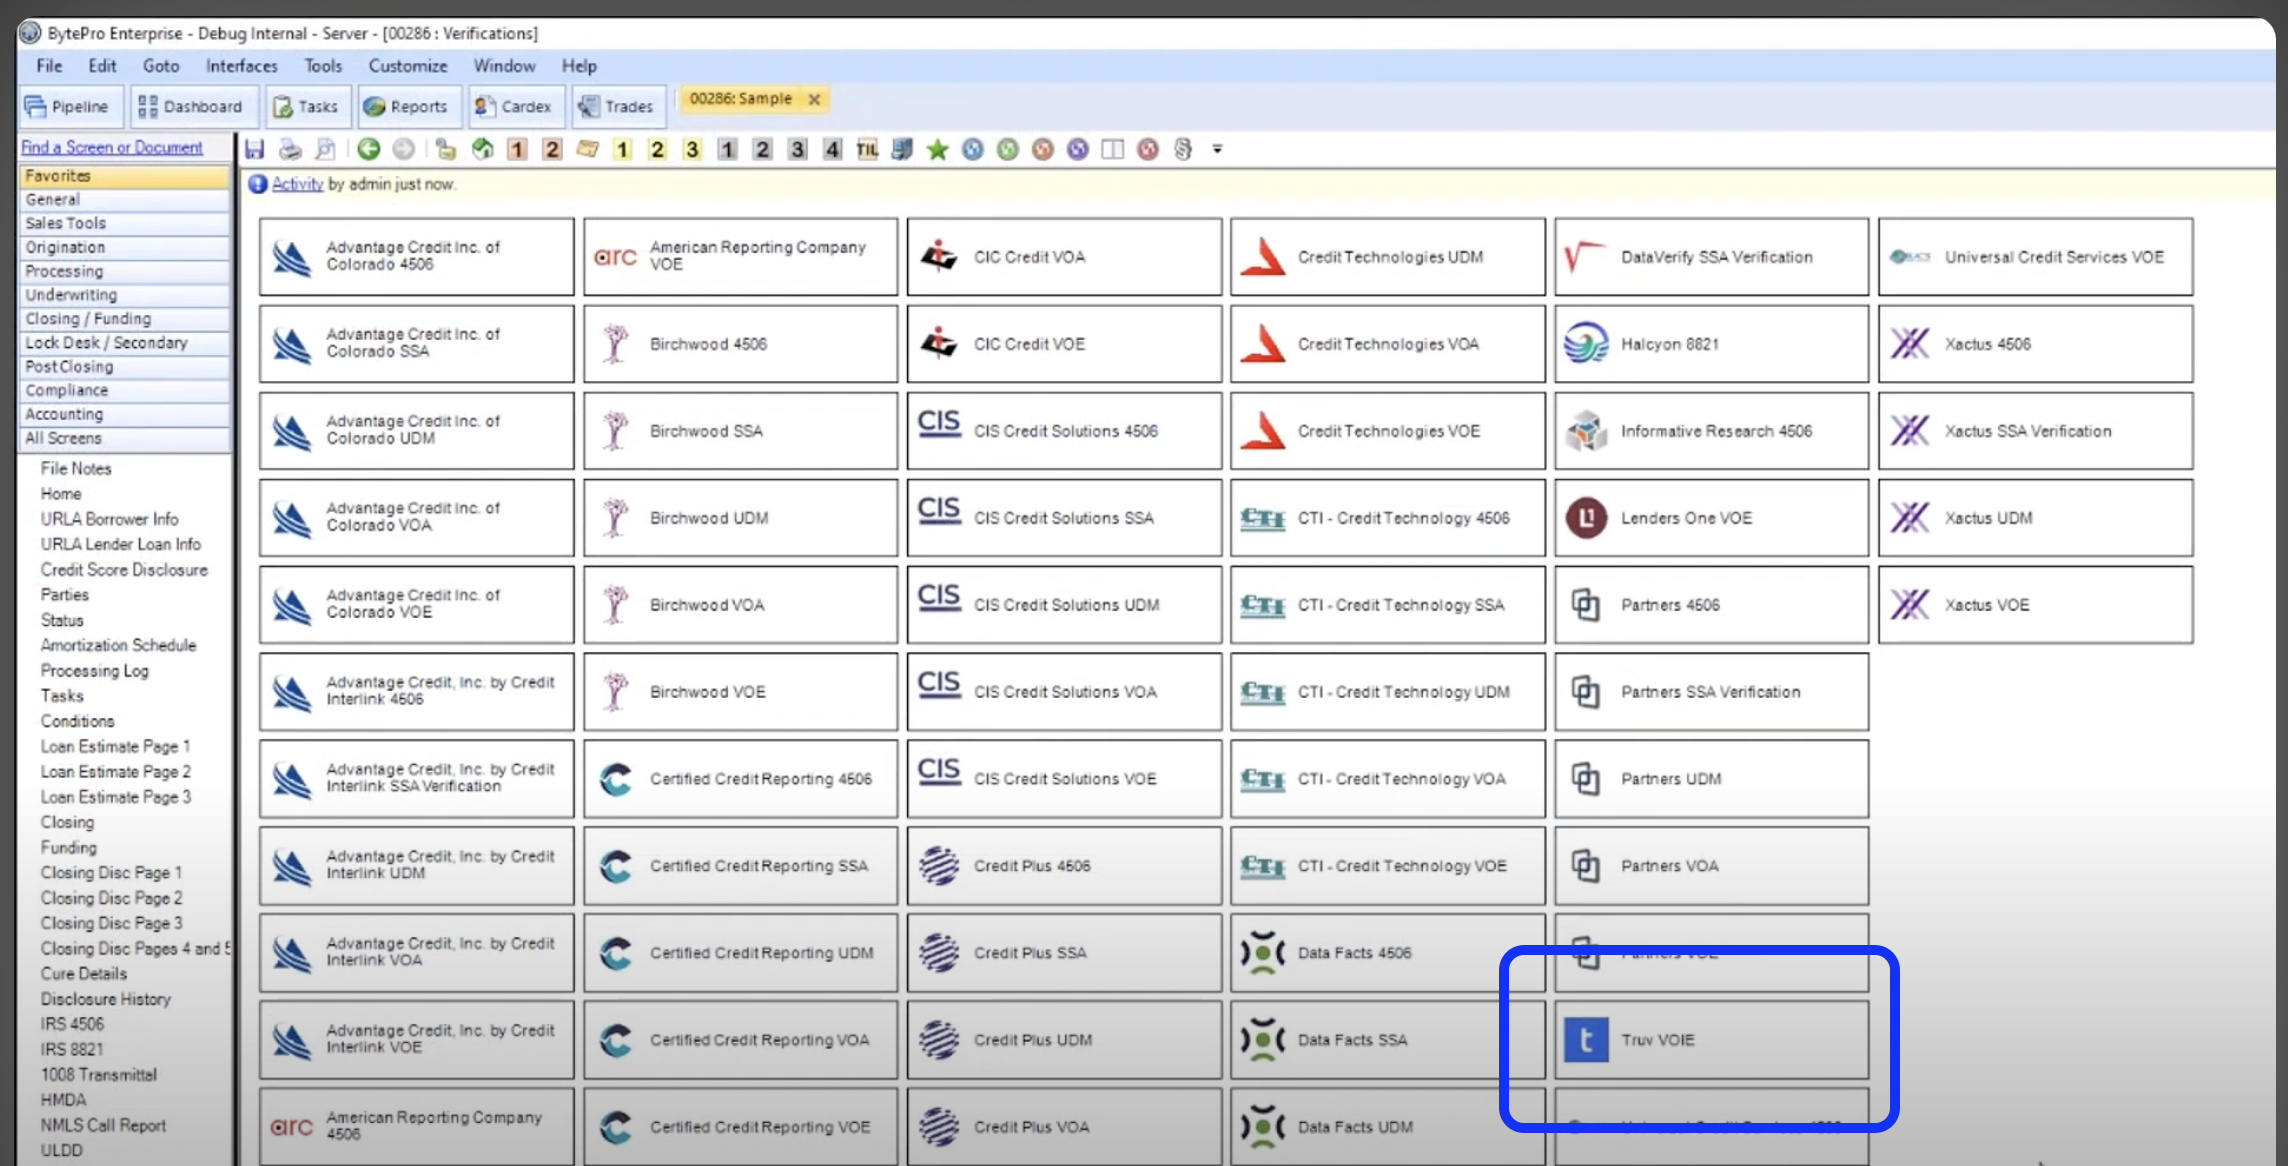
Navigate to Verifications: In the application details, navigate to Interfaces ->Verifications section.
-
Select Truv Verification: Select Truv as the provider.

-
Auto run options: Once Truv is selected, Click on the Defaults to set the auto start options.
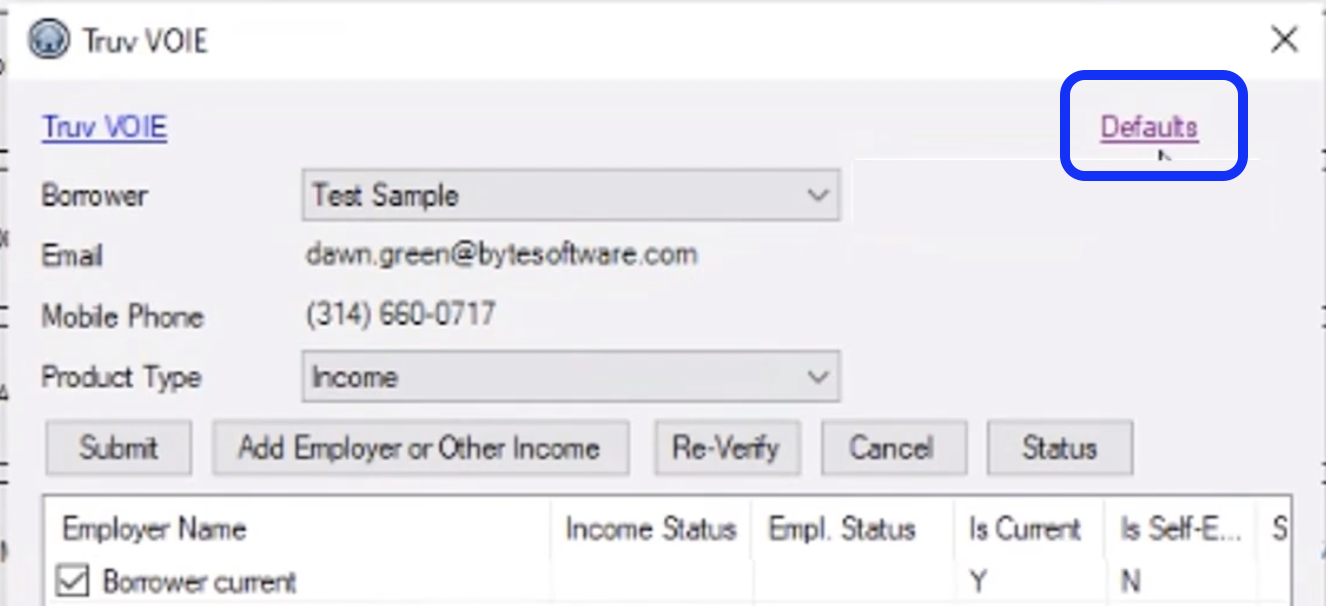
-
Set the following Auto run conditions:
- Auto Start Product Type to Income for Income and employment Verification
- Auto Start Reverify Product Typeto Employment for Employment Verification or 10 day PCV
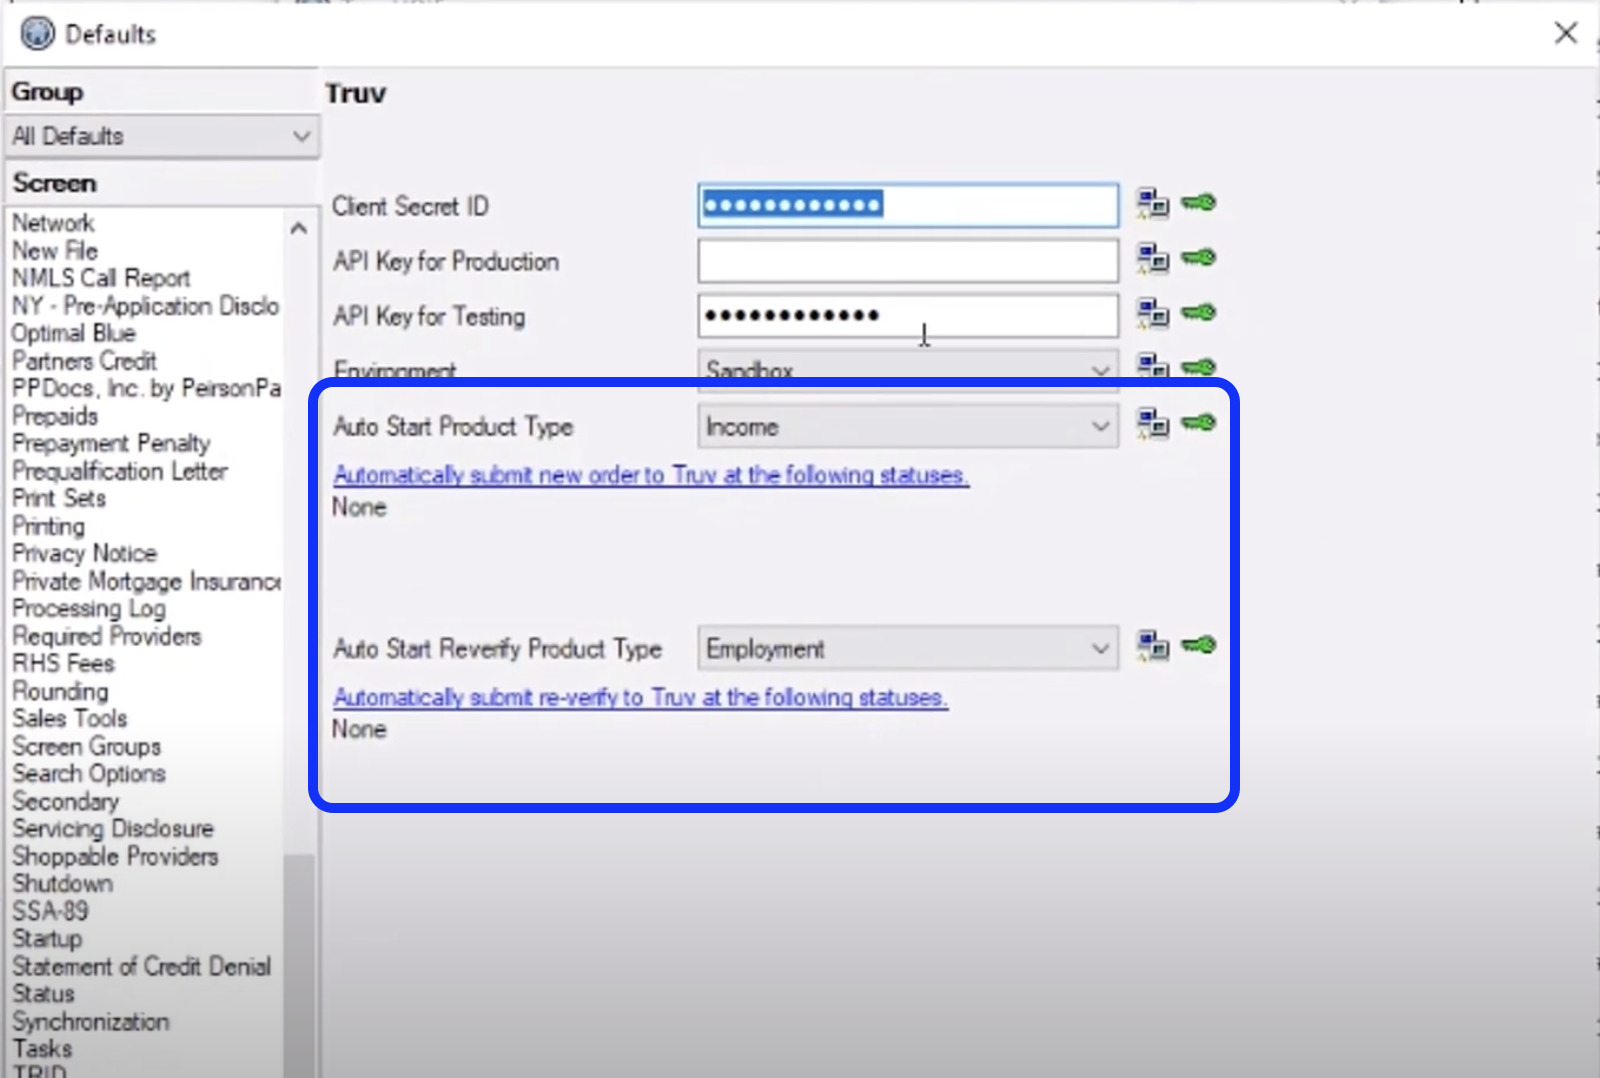
-
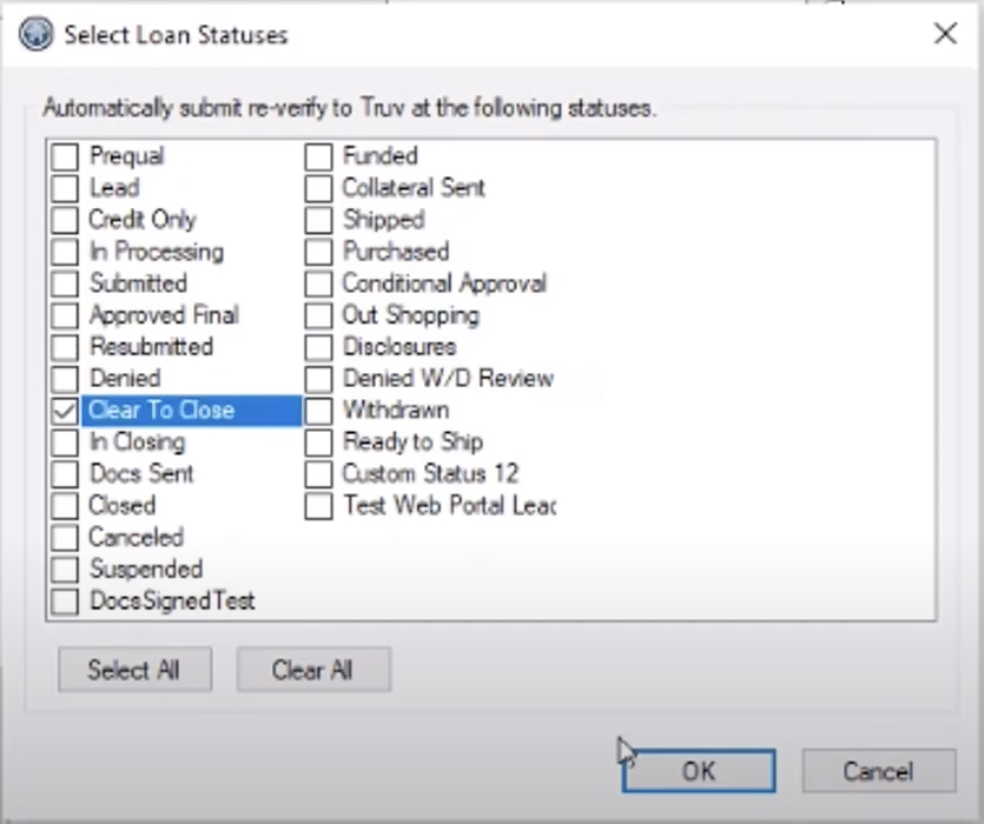
Now set the conditions when the auto run gets triggered
- Select Loan Statuses to In Processing or submit auto-runs for re-verifications when Loan Statuses is Clear to Close
Manual ordering
Once the integration is enabled, follow these steps to order a verification:
-
Open Loan Application: Access the relevant loan application in BYTE Software.
-
Navigate to Verifications: In the application details, navigate to Interfaces ->Verifications section.
-
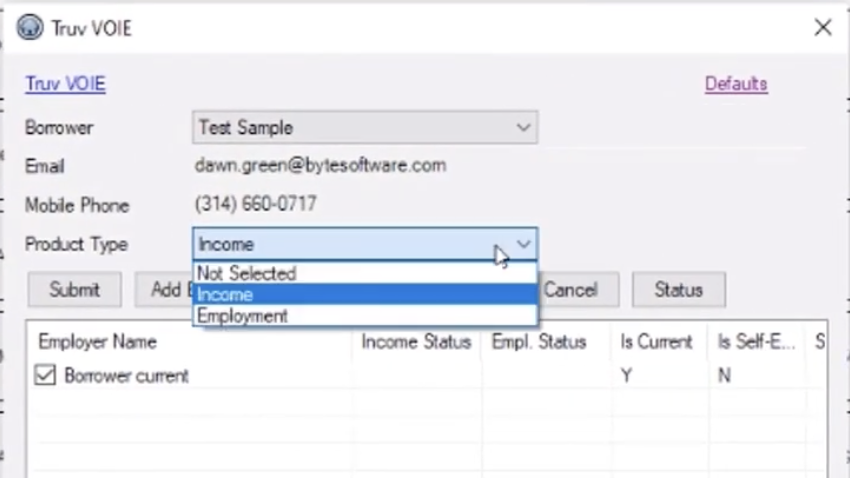
Select Truv Verification: Select Truv as the provider.
-
Input Applicant Information: Fill in the necessary details, such as the applicant’s name, employer, and any additional information requested.
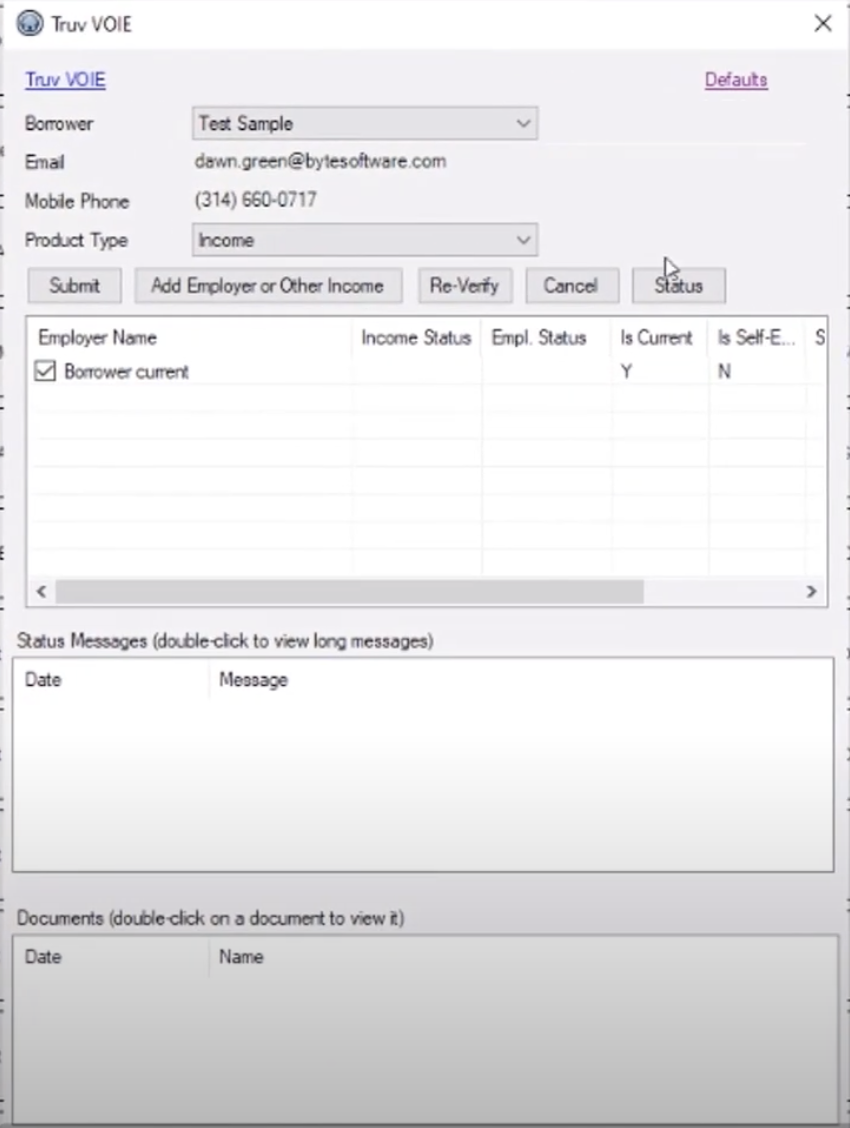
-
Select co-borrowers from the Borrower drop down.
-
Select the Product Type as Income to place Income and Employment verification and Employment for Employment only verification or 10-day PCV.
-
All the employers are listed under the Employer Name, you have the option to select or unselect employers before placing an order.
-
If it's a Current employer, it will be listed as Y in the Is Current column against the employer name. The similar behavior applies to Self employed status.
-
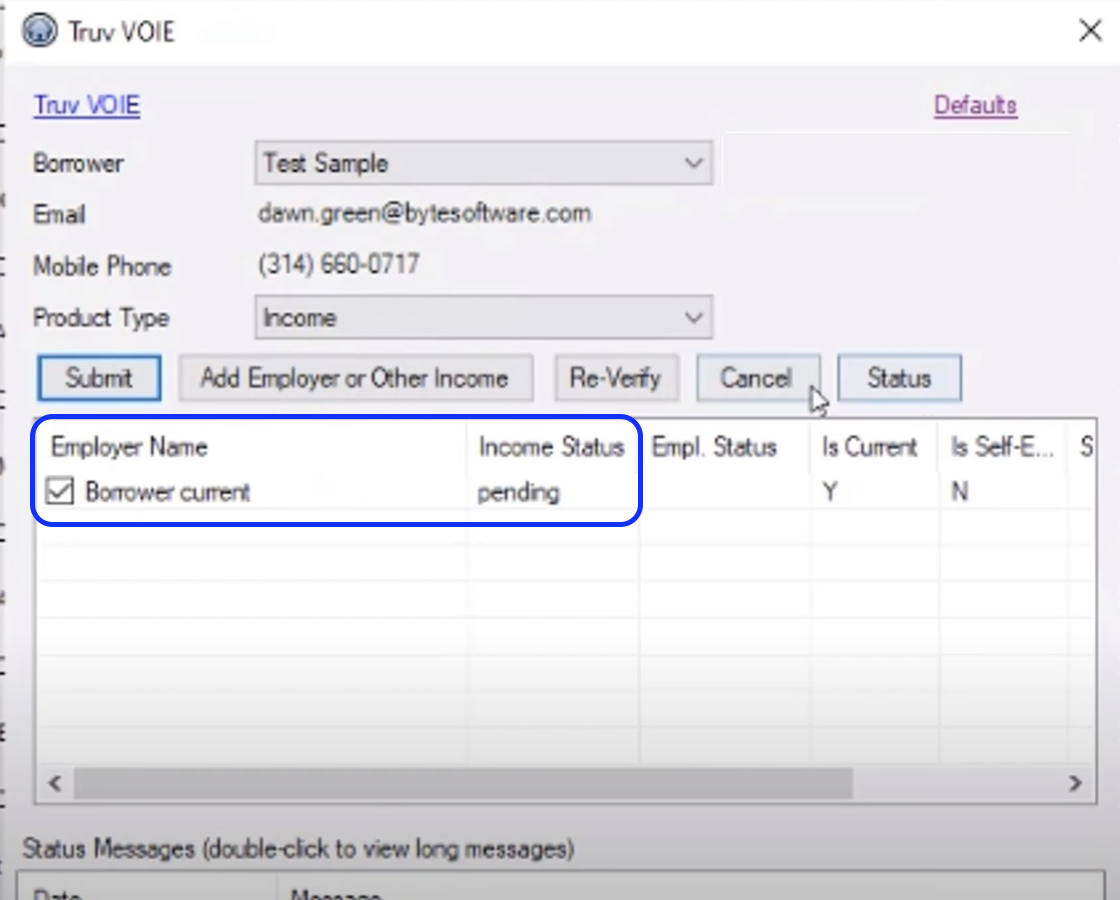
You can click on Status and the Status messages will be listed under the Status Messages.
-
If Order is Pending, you may go ahead and Cancel or click on Add Employer or Other Income button.
-
-
Submit the Request: Submit the request, and Truv will automatically begin retrieving income and employment data.
Retrieving Reports and Documents
To retrieve reports and documents after ordering a verification:
- Access Completed Verifications: Once Truv has completed the verification, you’ll receive a notification within BYTE Software.
- View Verification Details: Go to the Verifications section of the loan application and click on the completed Truv verification.
- Download Reports: You can view and download the verification report, which includes detailed information on the applicant's income and employment.
- Attach to Application: Attach the report directly to the loan application for easy access during underwriting.
Overview of Truv within Byte Software
Below is a quick overview of Truv within Byte Software, encompassing the auto-run and manual ordering workflows
Updated 11 months ago