
LenderLogix
Use Truv's Verification of Income and Employment (VOI/E) solution within the LenderLogix LiteSpeed point-of-sale system to gain rapid access to verified employment and income data, enabling fast, accurate loan decisions.
Overview
Truv's integration with LenderLogix LiteSpeed provides instant access to borrowers' employment and income details directly from verified payroll accounts. This integration enables quick and accurate verification within seconds, enhancing the speed and efficiency of decision-making.
Key Benefits
- Instant Verification: Quickly verify employment and income details.
- Reliable Data: Access trustworthy information from reputable payroll providers.
- Streamlined Process: Improve underwriting efficiency and decision-making speed.
How it works
During the loan application process, once borrowers or co-borrowers have submitted their information, they are prompted to connect their payroll accounts through Truv by clicking Verify Employment.
- Borrower Connects Accounts: Borrowers are guided to securely link their payroll accounts.
- Truv Generates Reports: Verification reports are automatically generated and made available in all leading Loan Origination Systems (LOS), such as Encompass®. Reports, including pay stubs, W-2s, and borrower-level documents, are added to the Encompass eFolder, along with other payroll documents.
- Ongoing Monitoring: Connected payroll accounts are monitored for updates, allowing new reports to be generated throughout the loan process.
LenderLogix Setup Guide
To get started, contact your LenderLogix Customer Success Manager to let them know that you would like to enable the Truv LiteSpeed integration on your account.
Step 1: Copy Truv Client ID and Key
The first step in this one time set-up process will be collaborating to securely retrieve your Truv account's API Client ID and Production (or Sandbox) Secret value.
- Login to your Truv Dashboard : Access your Truv Dashboard.
- Navigate to API Keys:
- Go to the API Keys tab in Truv Dashboard.
- Copy the Client ID and Secret for the right environment.
- Input Credentials in LiteSpeed: Enter the Client ID and Secret into the appropriate fields in your LiteSpeed account.
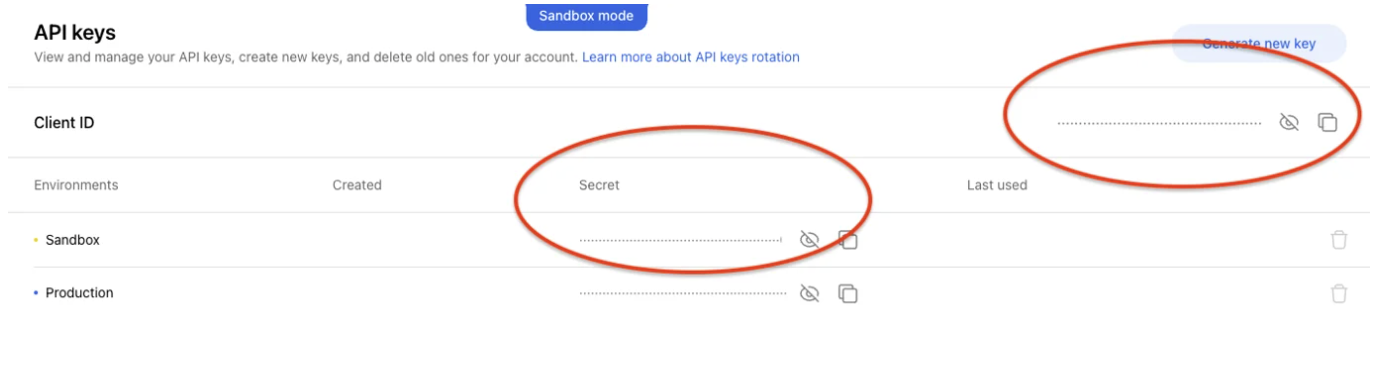
Note: Truv assigns separate secrets per Sandbox and Production environment.Ensure you select the correct environment (Production or Sandbox) for your setup.
Step 2: Copy Truv Template ID
Once your LiteSpeed account has the Truv API credentials assigned you are now ready to configure the Truv Templates that you'd like to use on your LiteSpeed account.
- Login to your Truv Dashboard : Access your Truv Dashboard.
- Access the Templates Tab: In the Truv Dashboard, go t to the Templates tab.
- Select Your Template: Choose the template you’d like to use in LiteSpeed, and copy the Template ID value.
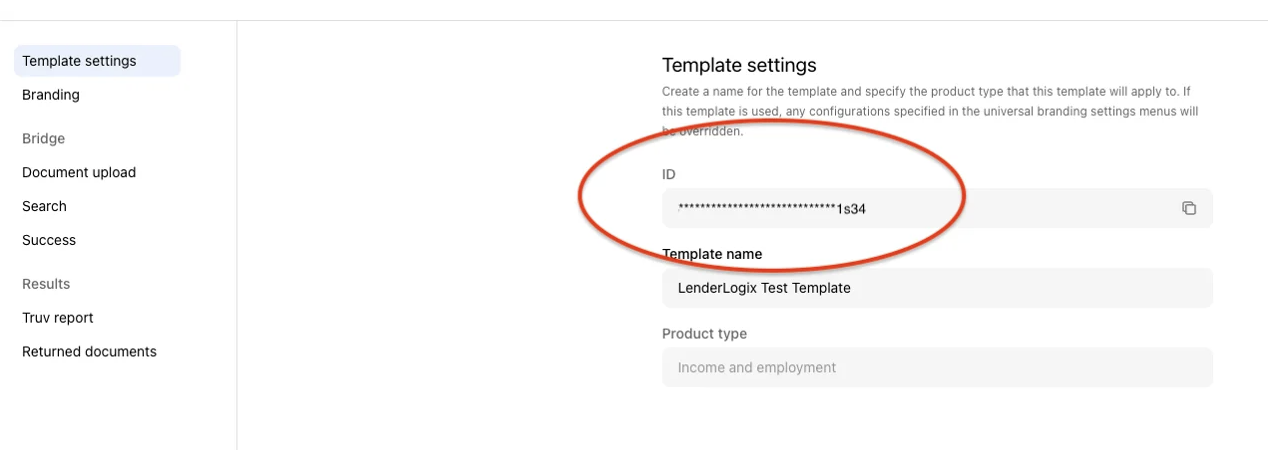
Note: Truv and LiteSpeed supports configuration at the branch level.Each branch using LiteSpeed can use unique white labeled Truv templates, increasing borrower trust as they login to their employers.
Step 3: Add Truv Template IDs to LenderLogix LiteSpeed
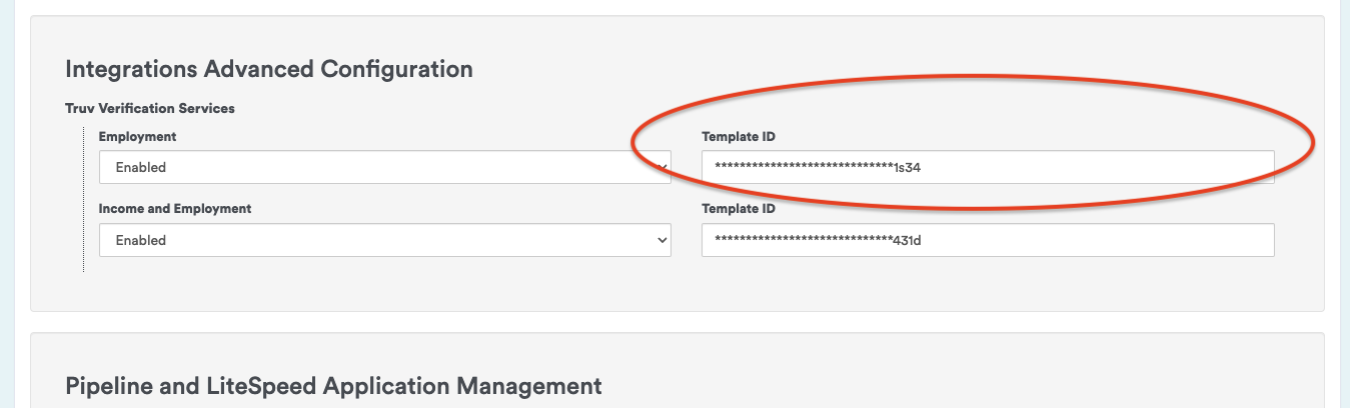
Now, add template IDs into your LenderLogix LiteSpeed account
- Log in to LiteSpeed: Access your LenderLogix LiteSpeed account.
- Advanced LiteSpeed Settings: Navigate to the*Advanced LiteSpeed Settings** page.
- Add Template ID: Paste the Truv Template ID into the appropriate field and Save your settings.
Truv integration is now configured for your LiteSpeed account.
Step 4: Needs List Truv Employment Update
Once a new LiteSpeed application is received, applicants will see a task on their Needs List to verify their employment and income.
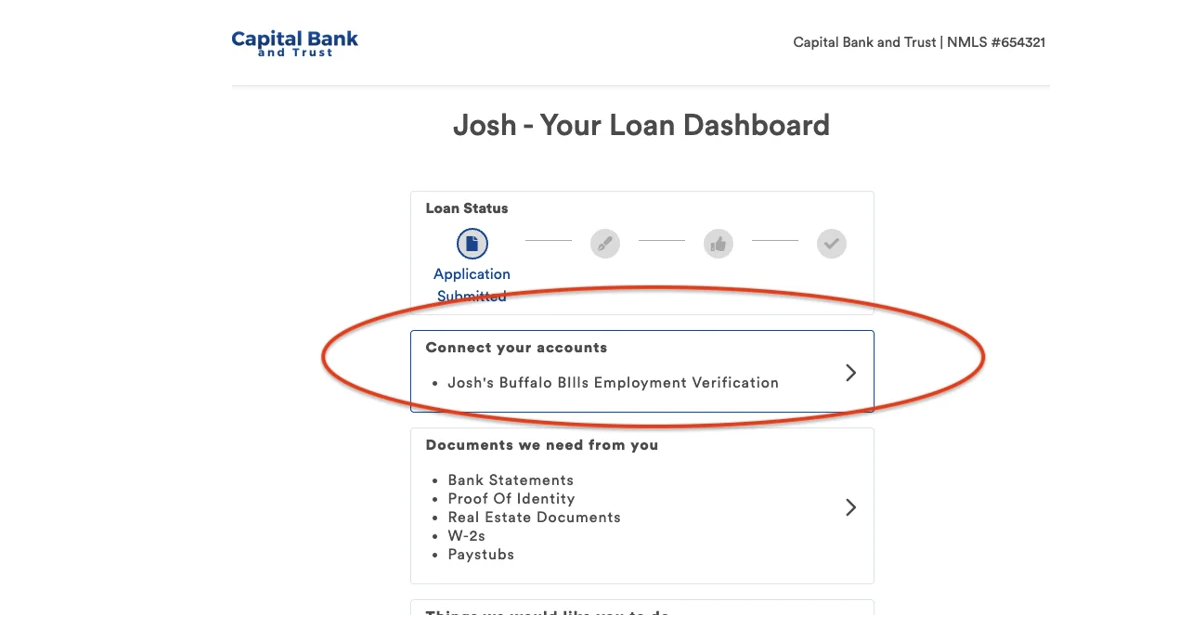
Borrowers and co-borrowers can complete the verification process by connecting their accounts through Truv. After verification, the loan officer and other configured recipients will receive notifications (via text or email) that the process is complete. Truv documents will be added to the Encompass eFolder on the loan.
Borrower Workflow using Truv in LenderLogix
Borrowers will upload their employment and income details in the Upload Documents section of the loan application and will be prompted to connect their payroll accounts via Truv.
For a quick overview of this process, check out the video below:
Launch with Truv in LenderLogix
- Coordinate with LenderLogix Customer Success: Validate your one-time admin setup.
- Enable Truv in LiteSpeed: Turn on the Truv integration in your LiteSpeed account.
- Customize Templates: Configure your templates in the Truv Dashboard.
- Test in Sandbox Mode: Ensure the integration is functioning as expected by testing in the Sandbox environment.
- Go Live: Once everything is verified, go live with the integration in Production. The verification data will be submitted to DU (Desktop Underwriter) and LPA (Loan Product Advisor) systems for loan decisioning.
You are now live with Truv within LenderLogix.
Refer to the detailed step-by-step guide to launch Truv within LenderLogix.