Encompass
Complete income and employment verification for US employees from within the Encompass platform.
About Encompass
Truv helps loan officers and processors submit income and employment verification requests on behalf of borrowers. Now with Encompass integrations, customers retrieve and refresh aggregate reports and store them in the Encompass eFolder during the mortgage loan origination process. The integration also allows for Orders to contact users for their provider information.
Setting up Encompass for administrators
The steps below cover each part of setting Truv up with Encompass using administrator privileges.
Step 1
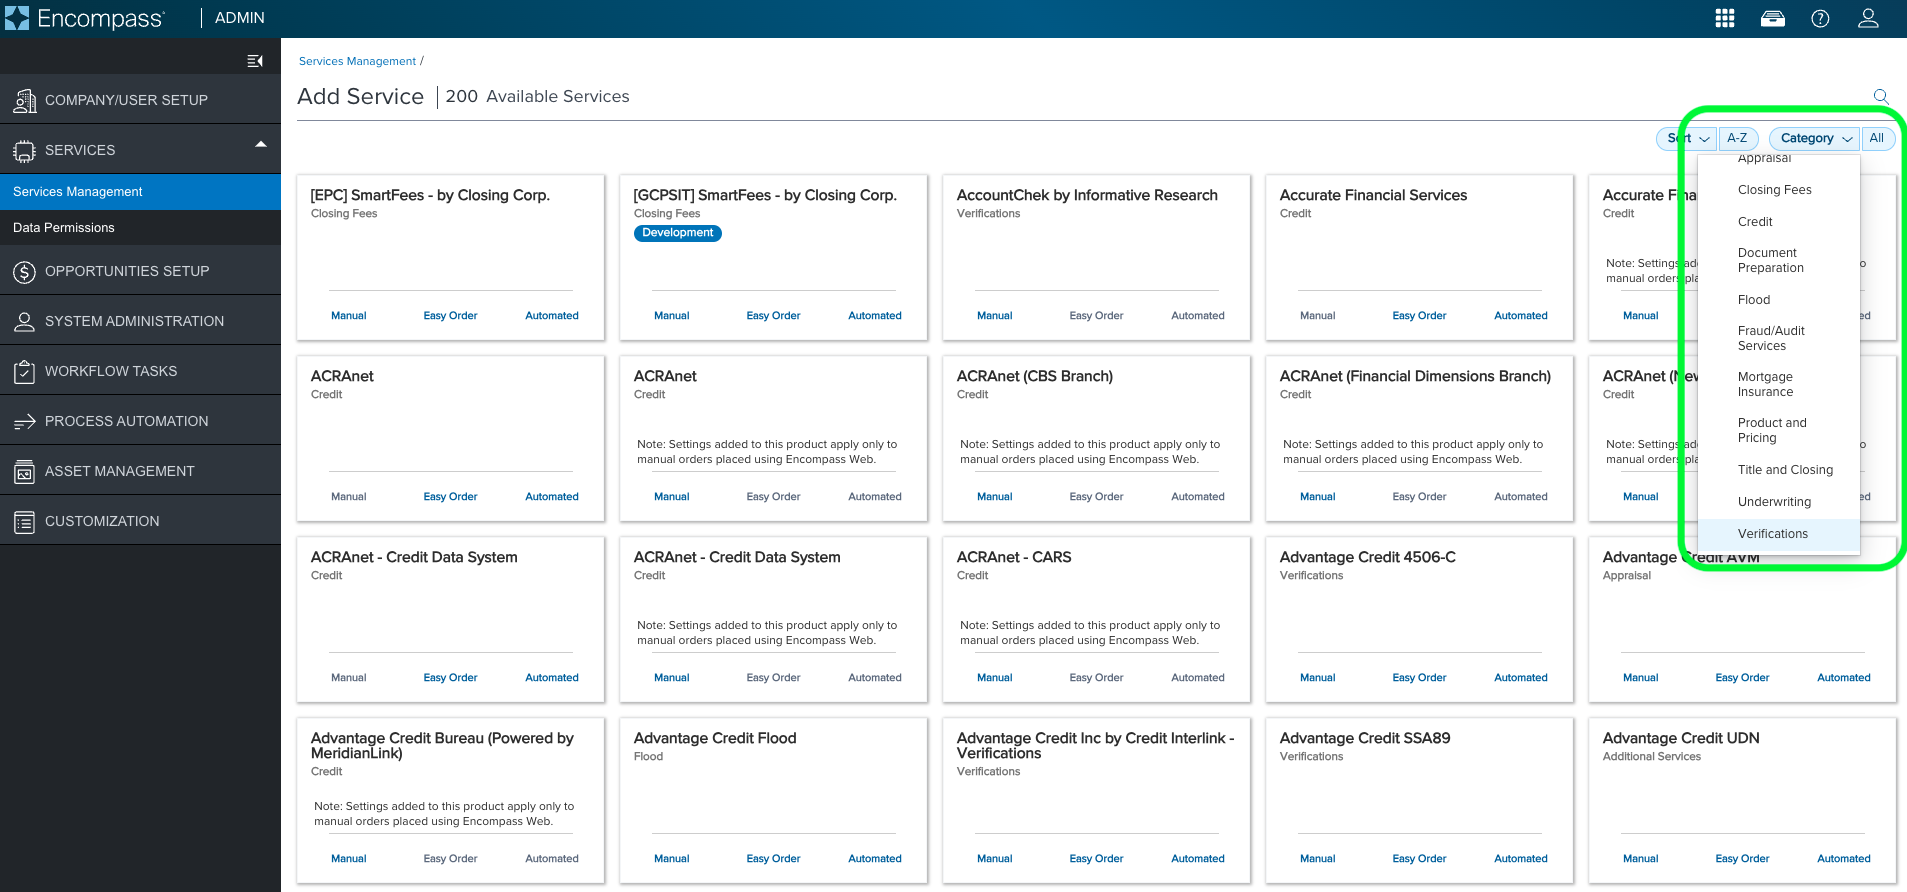
Log into Encompass as an administrator using Encompass Web. Navigate to the Admin tab at the top of the screen, select Services on the left navigation. Select Services Management and then Add Service on the right.

Step 2
Select Verifications in the Category dropdown on the right.
Step 3
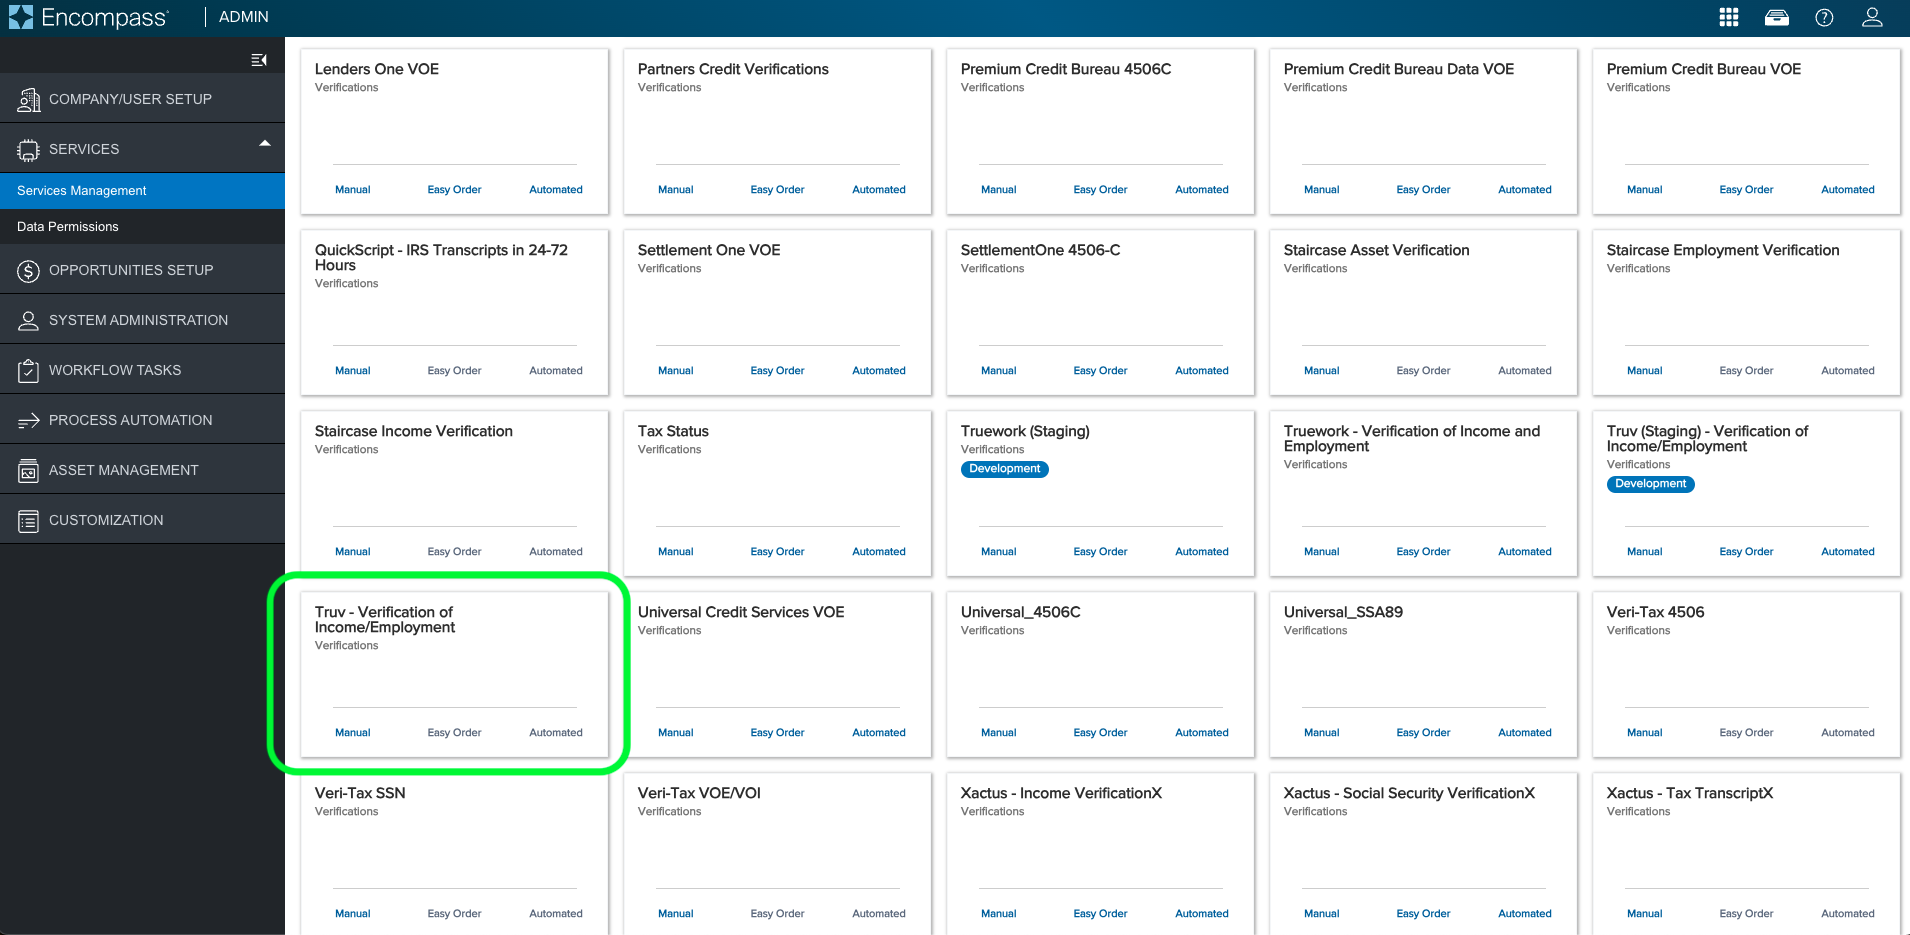
Select the Truv tile for your integration. Select Manual for triggering Truv verifications manually.
Step 4
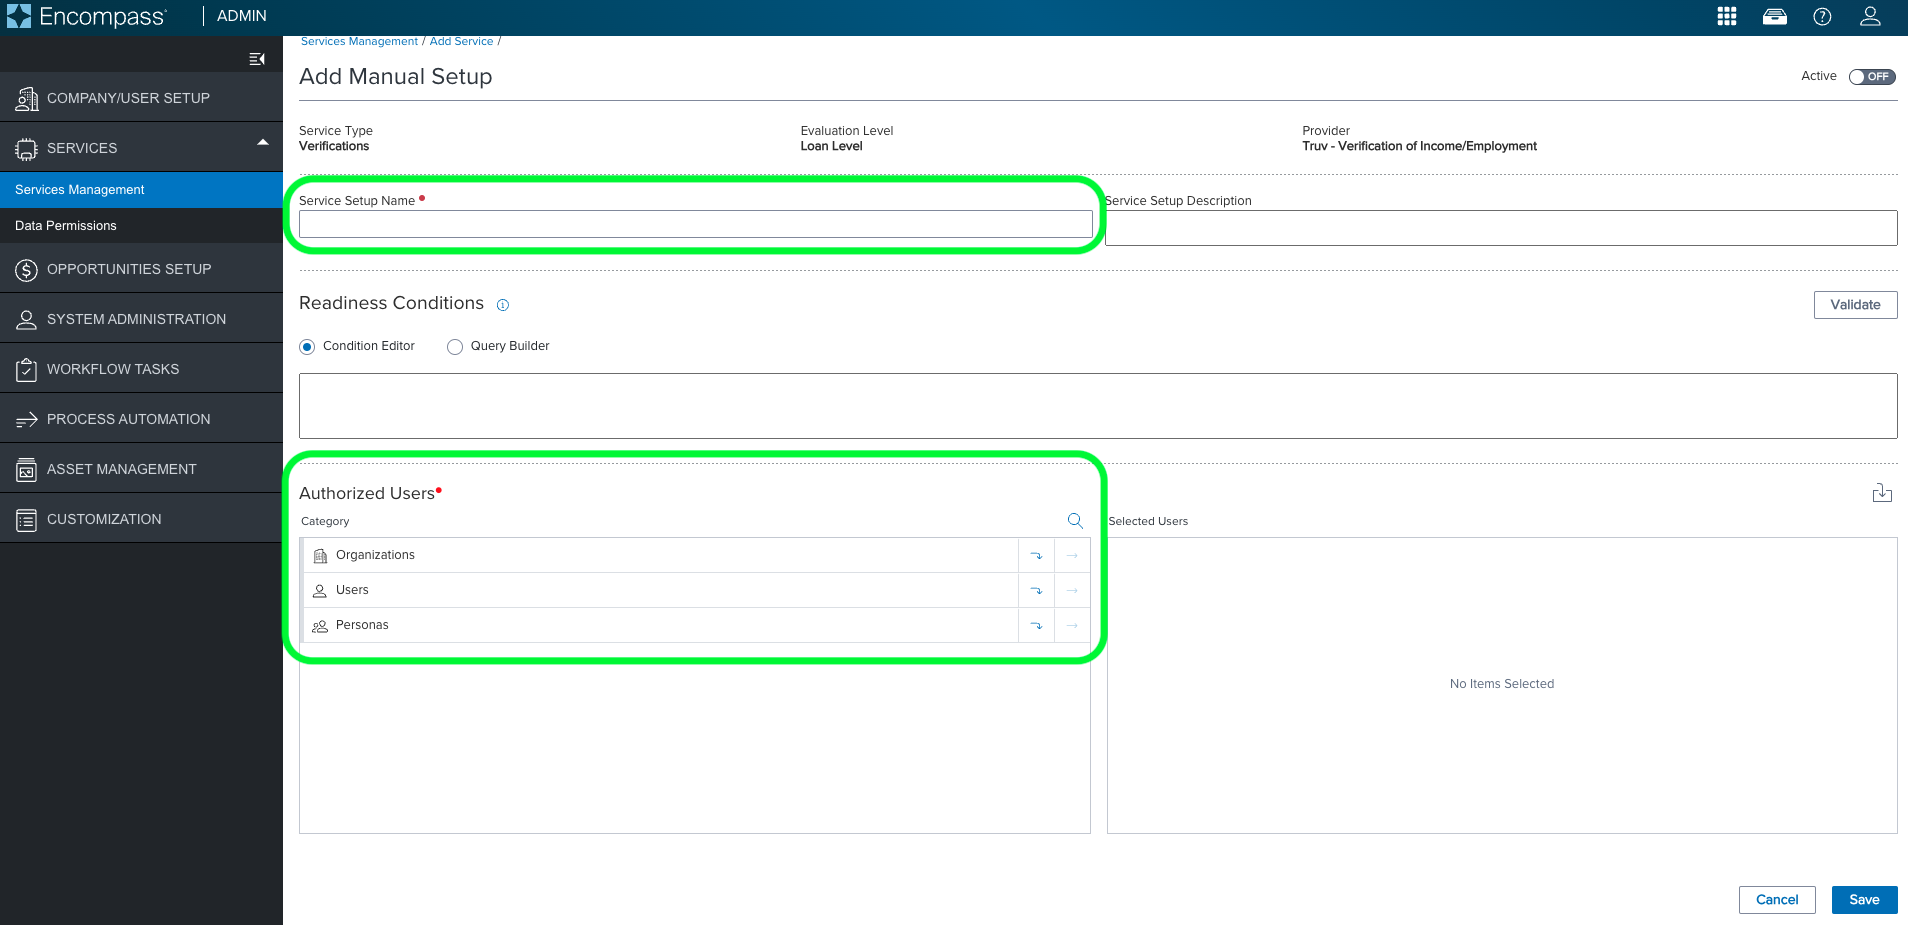
On the Add Manual Setup page, complete the Service Setup Name field. Add any Authorized Users to the configuration in the section below. Select Save to continue.
Step 5
Visit Truv’s API Dashboard and select API Keys. Copy the credential values from your environment using the Copy icon.
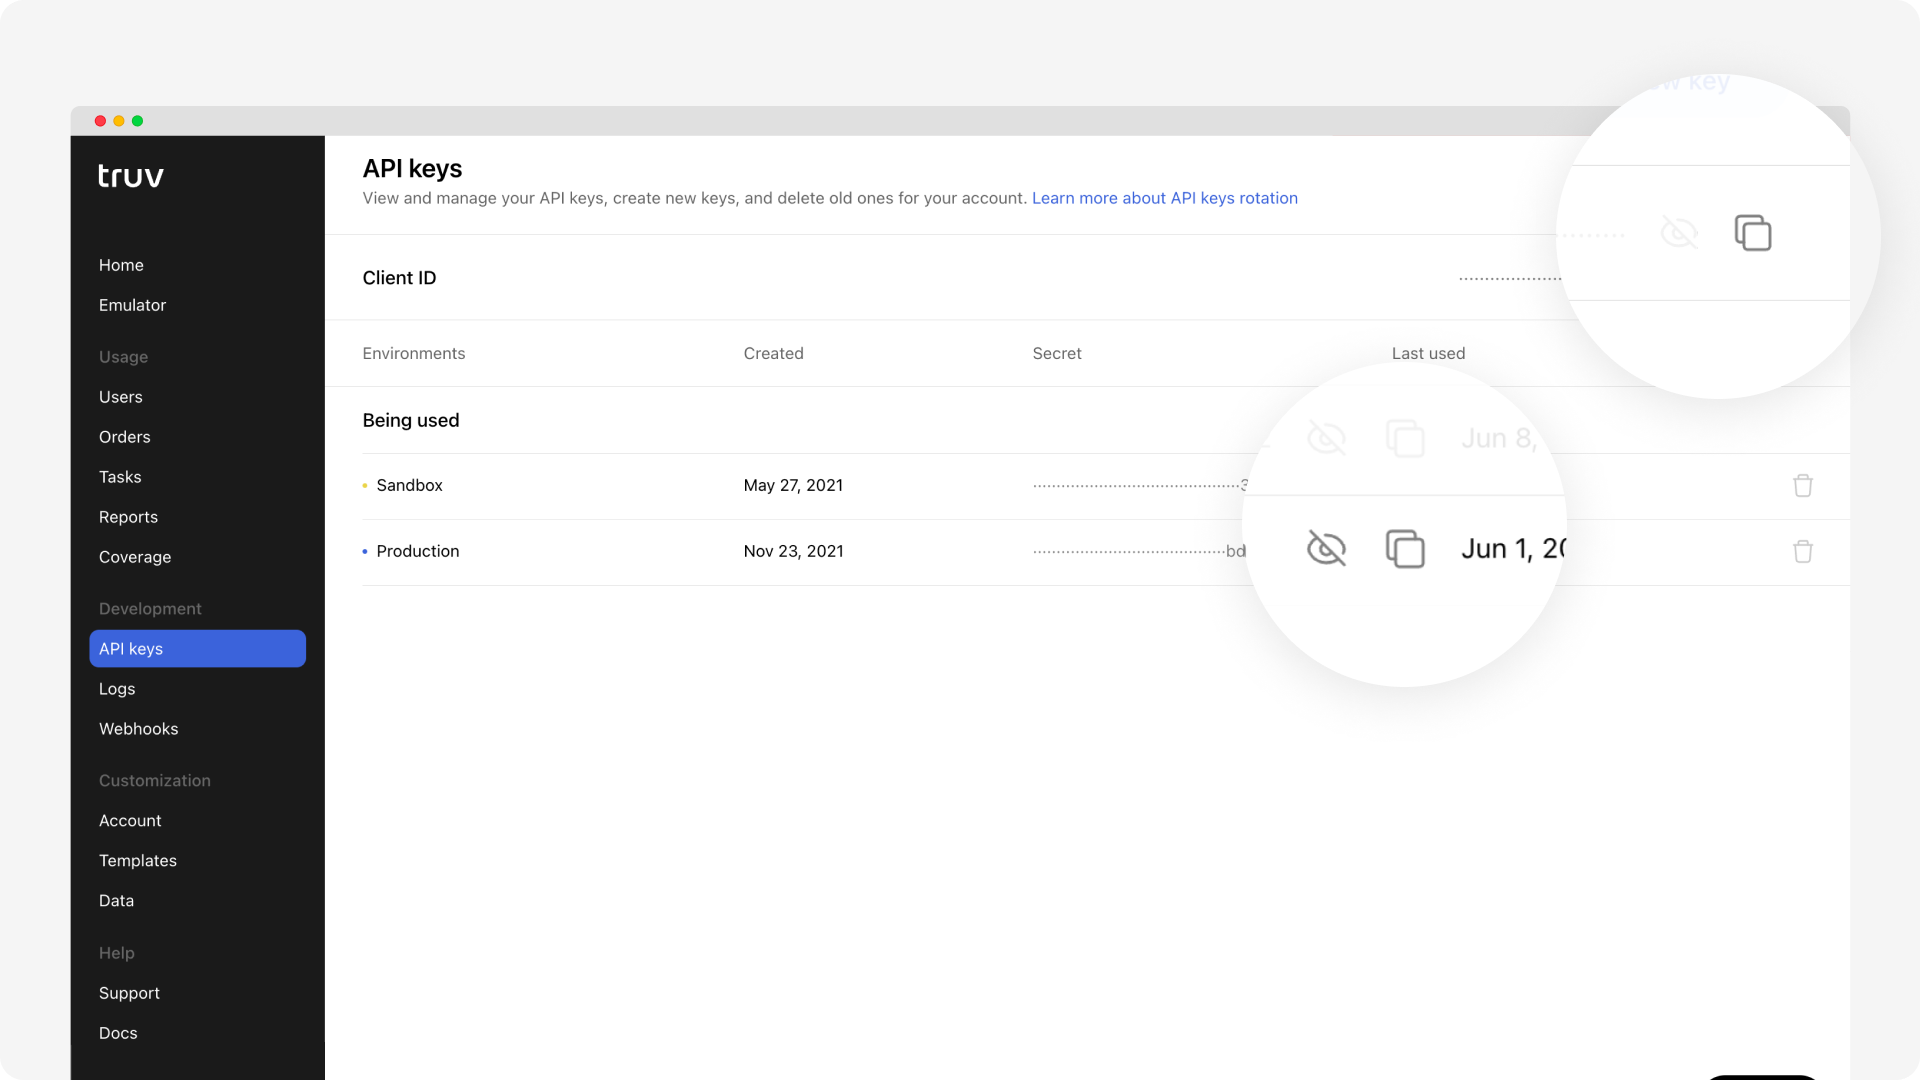
NoteTruv has three environments, sandbox, development, and production. Each requires an associated Access secret for their respective uses. Sandbox is for checking structure and getting sample data, Development is a production-like environment for end to end testing. Confirm your configurations in these environments before moving to Production. Test verifications in the development environment are not billed or limited. For sandbox data, please refer to Truv's Testing page.
Step 6
Navigate back to the Encompass platform for the Services Management section. Select your Truv integration, then select Credentials on the right.

For the Add Company Credentials pop-up, input the Client ID and Access secret for the associated environment and select Save.
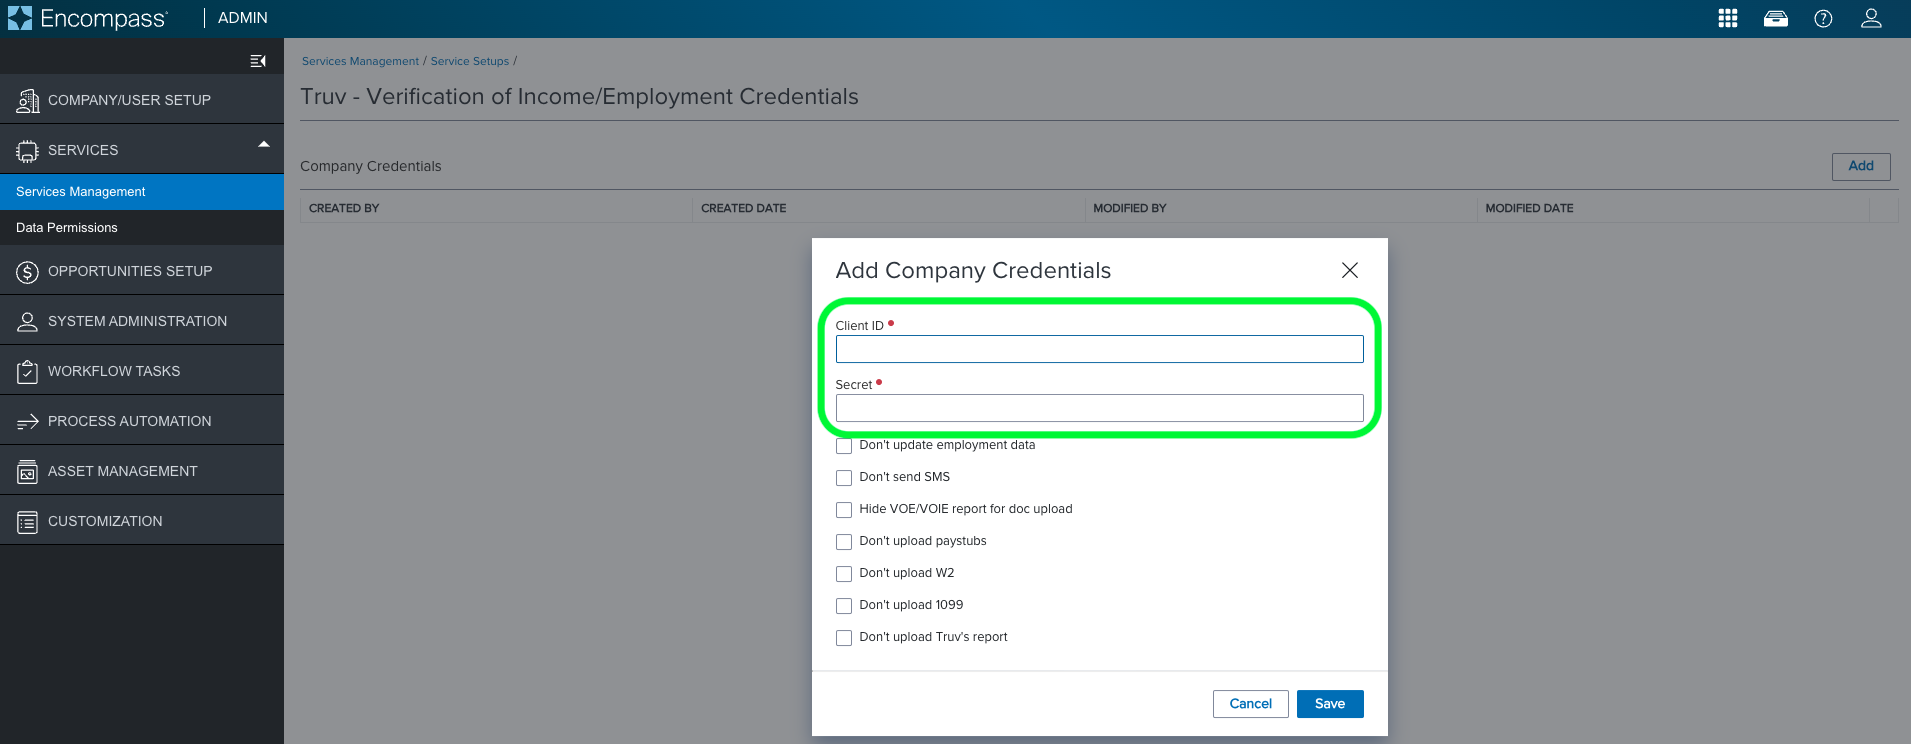
Configuration Settings
Don't update employment data: When checked, this feature allows the Truv verification to be uploaded into Encompass without overwriting the existing employment information in Form 1003. For some customers, it is important to upload the Truv report, paystubs, and W-2s without modifying the existing data in Encompass.
Don't send SMS: When checked, Truv will not send any SMS notifications to the borrower.
Hide VOE/VOIE report for doc upload: When a Truv verification is successful, the Truv report, along with the paystubs and W-2s, is uploaded into Encompass. However, for some customers, if the connection to the payroll provider is unsuccessful, manual document uploads require additional checks. In such cases, they prefer not to upload the Truv report, as it may give a false sense of verification. Instead, they only want the manually uploaded documents to be added to Encompass for the lender's review.
Don't upload paystubs: When checked, PDF paystubs will not be uploaded to Encompass.
Don't upload W2: When checked, PDF W2s will not be uploaded to Encompass.
Don't upload 1099: When checked, PDF 1099s will not be uploaded to Encompass.
Don't upload Truv's report: When checked, the PDF Truv report will not be uploaded to Encompass.
Step 7
Activate the Truv Verification by toggling the Status button for the service setup. If the client_id and access_secret are incorrect, an error message appears when creating an Order.

Success!You've activated Truv for Encompass!
Completing verification requests on Encompass LOConnect
Follow the steps below when an administrator sets Truv up with Encompass. This section helps you submit an income and employment verification request using Truv within Encompass using Orders.
Step 1
Go to PIPELINE tab, open the loan file, select Services, then All Services.
Step 2
Select Order under Verifications and select Truv - Verification of Income/Employment, then select Next.
Step 3
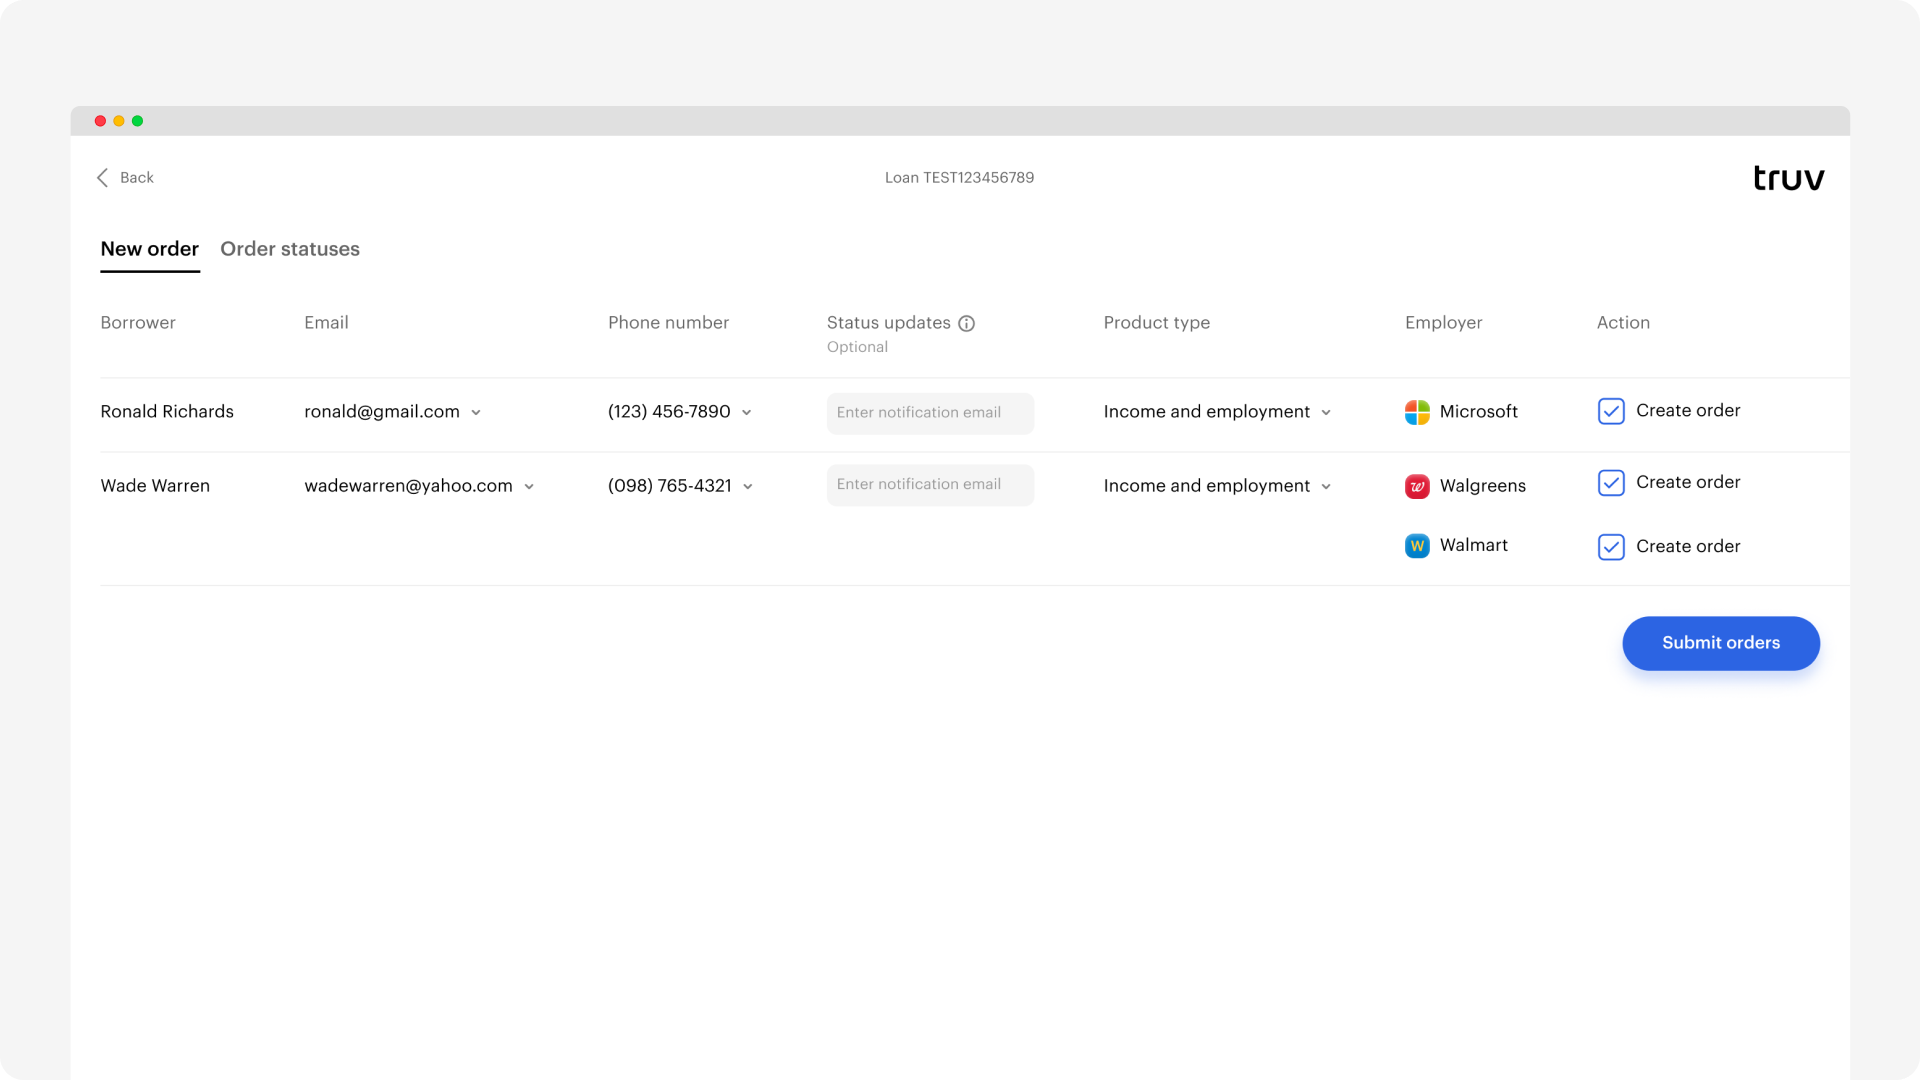
Complete the email address and phone number fields.
- Select an email address for the borrower to receive an email notification from Truv.
- Select a phone number for the borrower to receive an SMS notification from Truv.
- Including a borrower's email and phone number to result in higher conversions. Confirm your borrower's consent before including email and phone number for Orders.
- Under the Status updates column header is an optional field. You can enter additional email addresses for contacts who will receive status update email notifications from Truv.
- Email addresses for the Loan Officer and Loan Processor roles in Encompass can be added by default to receive email status updates, in addition to the order creator, reach out to Truv support for setup assistance.
- Select product type, Employment history for VOE or Income and Employment for VOIE.
- Select up to 5 employers for VOE.
- Select 5 employers for VOIE. Both Income and Employment for this product type are verified.
- Under Action, select the Create Order checkbox.
Step 4
Select Submit. The next page is for Managing reports. This covers all Order statuses and updates for Truv in Encompass.
Success!You'll redirect to the transaction list, and the borrower receives an email with a link to verify Income and Employment instantly.
Customize Order expiration using the Truv Dashboard. Go to Settings, then Branding, Field Name: link_expiry. The Order will expire and the status is marked as Expired in Orders. Borrowers then cannot use the generated link to complete the verification.
The status column reflects the all associated status updates. If an Order has multiple employments, borrowers receive email reminders. Email reminder frequency is every 24 hours for three business days by default. The option to unsubscribe is also available.
NoteUnverified employers appear as
Pendingstatus.
Managing reports
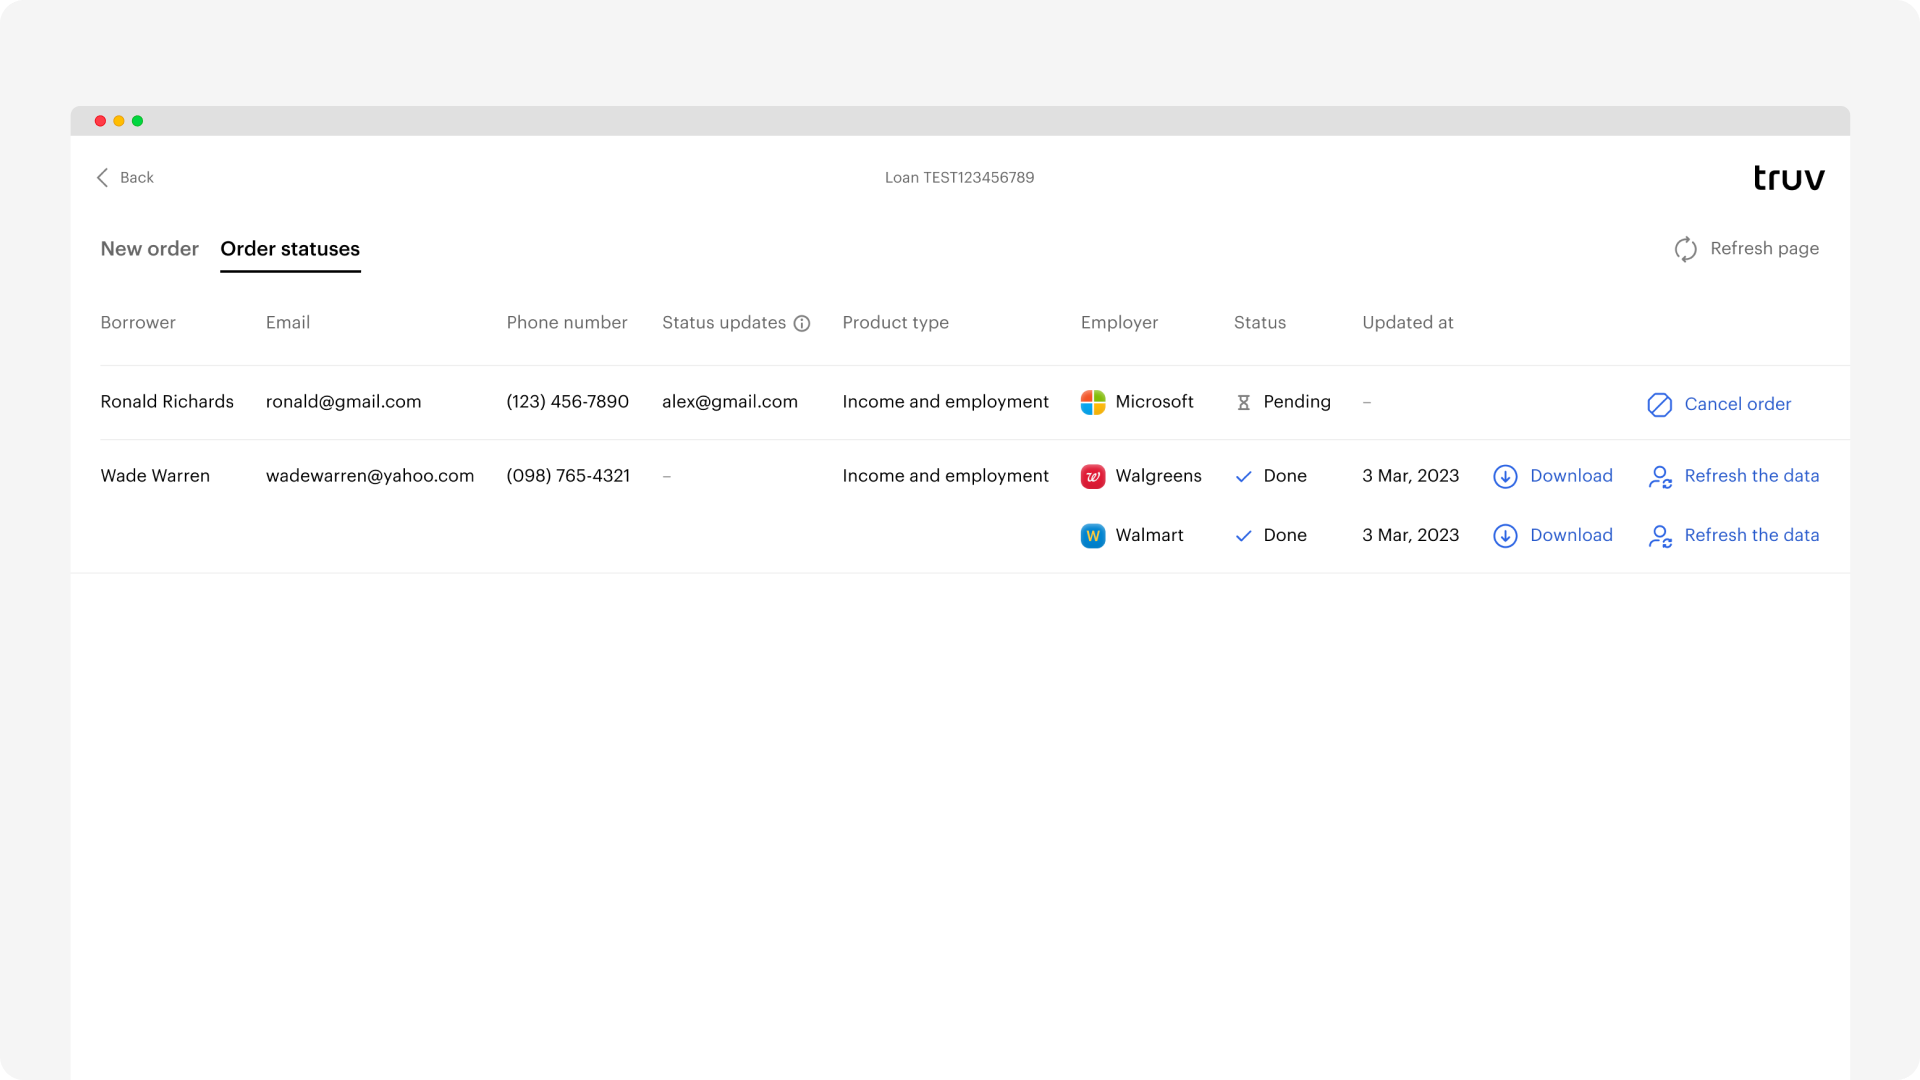
The Order statuses tab covers the options to refresh, download, and cancel reports.
Refresh
Refresh completed VOE or VOIE reports with today’s income and employment information. Select the Refresh the data action to initiate the request. After submitting, the status changes to Pending. The new report with updated data is available when complete.
Download
View completed VOE or VOIE reports by selecting Download button on the Order statuses tab. If the order request includes multiple employments, separate PDFs are generated.
NoteIf the borrower needs to verify multiple employments, the status will remain
pendinguntil all employers are verified. The PDF Truv report, including the Report ID, will only be generated once the entire Truv Order is completed, expired, or cancelled.
Partial Verifications
If the borrower does not verify all employments and the order is expired or cancelled, Truv will generate a report with a Report ID for the verified employer(s).
Cancel
Ordered requests can be cancelled by selecting Cancel order button. This is only possible after an Order is created and in Pending status. Completed and expired orders cannot be cancelled.
Support
Need help? Email [email protected] or contact Truv through your dashboard.
Updated 7 months ago