> ## Documentation Index
> Fetch the complete documentation index at: https://docs.truv.com/llms.txt
> Use this file to discover all available pages before exploring further.
# Customization
> White labeling, eFolder document mapping, status notification routing, and custom field configuration
Truv gives Encompass lenders full control over the borrower experience, document delivery, and notification routing. Customization is managed through Truv Templates in the Dashboard and field mapping in Encompass. No code required.
***
## Access Field Mapping in Encompass
Several sections on this page configure Truv through Encompass's **Field Mapping** panel for the Truv service. Here's how to reach it — each section below tells you exactly which mapping to add once you're there.
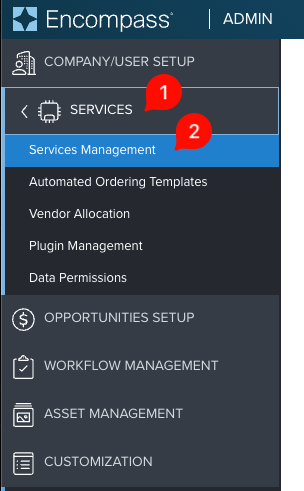
Log into Encompass LO Connect as an administrator. Navigate to **Company/User Setup > Services > Services Management**.
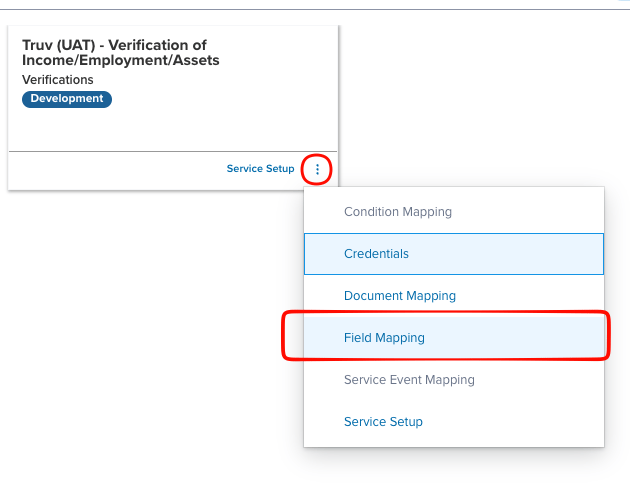
 Locate the **Truv - Verification of Income/Employment/Assets** tile, click the vertical ellipses, and select **Field Mapping**.
 ***
## White Labeling with Truv Templates
Templates let you customize every borrower-facing touchpoint: branding, notifications, the verification widget, returned documents, and fallback behavior. Templates can be scoped to specific business units or branches.
**What you can customize:**
* Logo, accent color, button colors, and background
* Custom text and messaging throughout the flow
* Privacy policy link
* Email and SMS content for initial invite, reminder, and completion messages
* Notification recipients (see [Status Update Recipients](#status-update-recipients) below)
* Link expiration window (default: 72 hours)
* Per-loan personalization via the `{custom_field}` placeholder (see [Wholesale and Correspondent Lender Support](#wholesale-and-correspondent-lender-support) below)
* Employer search configuration and pre-populated employer lists
* Success screen messaging
* Fallback to document upload when payroll connection is unavailable
* Default: 6 most recent paystubs, 3 most recent W-2s, 3 YTD paystubs
* Configurable per product type within the template
**Managing templates:** Navigate to the [Truv Dashboard](https://dashboard.truv.com/app/customization/templates) under **Customization > Templates**. You can create, duplicate, delete, or set a template as the default. To apply a template to an ASO rule, copy the Template ID and paste it into the ASO configuration.
***
## eFolder Document Mapping
Control exactly where each Truv document is routed in the Encompass eFolder.
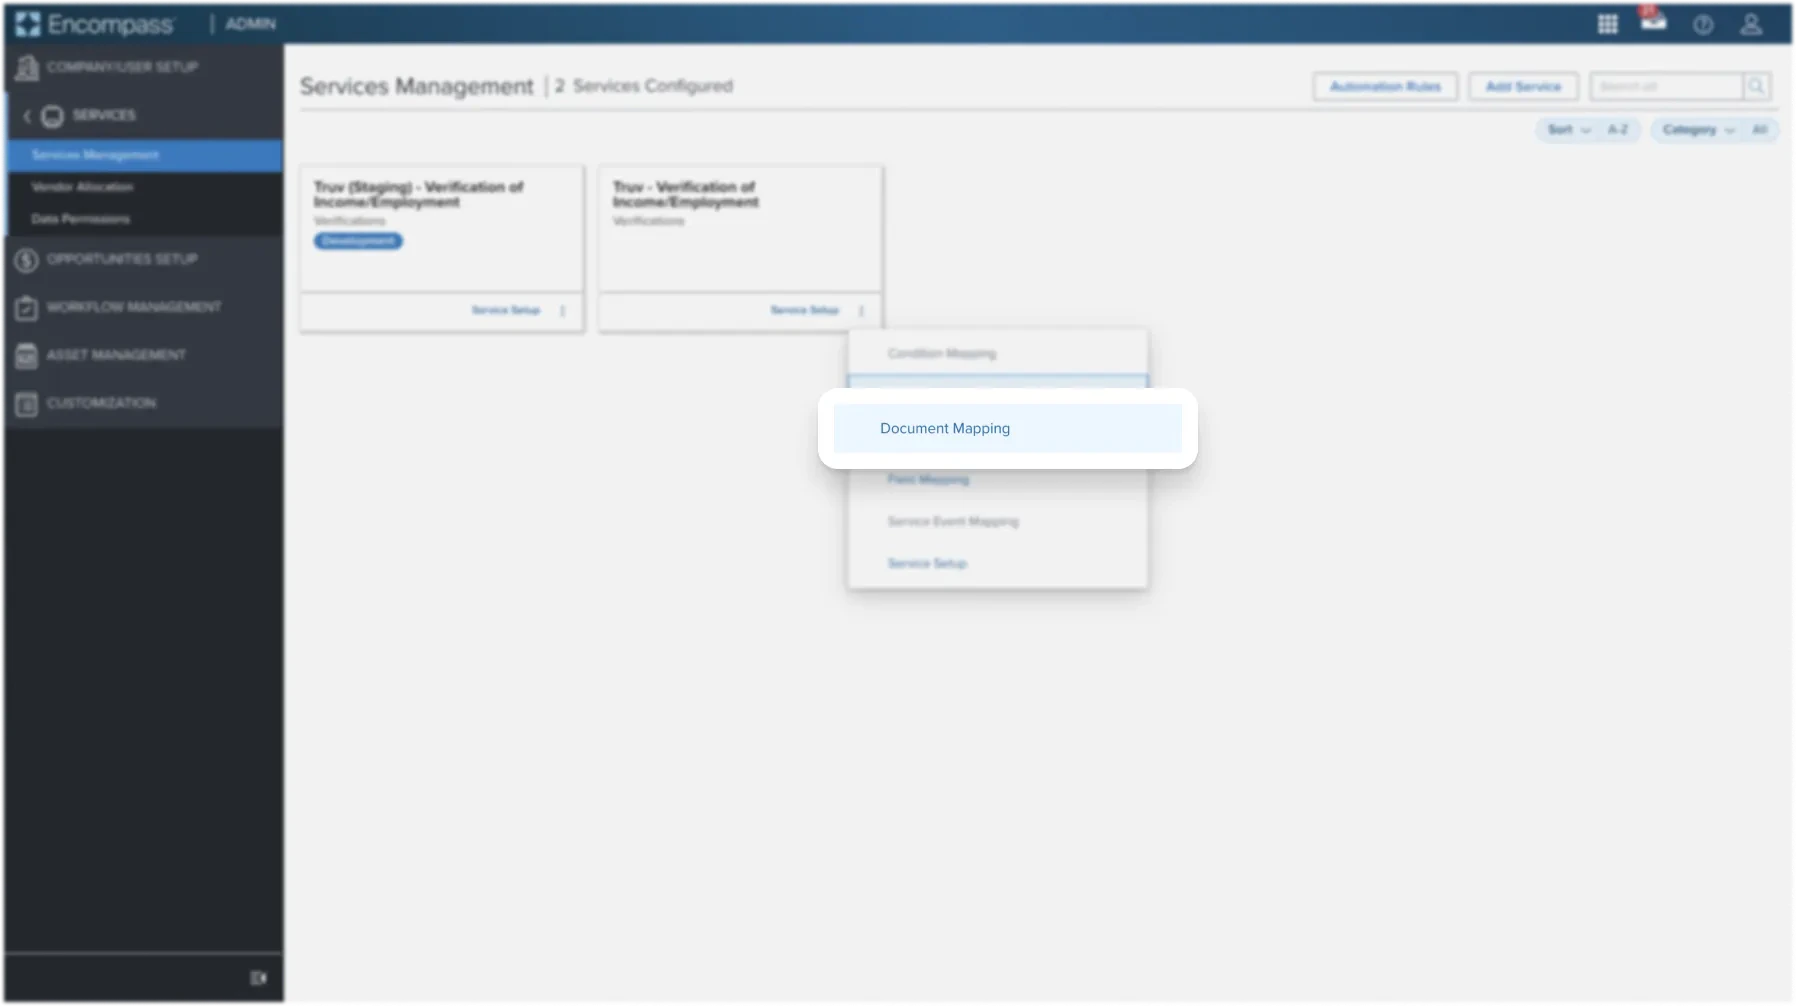
Log into Encompass Web as an administrator. Navigate to **Admin > Services > Services Management**. Find the Truv service tile and click the three dots to select **Document Mapping**.
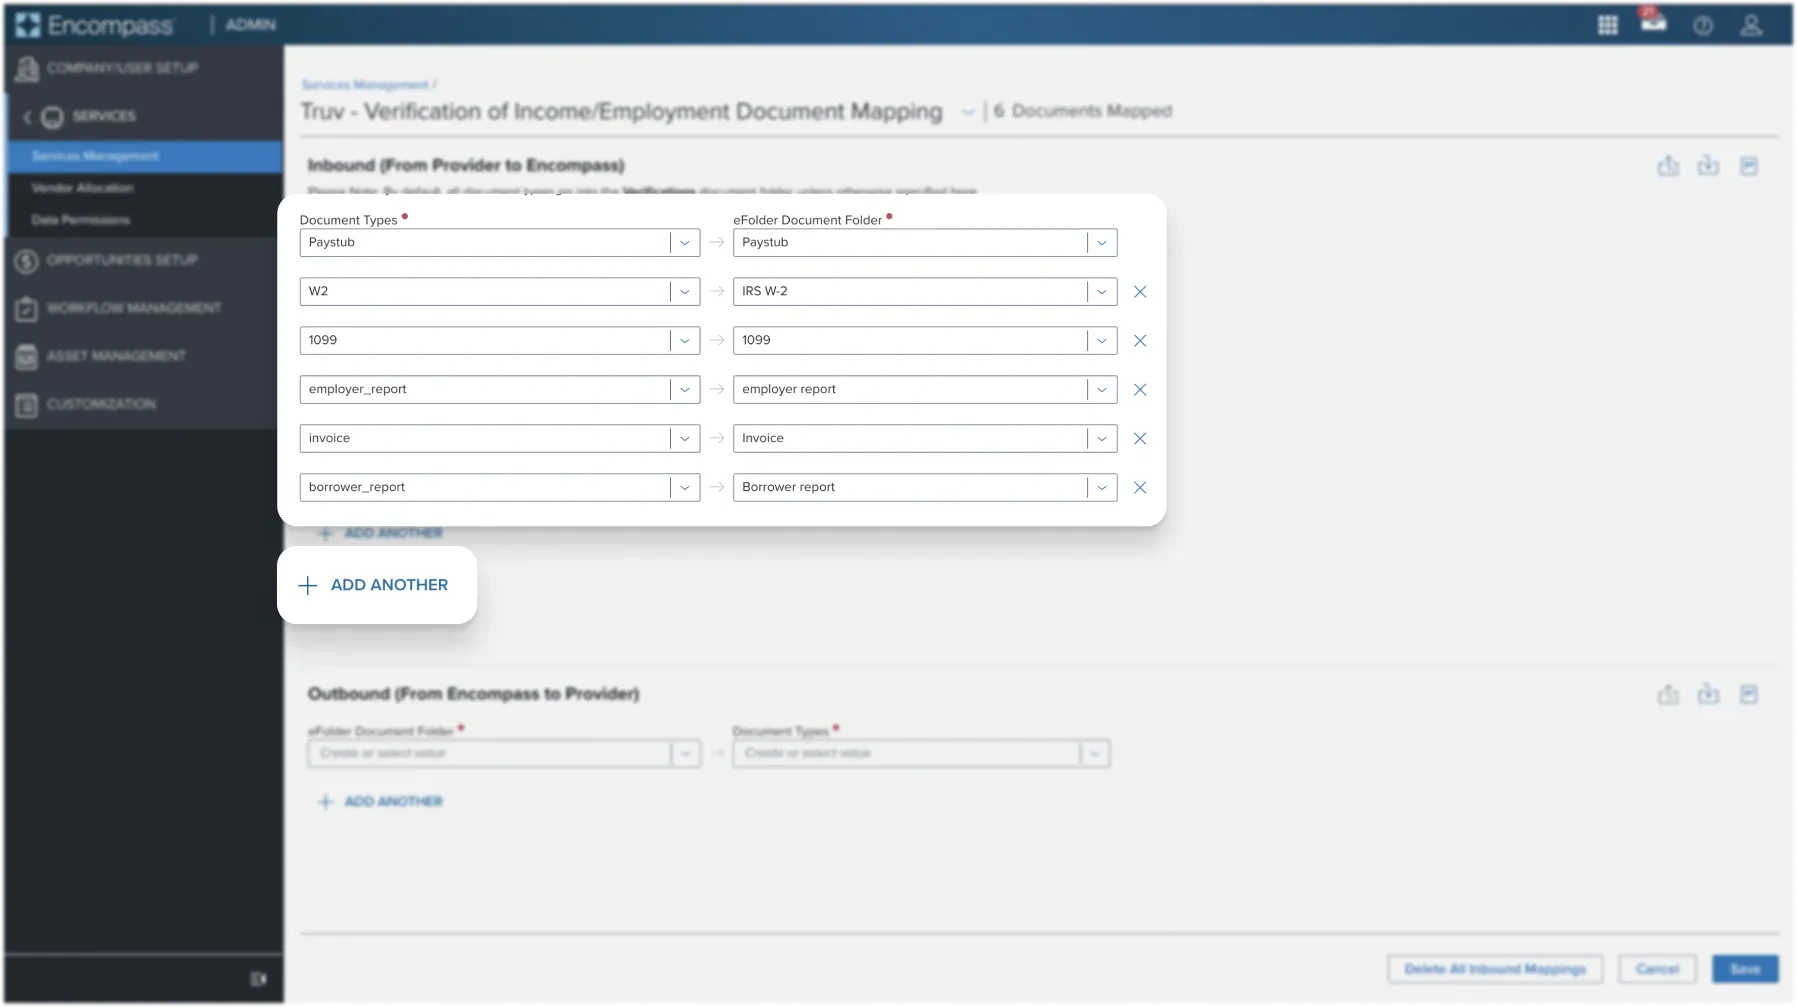
In the Document Mapping panel:
* Enter the **Document Type** on the left (must match exactly, see table below)
* Select the **eFolder destination** on the right
* Click **Add Another** to create additional mappings
* Click **Save** when complete
**Supported document types:**
| Document Type | Description |
| ----------------- | --------------------------------------------------------------- |
| `paystub` | Pay stubs retrieved from the borrower's payroll account |
| `w2` | W-2 documents retrieved from the payroll account |
| `1099` | 1099 tax statements |
| `employer_report` | Employment and income summary for a specific employer |
| `borrower_report` | Comprehensive employment/income summary including the Report ID |
| `invoice` | Service cost itemization |
| `voa_report` | Asset, balance, and transaction data including the Report ID |
Document Type names must match the table exactly. eFolder destination names are customizable to match your Encompass folder structure.
**Routing all documents to Unassigned eFolder:** Instead of mapping specific document types, you can request that all Truv documents route to the **Unassigned** eFolder for manual sorting by your operations team. Contact your Truv Customer Success Manager to enable this option.
***
## White Labeling with Truv Templates
Templates let you customize every borrower-facing touchpoint: branding, notifications, the verification widget, returned documents, and fallback behavior. Templates can be scoped to specific business units or branches.
**What you can customize:**
* Logo, accent color, button colors, and background
* Custom text and messaging throughout the flow
* Privacy policy link
* Email and SMS content for initial invite, reminder, and completion messages
* Notification recipients (see [Status Update Recipients](#status-update-recipients) below)
* Link expiration window (default: 72 hours)
* Per-loan personalization via the `{custom_field}` placeholder (see [Wholesale and Correspondent Lender Support](#wholesale-and-correspondent-lender-support) below)
* Employer search configuration and pre-populated employer lists
* Success screen messaging
* Fallback to document upload when payroll connection is unavailable
* Default: 6 most recent paystubs, 3 most recent W-2s, 3 YTD paystubs
* Configurable per product type within the template
**Managing templates:** Navigate to the [Truv Dashboard](https://dashboard.truv.com/app/customization/templates) under **Customization > Templates**. You can create, duplicate, delete, or set a template as the default. To apply a template to an ASO rule, copy the Template ID and paste it into the ASO configuration.
***
## eFolder Document Mapping
Control exactly where each Truv document is routed in the Encompass eFolder.
Log into Encompass Web as an administrator. Navigate to **Admin > Services > Services Management**. Find the Truv service tile and click the three dots to select **Document Mapping**.
In the Document Mapping panel:
* Enter the **Document Type** on the left (must match exactly, see table below)
* Select the **eFolder destination** on the right
* Click **Add Another** to create additional mappings
* Click **Save** when complete
**Supported document types:**
| Document Type | Description |
| ----------------- | --------------------------------------------------------------- |
| `paystub` | Pay stubs retrieved from the borrower's payroll account |
| `w2` | W-2 documents retrieved from the payroll account |
| `1099` | 1099 tax statements |
| `employer_report` | Employment and income summary for a specific employer |
| `borrower_report` | Comprehensive employment/income summary including the Report ID |
| `invoice` | Service cost itemization |
| `voa_report` | Asset, balance, and transaction data including the Report ID |
Document Type names must match the table exactly. eFolder destination names are customizable to match your Encompass folder structure.
**Routing all documents to Unassigned eFolder:** Instead of mapping specific document types, you can request that all Truv documents route to the **Unassigned** eFolder for manual sorting by your operations team. Contact your Truv Customer Success Manager to enable this option.
 ***
## Status update recipients
Configure which team members receive status notifications at each step of the verification process.
**Four routing options:**
| Option | Description |
| -------------------------------------------------- | ----------------------------------------------------------------------------------------------------------------------------------------------------------------------------------------------------------------------------------- |
| **Loan originator and loan processor on the loan** | Truv reads the loan originator and processor names associated with every loan application to ensure the right loan personnel gets notified of the updates. |
| **Order creator** | Truv recognizes that every organization functions differently and notifications are completely customizable based on your needs. Truv provides you with the optionality to send status updates to the personnel creating the order. |
| **Static distribution list** | Truv provides you with additional customization and the optionality to send status updates to a static distribution list. Clients have the opportunity to update and maintain this in their Account settings in Truv Dashboard. |
| **Custom role** | Truv allows lenders to automatically send status updates to any user or role in the loan file automatically. See our full setup guide below. |
### Mapping a custom role email field
You can map any Encompass field containing an email address to automatically populate the Status updates field. Up to 5 CC recipients are supported — each uses its own provider field name:
| Recipient slot | Provider Field Name |
| -------------- | --------------------------- |
| 1 | `truv_custom_email_field` |
| 2 | `truv_custom_email_field_2` |
| 3 | `truv_custom_email_field_3` |
| 4 | `truv_custom_email_field_4` |
| 5 | `truv_custom_email_field_5` |
Two options:
* **Use an existing field:** any standard, custom, or LR field in your Encompass instance that already contains an email address.
* **Use a dedicated Truv field:** the field-creation payload in [Write order statuses to custom fields](#setup) includes `CX.TruvCustomEmailField` through `CX.TruvCustomEmailField5` — purpose-built fields you can type a CC email address into directly. Using these lets you bulk-import all 5 mappings via the CSV import in that section, instead of mapping each one by hand below.
Open [Field Mapping](#access-field-mapping-in-encompass) for the Truv service. For each recipient you want to CC, add a mapping:
* **Encompass Field ID:** the field chosen or created in step 1
* **Mapping Type:** Maps To
* **Provider Field Name:** the recipient slot's provider field name from the table above
Click **Save**.
Once saved, when the Truv panel opens in Encompass, the emails from the mapped fields are automatically added to the Status updates field for both manual and ASO orders. Invalid or missing emails are skipped without error.
***
## Write order statuses to custom fields
Truv writes order status data for each borrower and product directly into your Encompass loan file, giving your team real-time visibility into verification progress without leaving Encompass.
### Field Structure
For each borrower and product combination, Truv populates two custom fields:
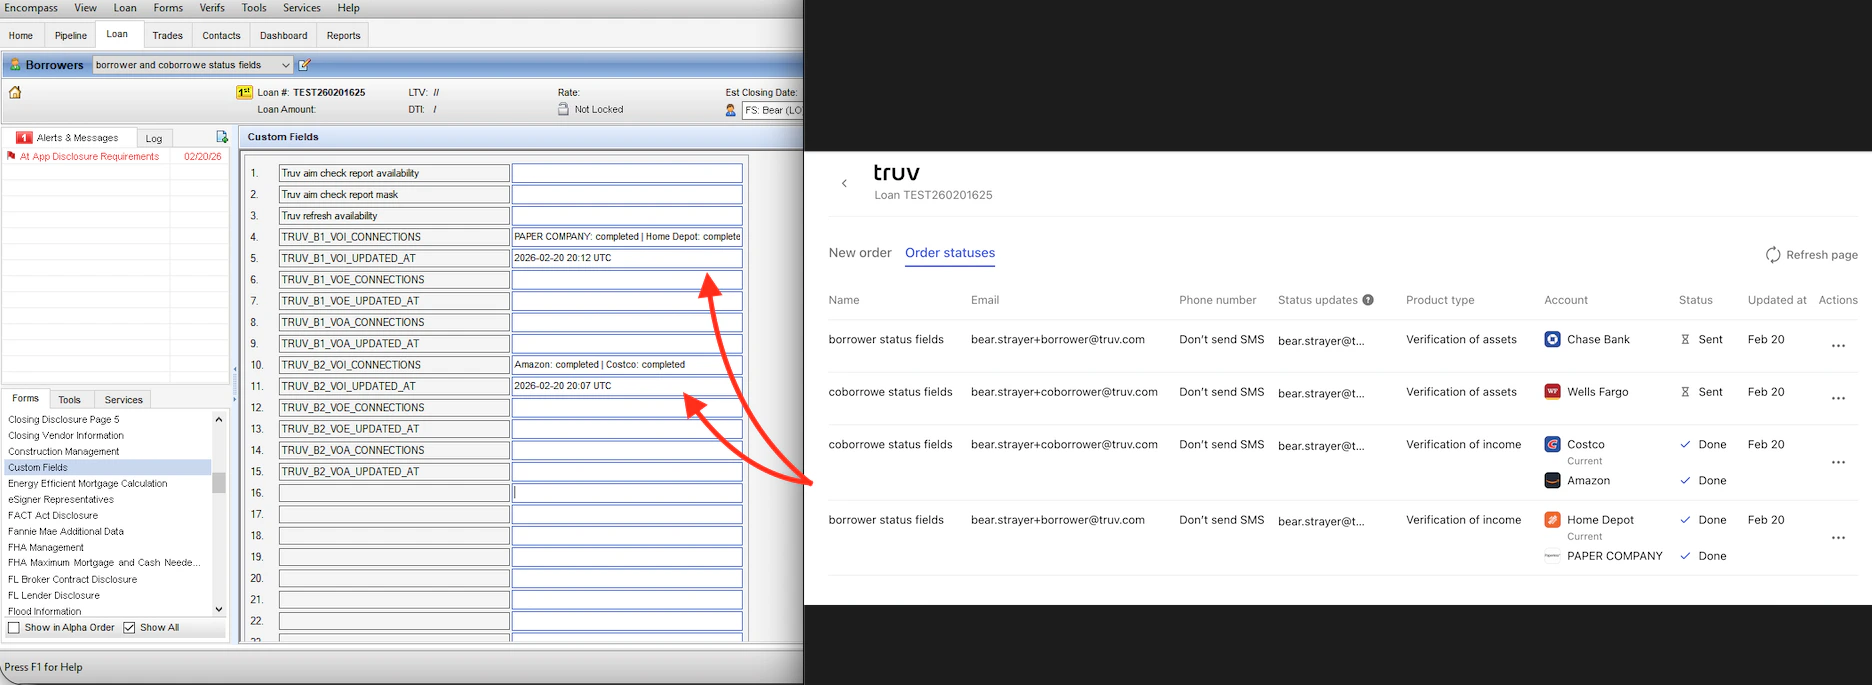
* **Connections**: a pipe-delimited list of employers or financial institutions and their current statuses, in the format: `[Employer]: [Status] | [Employer2]: [Status]`
* **Last Updated**: the timestamp the Connections field was last updated, in the format `YYYY-MM-DD HH:MM UTC`
Up to 8 borrowers are supported per loan, across three products (VOI, VOE, VOA), for a maximum of 48 custom fields per loan file.
All custom fields must be configured as **STRING** format in Encompass.
### Which product populates which field
Income verification always includes employment data — there's no way to order income without it. Employment, on its own, can be ordered separately without income. The field name reflects that:
| Ordered product | Fields populated |
| ----------------------------------------------- | -------------------------------------- |
| Income and employment (VOI) | `_VOI_CONNECTIONS` / `_VOI_UPDATED_AT` |
| Employment only (VOE) | `_VOE_CONNECTIONS` / `_VOE_UPDATED_AT` |
| Income (and employment) & Assets (VOI + VOA) | Both the `_VOI_` and `_VOA_` fields |
| Assets (VOA) | `_VOA_CONNECTIONS` / `_VOA_UPDATED_AT` |
| Deposit-based Verification of Employment (DVOE) | `_VOA_CONNECTIONS` / `_VOA_UPDATED_AT` |
Because income orders always include employment data but only populate the `_VOI_` fields, mapping the `_VOE_` fields for an income order is the most common cause of "my custom fields aren't populating" support tickets. If your loan team orders income verification, map the `_VOI_` fields — even though employment data is included.
### Field reference
Each per-borrower field name follows the pattern `TRUV_B{slot}_{PRODUCT}_CONNECTIONS` / `TRUV_B{slot}_{PRODUCT}_UPDATED_AT`, where `{PRODUCT}` is `VOI`, `VOE`, or `VOA` per the mapping above:
| Slot | Borrower |
| ---- | ------------ |
| B1 | Borrower 1 |
| B2 | Coborrower 1 |
| B3 | Borrower 2 |
| B4 | Coborrower 2 |
| B5 | Borrower 3 |
| B6 | Coborrower 3 |
| B7 | Borrower 4 |
| B8 | Coborrower 4 |
For example, Coborrower 1's VOA fields are `TRUV_B2_VOA_CONNECTIONS` and `TRUV_B2_VOA_UPDATED_AT`.
| Borrower | Ordered product | Connections Field | Last Updated Field |
| ------------ | --------------------------- | ------------------------- | ------------------------ |
| Borrower 1 | Income and employment (VOI) | `TRUV_B1_VOI_CONNECTIONS` | `TRUV_B1_VOI_UPDATED_AT` |
| Borrower 1 | Employment only (VOE) | `TRUV_B1_VOE_CONNECTIONS` | `TRUV_B1_VOE_UPDATED_AT` |
| Borrower 1 | Assets, VOI + VOA, or DVOE | `TRUV_B1_VOA_CONNECTIONS` | `TRUV_B1_VOA_UPDATED_AT` |
| Coborrower 1 | Income and employment (VOI) | `TRUV_B2_VOI_CONNECTIONS` | `TRUV_B2_VOI_UPDATED_AT` |
| Coborrower 1 | Employment only (VOE) | `TRUV_B2_VOE_CONNECTIONS` | `TRUV_B2_VOE_UPDATED_AT` |
| Coborrower 1 | Assets, VOI + VOA, or DVOE | `TRUV_B2_VOA_CONNECTIONS` | `TRUV_B2_VOA_UPDATED_AT` |
| Borrower 2 | Income and employment (VOI) | `TRUV_B3_VOI_CONNECTIONS` | `TRUV_B3_VOI_UPDATED_AT` |
| Borrower 2 | Employment only (VOE) | `TRUV_B3_VOE_CONNECTIONS` | `TRUV_B3_VOE_UPDATED_AT` |
| Borrower 2 | Assets, VOI + VOA, or DVOE | `TRUV_B3_VOA_CONNECTIONS` | `TRUV_B3_VOA_UPDATED_AT` |
| Coborrower 2 | Income and employment (VOI) | `TRUV_B4_VOI_CONNECTIONS` | `TRUV_B4_VOI_UPDATED_AT` |
| Coborrower 2 | Employment only (VOE) | `TRUV_B4_VOE_CONNECTIONS` | `TRUV_B4_VOE_UPDATED_AT` |
| Coborrower 2 | Assets, VOI + VOA, or DVOE | `TRUV_B4_VOA_CONNECTIONS` | `TRUV_B4_VOA_UPDATED_AT` |
| Borrower 3 | Income and employment (VOI) | `TRUV_B5_VOI_CONNECTIONS` | `TRUV_B5_VOI_UPDATED_AT` |
| Borrower 3 | Employment only (VOE) | `TRUV_B5_VOE_CONNECTIONS` | `TRUV_B5_VOE_UPDATED_AT` |
| Borrower 3 | Assets, VOI + VOA, or DVOE | `TRUV_B5_VOA_CONNECTIONS` | `TRUV_B5_VOA_UPDATED_AT` |
| Coborrower 3 | Income and employment (VOI) | `TRUV_B6_VOI_CONNECTIONS` | `TRUV_B6_VOI_UPDATED_AT` |
| Coborrower 3 | Employment only (VOE) | `TRUV_B6_VOE_CONNECTIONS` | `TRUV_B6_VOE_UPDATED_AT` |
| Coborrower 3 | Assets, VOI + VOA, or DVOE | `TRUV_B6_VOA_CONNECTIONS` | `TRUV_B6_VOA_UPDATED_AT` |
| Borrower 4 | Income and employment (VOI) | `TRUV_B7_VOI_CONNECTIONS` | `TRUV_B7_VOI_UPDATED_AT` |
| Borrower 4 | Employment only (VOE) | `TRUV_B7_VOE_CONNECTIONS` | `TRUV_B7_VOE_UPDATED_AT` |
| Borrower 4 | Assets, VOI + VOA, or DVOE | `TRUV_B7_VOA_CONNECTIONS` | `TRUV_B7_VOA_UPDATED_AT` |
| Coborrower 4 | Income and employment (VOI) | `TRUV_B8_VOI_CONNECTIONS` | `TRUV_B8_VOI_UPDATED_AT` |
| Coborrower 4 | Employment only (VOE) | `TRUV_B8_VOE_CONNECTIONS` | `TRUV_B8_VOE_UPDATED_AT` |
| Coborrower 4 | Assets, VOI + VOA, or DVOE | `TRUV_B8_VOA_CONNECTIONS` | `TRUV_B8_VOA_UPDATED_AT` |
Beyond the per-borrower fields, Truv writes a few other fields back into Encompass:
| Provider Field Name | Mapping Type | Description |
| --------------------- | ------------ | ------------------------------------------------------------------------------------------------------------------------------------------------------------------------------------------------------------------------------------------------------------------------------------------------------------------------------------------------------------------------------------------------------------------------------------------------------------------------------------------------------------------------ |
| `truv_user_ids` | Maps From | Comma-separated Truv User IDs for all borrowers/coborrowers, in fixed order: `[borrower_1], [coborrower_1], [borrower_2], [coborrower_2], [borrower_3], [coborrower_3], [borrower_4], [coborrower_4]`. If a higher-numbered borrower populates before a lower-numbered one, empty positions are held with commas. Useful for referencing the User ID or calling Truv endpoints that require one, such as [Retrieve an income and employment report](/api-reference/user-income-and-employment-reports/users_get_report). |
| `partnerStatus` | Maps Between | Latest status across all Truv orders on the loan file (e.g. Order Accepted, Order Completed, Order Delivery Error). Null until the first order is created. |
| `aim_check_available` | Maps Between | Comma-delimited borrower full names for whom the Freddie Mac [AIM Check](/mortgage/integration/ice-encompass/aim-check) report is available. Used in ASO Automated Readiness Conditions. |
The downloadable payload and mapping CSV in Setup below cover every field in both tables — you don't need to type any of these out by hand.
### Setup
See [Access Field Mapping in Encompass](#access-field-mapping-in-encompass) above.
Before you can map anything, the custom fields must exist in Encompass if standard fields are not being used. Truv has put together a full list of custom fields matching every writeback field, ready for lenders to use as-is. Choose one:
* **Bulk, one API call:** download the payload below and send it to ICE's Encompass Developer Connect API in a single request — see [Automate custom field setup](#automate-custom-field-setup-with-the-encompass-api-server-side) below.
* **Individually:** in Encompass SmartClient, go to **Settings > Loan Setup > Loan Custom Fields** and add each field by hand.
encompass-truv-custom-fields-payload.json
Once the custom fields exist or standard fields are identified, map them. Choose one:
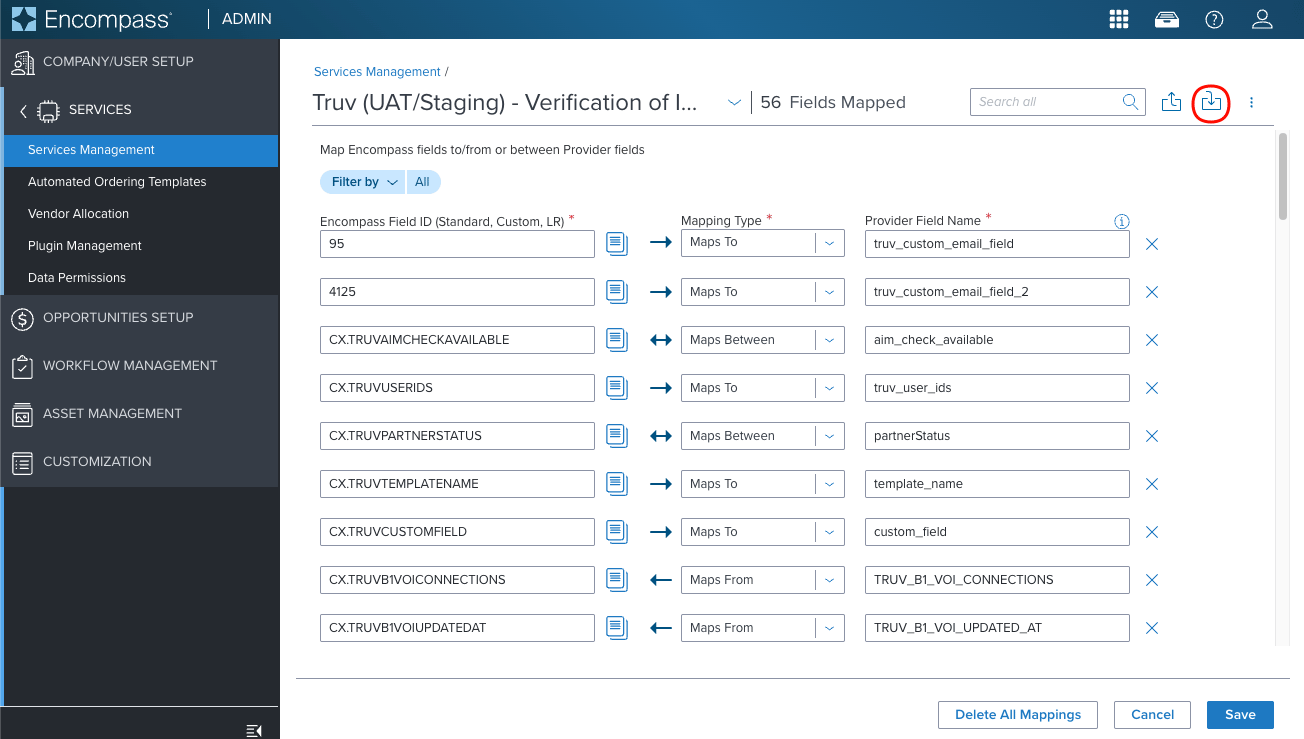
* **Bulk, one import:** download the CSV below, then in the Field Mapping panel you opened in step 1, click the import icon (the downward-arrow icon next to the search bar, to the right of the export icon) to load every mapping at once.
***
## Status update recipients
Configure which team members receive status notifications at each step of the verification process.
**Four routing options:**
| Option | Description |
| -------------------------------------------------- | ----------------------------------------------------------------------------------------------------------------------------------------------------------------------------------------------------------------------------------- |
| **Loan originator and loan processor on the loan** | Truv reads the loan originator and processor names associated with every loan application to ensure the right loan personnel gets notified of the updates. |
| **Order creator** | Truv recognizes that every organization functions differently and notifications are completely customizable based on your needs. Truv provides you with the optionality to send status updates to the personnel creating the order. |
| **Static distribution list** | Truv provides you with additional customization and the optionality to send status updates to a static distribution list. Clients have the opportunity to update and maintain this in their Account settings in Truv Dashboard. |
| **Custom role** | Truv allows lenders to automatically send status updates to any user or role in the loan file automatically. See our full setup guide below. |
### Mapping a custom role email field
You can map any Encompass field containing an email address to automatically populate the Status updates field. Up to 5 CC recipients are supported — each uses its own provider field name:
| Recipient slot | Provider Field Name |
| -------------- | --------------------------- |
| 1 | `truv_custom_email_field` |
| 2 | `truv_custom_email_field_2` |
| 3 | `truv_custom_email_field_3` |
| 4 | `truv_custom_email_field_4` |
| 5 | `truv_custom_email_field_5` |
Two options:
* **Use an existing field:** any standard, custom, or LR field in your Encompass instance that already contains an email address.
* **Use a dedicated Truv field:** the field-creation payload in [Write order statuses to custom fields](#setup) includes `CX.TruvCustomEmailField` through `CX.TruvCustomEmailField5` — purpose-built fields you can type a CC email address into directly. Using these lets you bulk-import all 5 mappings via the CSV import in that section, instead of mapping each one by hand below.
Open [Field Mapping](#access-field-mapping-in-encompass) for the Truv service. For each recipient you want to CC, add a mapping:
* **Encompass Field ID:** the field chosen or created in step 1
* **Mapping Type:** Maps To
* **Provider Field Name:** the recipient slot's provider field name from the table above
Click **Save**.
Once saved, when the Truv panel opens in Encompass, the emails from the mapped fields are automatically added to the Status updates field for both manual and ASO orders. Invalid or missing emails are skipped without error.
***
## Write order statuses to custom fields
Truv writes order status data for each borrower and product directly into your Encompass loan file, giving your team real-time visibility into verification progress without leaving Encompass.
### Field Structure
For each borrower and product combination, Truv populates two custom fields:
* **Connections**: a pipe-delimited list of employers or financial institutions and their current statuses, in the format: `[Employer]: [Status] | [Employer2]: [Status]`
* **Last Updated**: the timestamp the Connections field was last updated, in the format `YYYY-MM-DD HH:MM UTC`
Up to 8 borrowers are supported per loan, across three products (VOI, VOE, VOA), for a maximum of 48 custom fields per loan file.
All custom fields must be configured as **STRING** format in Encompass.
### Which product populates which field
Income verification always includes employment data — there's no way to order income without it. Employment, on its own, can be ordered separately without income. The field name reflects that:
| Ordered product | Fields populated |
| ----------------------------------------------- | -------------------------------------- |
| Income and employment (VOI) | `_VOI_CONNECTIONS` / `_VOI_UPDATED_AT` |
| Employment only (VOE) | `_VOE_CONNECTIONS` / `_VOE_UPDATED_AT` |
| Income (and employment) & Assets (VOI + VOA) | Both the `_VOI_` and `_VOA_` fields |
| Assets (VOA) | `_VOA_CONNECTIONS` / `_VOA_UPDATED_AT` |
| Deposit-based Verification of Employment (DVOE) | `_VOA_CONNECTIONS` / `_VOA_UPDATED_AT` |
Because income orders always include employment data but only populate the `_VOI_` fields, mapping the `_VOE_` fields for an income order is the most common cause of "my custom fields aren't populating" support tickets. If your loan team orders income verification, map the `_VOI_` fields — even though employment data is included.
### Field reference
Each per-borrower field name follows the pattern `TRUV_B{slot}_{PRODUCT}_CONNECTIONS` / `TRUV_B{slot}_{PRODUCT}_UPDATED_AT`, where `{PRODUCT}` is `VOI`, `VOE`, or `VOA` per the mapping above:
| Slot | Borrower |
| ---- | ------------ |
| B1 | Borrower 1 |
| B2 | Coborrower 1 |
| B3 | Borrower 2 |
| B4 | Coborrower 2 |
| B5 | Borrower 3 |
| B6 | Coborrower 3 |
| B7 | Borrower 4 |
| B8 | Coborrower 4 |
For example, Coborrower 1's VOA fields are `TRUV_B2_VOA_CONNECTIONS` and `TRUV_B2_VOA_UPDATED_AT`.
| Borrower | Ordered product | Connections Field | Last Updated Field |
| ------------ | --------------------------- | ------------------------- | ------------------------ |
| Borrower 1 | Income and employment (VOI) | `TRUV_B1_VOI_CONNECTIONS` | `TRUV_B1_VOI_UPDATED_AT` |
| Borrower 1 | Employment only (VOE) | `TRUV_B1_VOE_CONNECTIONS` | `TRUV_B1_VOE_UPDATED_AT` |
| Borrower 1 | Assets, VOI + VOA, or DVOE | `TRUV_B1_VOA_CONNECTIONS` | `TRUV_B1_VOA_UPDATED_AT` |
| Coborrower 1 | Income and employment (VOI) | `TRUV_B2_VOI_CONNECTIONS` | `TRUV_B2_VOI_UPDATED_AT` |
| Coborrower 1 | Employment only (VOE) | `TRUV_B2_VOE_CONNECTIONS` | `TRUV_B2_VOE_UPDATED_AT` |
| Coborrower 1 | Assets, VOI + VOA, or DVOE | `TRUV_B2_VOA_CONNECTIONS` | `TRUV_B2_VOA_UPDATED_AT` |
| Borrower 2 | Income and employment (VOI) | `TRUV_B3_VOI_CONNECTIONS` | `TRUV_B3_VOI_UPDATED_AT` |
| Borrower 2 | Employment only (VOE) | `TRUV_B3_VOE_CONNECTIONS` | `TRUV_B3_VOE_UPDATED_AT` |
| Borrower 2 | Assets, VOI + VOA, or DVOE | `TRUV_B3_VOA_CONNECTIONS` | `TRUV_B3_VOA_UPDATED_AT` |
| Coborrower 2 | Income and employment (VOI) | `TRUV_B4_VOI_CONNECTIONS` | `TRUV_B4_VOI_UPDATED_AT` |
| Coborrower 2 | Employment only (VOE) | `TRUV_B4_VOE_CONNECTIONS` | `TRUV_B4_VOE_UPDATED_AT` |
| Coborrower 2 | Assets, VOI + VOA, or DVOE | `TRUV_B4_VOA_CONNECTIONS` | `TRUV_B4_VOA_UPDATED_AT` |
| Borrower 3 | Income and employment (VOI) | `TRUV_B5_VOI_CONNECTIONS` | `TRUV_B5_VOI_UPDATED_AT` |
| Borrower 3 | Employment only (VOE) | `TRUV_B5_VOE_CONNECTIONS` | `TRUV_B5_VOE_UPDATED_AT` |
| Borrower 3 | Assets, VOI + VOA, or DVOE | `TRUV_B5_VOA_CONNECTIONS` | `TRUV_B5_VOA_UPDATED_AT` |
| Coborrower 3 | Income and employment (VOI) | `TRUV_B6_VOI_CONNECTIONS` | `TRUV_B6_VOI_UPDATED_AT` |
| Coborrower 3 | Employment only (VOE) | `TRUV_B6_VOE_CONNECTIONS` | `TRUV_B6_VOE_UPDATED_AT` |
| Coborrower 3 | Assets, VOI + VOA, or DVOE | `TRUV_B6_VOA_CONNECTIONS` | `TRUV_B6_VOA_UPDATED_AT` |
| Borrower 4 | Income and employment (VOI) | `TRUV_B7_VOI_CONNECTIONS` | `TRUV_B7_VOI_UPDATED_AT` |
| Borrower 4 | Employment only (VOE) | `TRUV_B7_VOE_CONNECTIONS` | `TRUV_B7_VOE_UPDATED_AT` |
| Borrower 4 | Assets, VOI + VOA, or DVOE | `TRUV_B7_VOA_CONNECTIONS` | `TRUV_B7_VOA_UPDATED_AT` |
| Coborrower 4 | Income and employment (VOI) | `TRUV_B8_VOI_CONNECTIONS` | `TRUV_B8_VOI_UPDATED_AT` |
| Coborrower 4 | Employment only (VOE) | `TRUV_B8_VOE_CONNECTIONS` | `TRUV_B8_VOE_UPDATED_AT` |
| Coborrower 4 | Assets, VOI + VOA, or DVOE | `TRUV_B8_VOA_CONNECTIONS` | `TRUV_B8_VOA_UPDATED_AT` |
Beyond the per-borrower fields, Truv writes a few other fields back into Encompass:
| Provider Field Name | Mapping Type | Description |
| --------------------- | ------------ | ------------------------------------------------------------------------------------------------------------------------------------------------------------------------------------------------------------------------------------------------------------------------------------------------------------------------------------------------------------------------------------------------------------------------------------------------------------------------------------------------------------------------ |
| `truv_user_ids` | Maps From | Comma-separated Truv User IDs for all borrowers/coborrowers, in fixed order: `[borrower_1], [coborrower_1], [borrower_2], [coborrower_2], [borrower_3], [coborrower_3], [borrower_4], [coborrower_4]`. If a higher-numbered borrower populates before a lower-numbered one, empty positions are held with commas. Useful for referencing the User ID or calling Truv endpoints that require one, such as [Retrieve an income and employment report](/api-reference/user-income-and-employment-reports/users_get_report). |
| `partnerStatus` | Maps Between | Latest status across all Truv orders on the loan file (e.g. Order Accepted, Order Completed, Order Delivery Error). Null until the first order is created. |
| `aim_check_available` | Maps Between | Comma-delimited borrower full names for whom the Freddie Mac [AIM Check](/mortgage/integration/ice-encompass/aim-check) report is available. Used in ASO Automated Readiness Conditions. |
The downloadable payload and mapping CSV in Setup below cover every field in both tables — you don't need to type any of these out by hand.
### Setup
See [Access Field Mapping in Encompass](#access-field-mapping-in-encompass) above.
Before you can map anything, the custom fields must exist in Encompass if standard fields are not being used. Truv has put together a full list of custom fields matching every writeback field, ready for lenders to use as-is. Choose one:
* **Bulk, one API call:** download the payload below and send it to ICE's Encompass Developer Connect API in a single request — see [Automate custom field setup](#automate-custom-field-setup-with-the-encompass-api-server-side) below.
* **Individually:** in Encompass SmartClient, go to **Settings > Loan Setup > Loan Custom Fields** and add each field by hand.
encompass-truv-custom-fields-payload.json
Once the custom fields exist or standard fields are identified, map them. Choose one:
* **Bulk, one import:** download the CSV below, then in the Field Mapping panel you opened in step 1, click the import icon (the downward-arrow icon next to the search bar, to the right of the export icon) to load every mapping at once.
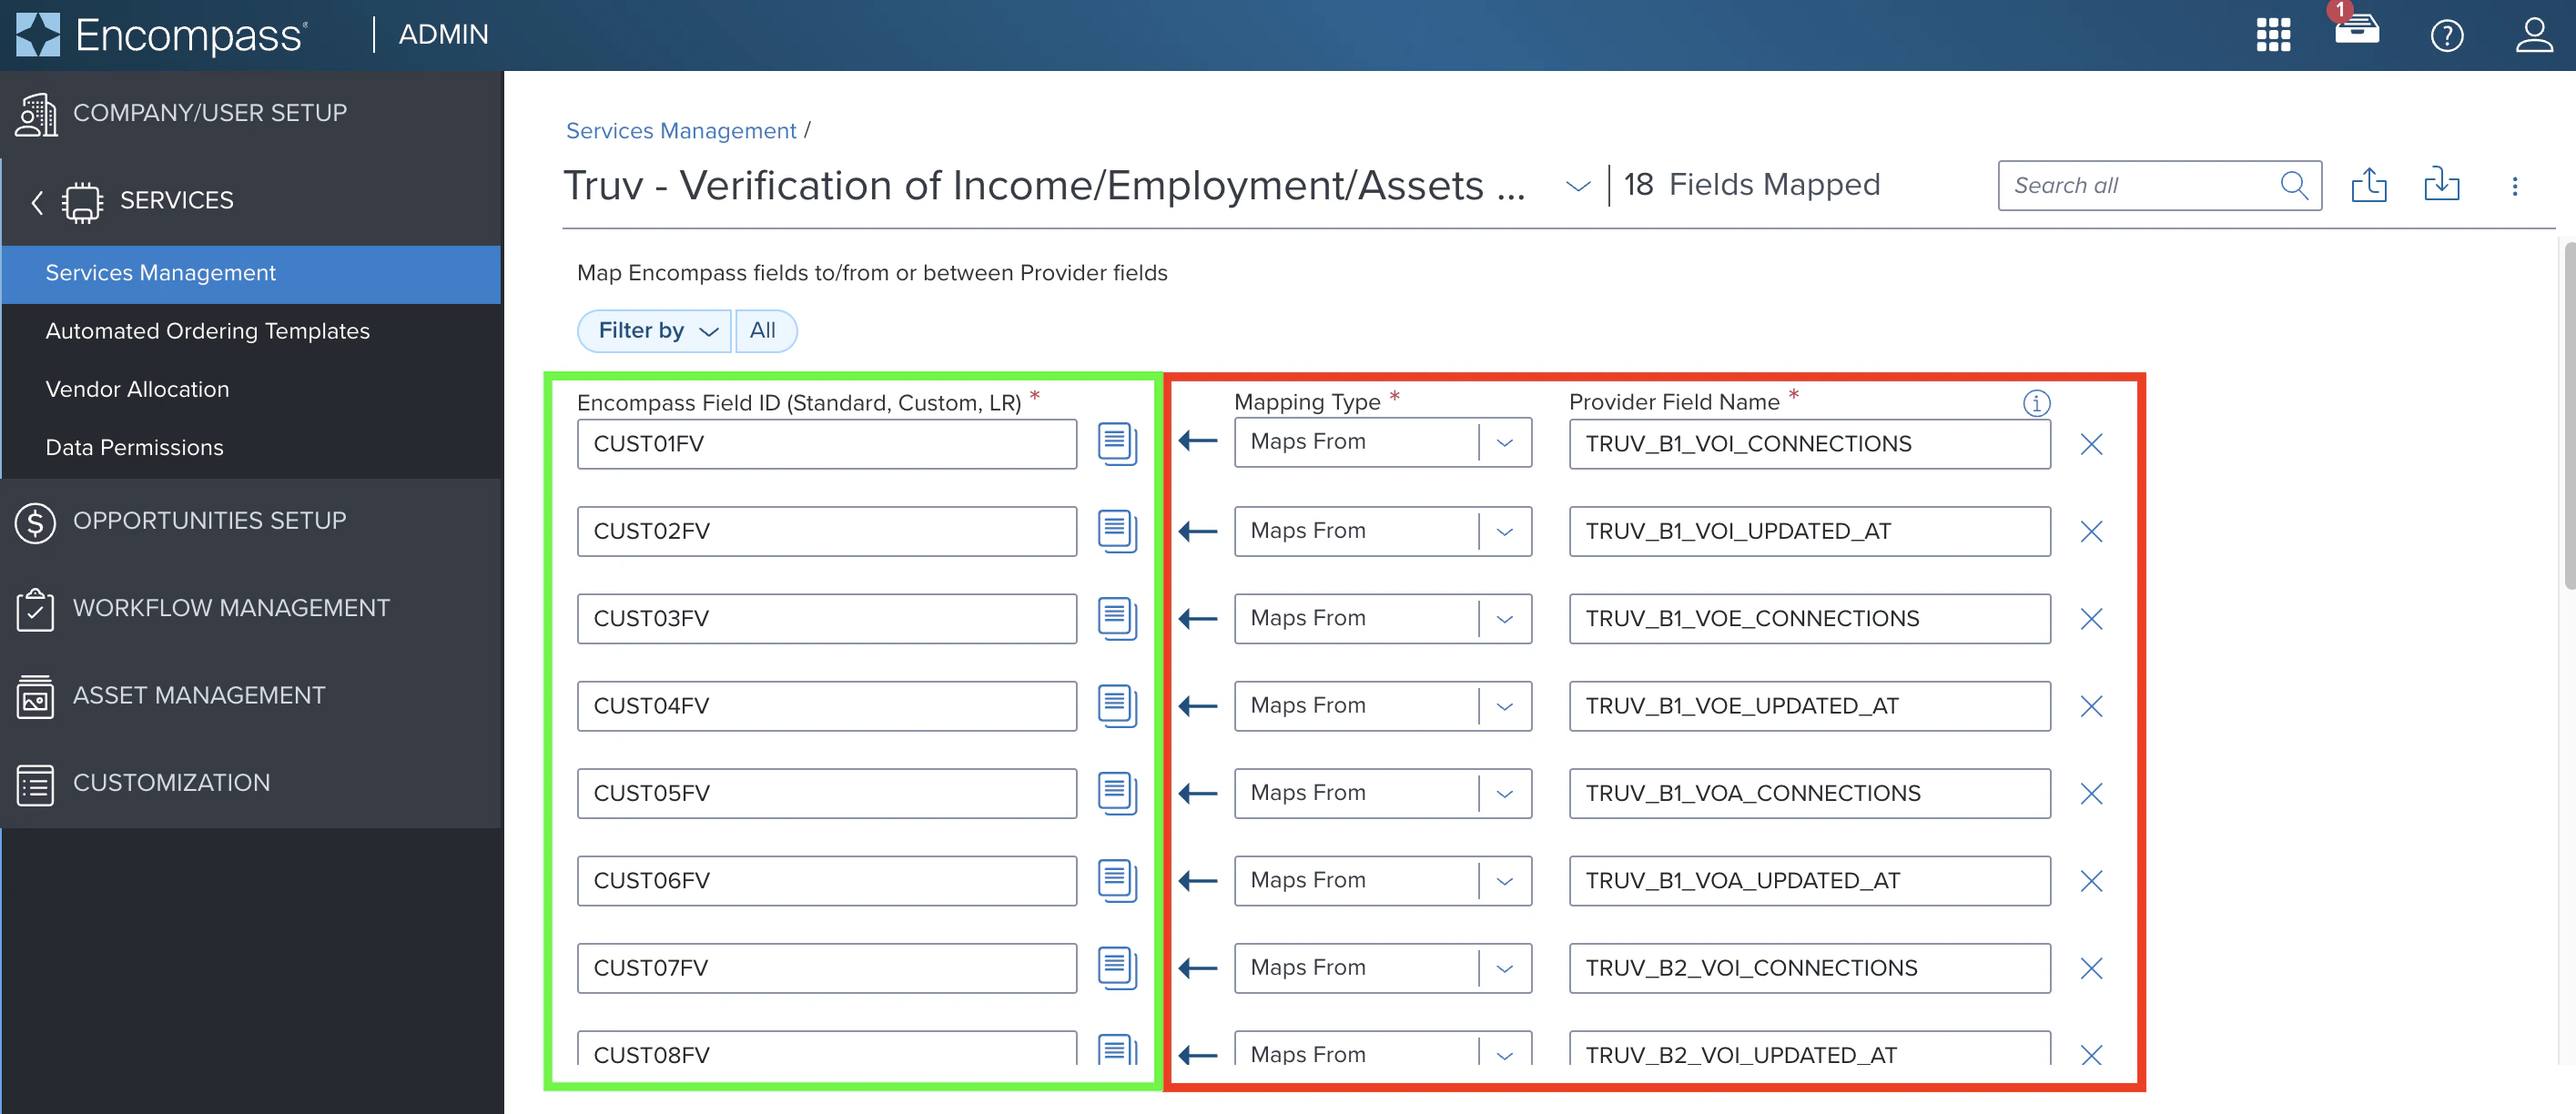
 * **Individually:** for each field, create a new mapping with a **Maps From** or **Maps Between** relationship (per the Field reference tables above):
* **Encompass Field ID** (left, shown in green): select an **unused** Encompass custom field ID
* **Mapping Type**: matches the table above (`Maps From` or `Maps Between`)
* **Provider Field Name** (right, shown in red): enter the Truv field name exactly as shown above (e.g., `TRUV_B1_VOI_CONNECTIONS`)
encompass-truv-field-mapping.csv
You must select unused Encompass custom field IDs. The Mapping Type and Provider Field Names must match exactly.
The CSV covers every writeback field (Maps From / Maps Between) plus the five email CC fields, mapped to the dedicated `CX.TruvCustomEmailField` fields created in the previous step — see [Mapping a custom role email field](#mapping-a-custom-role-email-field). `template_name` and `custom_field` still depend on which of *your* existing Encompass fields hold the source data, so map those manually.
Add the mapped custom fields to a pipeline view or any custom form to give your loan team real-time Truv order status visibility without leaving Encompass.
* **Individually:** for each field, create a new mapping with a **Maps From** or **Maps Between** relationship (per the Field reference tables above):
* **Encompass Field ID** (left, shown in green): select an **unused** Encompass custom field ID
* **Mapping Type**: matches the table above (`Maps From` or `Maps Between`)
* **Provider Field Name** (right, shown in red): enter the Truv field name exactly as shown above (e.g., `TRUV_B1_VOI_CONNECTIONS`)
encompass-truv-field-mapping.csv
You must select unused Encompass custom field IDs. The Mapping Type and Provider Field Names must match exactly.
The CSV covers every writeback field (Maps From / Maps Between) plus the five email CC fields, mapped to the dedicated `CX.TruvCustomEmailField` fields created in the previous step — see [Mapping a custom role email field](#mapping-a-custom-role-email-field). `template_name` and `custom_field` still depend on which of *your* existing Encompass fields hold the source data, so map those manually.
Add the mapped custom fields to a pipeline view or any custom form to give your loan team real-time Truv order status visibility without leaving Encompass.
 ***
## Automate custom field setup with the Encompass API \[Server-side]
ICE's [Encompass Developer Connect](https://developer.icemortgagetechnology.com/developer-connect) (EDC) API creates every Truv custom field — the per-borrower fields plus `truv_user_ids`, `partnerStatus`, `aim_check_available`, `template_name`, `custom_field`, and the five email CC fields — in a single call, instead of adding each one by hand.
Obtain a Client ID and Client Secret for your Encompass instance and exchange them for an OAuth2 access token. See ICE's [Authentication](https://developer.icemortgagetechnology.com/developer-connect/docs/authentication) guide — the account you authenticate with needs the persona permission to create or update custom fields (**Company Settings > Loan Setup > Loan Custom Fields**).
Open the [field-creation payload](#setup) you downloaded in Setup above and remove any fields you don't need (e.g. borrower slots beyond what your loan files use) before running the call below.
The [V3 Manage Custom Fields](https://developer.icemortgagetechnology.com/developer-connect/reference/v3-manage-custom-fields) endpoint accepts the whole array in one request. Send `action=add` with the downloaded payload as the request body — one call creates every field:
```bash theme={null}
curl -X PATCH "https://api.elliemae.com/encompass/v3/settings/loan/customFields?action=add" \
-H "Authorization: Bearer $EDC_ACCESS_TOKEN" \
-H "Content-Type: application/json" \
-d @encompass-truv-custom-fields-payload.json
```
The Manage Custom Fields API doesn't set a maximum field length at creation. If a field needs a longer length than Encompass's default (the [AIM Check setup guide](/mortgage/integration/ice-encompass/aim-check) uses 1000 characters for `aim_check_available`, for example), open **Settings > Loan Setup > Loan Custom Fields** in Encompass SmartClient after creation and adjust **Max Length** manually.
Import the [field mapping CSV](#setup) as described in Setup above — it maps every writeback field plus the five email CC fields in one step.
***
## Wholesale and Correspondent Lender Support
Wholesale and correspondent lenders can map an Encompass field (such as the loan officer's name) to a custom field in Truv's template, enabling personalized borrower-facing notifications. This builds on the templates covered in [White Labeling with Truv Templates](#white-labeling-with-truv-templates) above.
If your wholesale or correspondent channel orders through Encompass TPO Connect rather than Encompass LOS, see the [TPO Connect setup guide](/mortgage/integration/ice-encompass/tpo-connect) to activate Truv there first.
Open [Field Mapping](#access-field-mapping-in-encompass) for the Truv service and add the following mapping:
* **Encompass Field ID:** `1612` (Loan Originator Name) or any other Encompass field
* **Mapping Type:** Maps To
* **Provider Field Name:** `custom_field`
Click **Save**.
Open the [Truv Dashboard](https://dashboard.truv.com/app/customization/templates) and navigate to **Customization > Templates**. Open the relevant template and add the `{custom_field}` placeholder to notification content, including:
* Email First
* Email Reminder
* SMS First
* SMS Reminder
* Landing Page variations
Publish the template when complete.
To use the custom field:
* **Manual orders:** Select the configured template before creating the order
* **ASO orders:** Copy the Template ID from the Truv Dashboard and paste it into the ASO configuration
***
## Next steps
Manual ordering, ASO configuration, and AIM Check
One-time Encompass configuration
Manage templates in the Dashboard
[support@truv.com](mailto:support@truv.com)
***
## Automate custom field setup with the Encompass API \[Server-side]
ICE's [Encompass Developer Connect](https://developer.icemortgagetechnology.com/developer-connect) (EDC) API creates every Truv custom field — the per-borrower fields plus `truv_user_ids`, `partnerStatus`, `aim_check_available`, `template_name`, `custom_field`, and the five email CC fields — in a single call, instead of adding each one by hand.
Obtain a Client ID and Client Secret for your Encompass instance and exchange them for an OAuth2 access token. See ICE's [Authentication](https://developer.icemortgagetechnology.com/developer-connect/docs/authentication) guide — the account you authenticate with needs the persona permission to create or update custom fields (**Company Settings > Loan Setup > Loan Custom Fields**).
Open the [field-creation payload](#setup) you downloaded in Setup above and remove any fields you don't need (e.g. borrower slots beyond what your loan files use) before running the call below.
The [V3 Manage Custom Fields](https://developer.icemortgagetechnology.com/developer-connect/reference/v3-manage-custom-fields) endpoint accepts the whole array in one request. Send `action=add` with the downloaded payload as the request body — one call creates every field:
```bash theme={null}
curl -X PATCH "https://api.elliemae.com/encompass/v3/settings/loan/customFields?action=add" \
-H "Authorization: Bearer $EDC_ACCESS_TOKEN" \
-H "Content-Type: application/json" \
-d @encompass-truv-custom-fields-payload.json
```
The Manage Custom Fields API doesn't set a maximum field length at creation. If a field needs a longer length than Encompass's default (the [AIM Check setup guide](/mortgage/integration/ice-encompass/aim-check) uses 1000 characters for `aim_check_available`, for example), open **Settings > Loan Setup > Loan Custom Fields** in Encompass SmartClient after creation and adjust **Max Length** manually.
Import the [field mapping CSV](#setup) as described in Setup above — it maps every writeback field plus the five email CC fields in one step.
***
## Wholesale and Correspondent Lender Support
Wholesale and correspondent lenders can map an Encompass field (such as the loan officer's name) to a custom field in Truv's template, enabling personalized borrower-facing notifications. This builds on the templates covered in [White Labeling with Truv Templates](#white-labeling-with-truv-templates) above.
If your wholesale or correspondent channel orders through Encompass TPO Connect rather than Encompass LOS, see the [TPO Connect setup guide](/mortgage/integration/ice-encompass/tpo-connect) to activate Truv there first.
Open [Field Mapping](#access-field-mapping-in-encompass) for the Truv service and add the following mapping:
* **Encompass Field ID:** `1612` (Loan Originator Name) or any other Encompass field
* **Mapping Type:** Maps To
* **Provider Field Name:** `custom_field`
Click **Save**.
Open the [Truv Dashboard](https://dashboard.truv.com/app/customization/templates) and navigate to **Customization > Templates**. Open the relevant template and add the `{custom_field}` placeholder to notification content, including:
* Email First
* Email Reminder
* SMS First
* SMS Reminder
* Landing Page variations
Publish the template when complete.
To use the custom field:
* **Manual orders:** Select the configured template before creating the order
* **ASO orders:** Copy the Template ID from the Truv Dashboard and paste it into the ASO configuration
***
## Next steps
Manual ordering, ASO configuration, and AIM Check
One-time Encompass configuration
Manage templates in the Dashboard
[support@truv.com](mailto:support@truv.com)