> ## Documentation Index
> Fetch the complete documentation index at: https://docs.truv.com/llms.txt
> Use this file to discover all available pages before exploring further.
# BYTE Software
> Auto-run and manual income and employment verification within BYTE Software LOS
BYTE Software integrates effortlessly with Truv to provide fast, efficient income and employment verifications. Streamline your verification process in just a few steps, all within your loan origination platform.
***
## Key Benefits
* **Seamless Integration** — Direct integration enabling smooth transition from loan origination to verification
* **Fast and Accurate Verifications** — Automate income and employment verifications with quick turnaround
* **Efficient Workflow** — Keep the entire verification process within BYTE Software
* **Customization Options** — White-labeling and workflow customization available via Truv Dashboard Templates
* **Minimized Change Management** — Ready-to-use solution reducing IT burden
***
## How it works
The operations team initiates the loan application through BYTE Software.
Navigate to the Truv section within BYTE and select the verification type.
Borrowers receive email and text notifications with a customized experience powered by Truv Dashboard Templates.
Truv retrieves income and employment data and automatically populates it in BYTE Software.
***
## Enabling the Integration
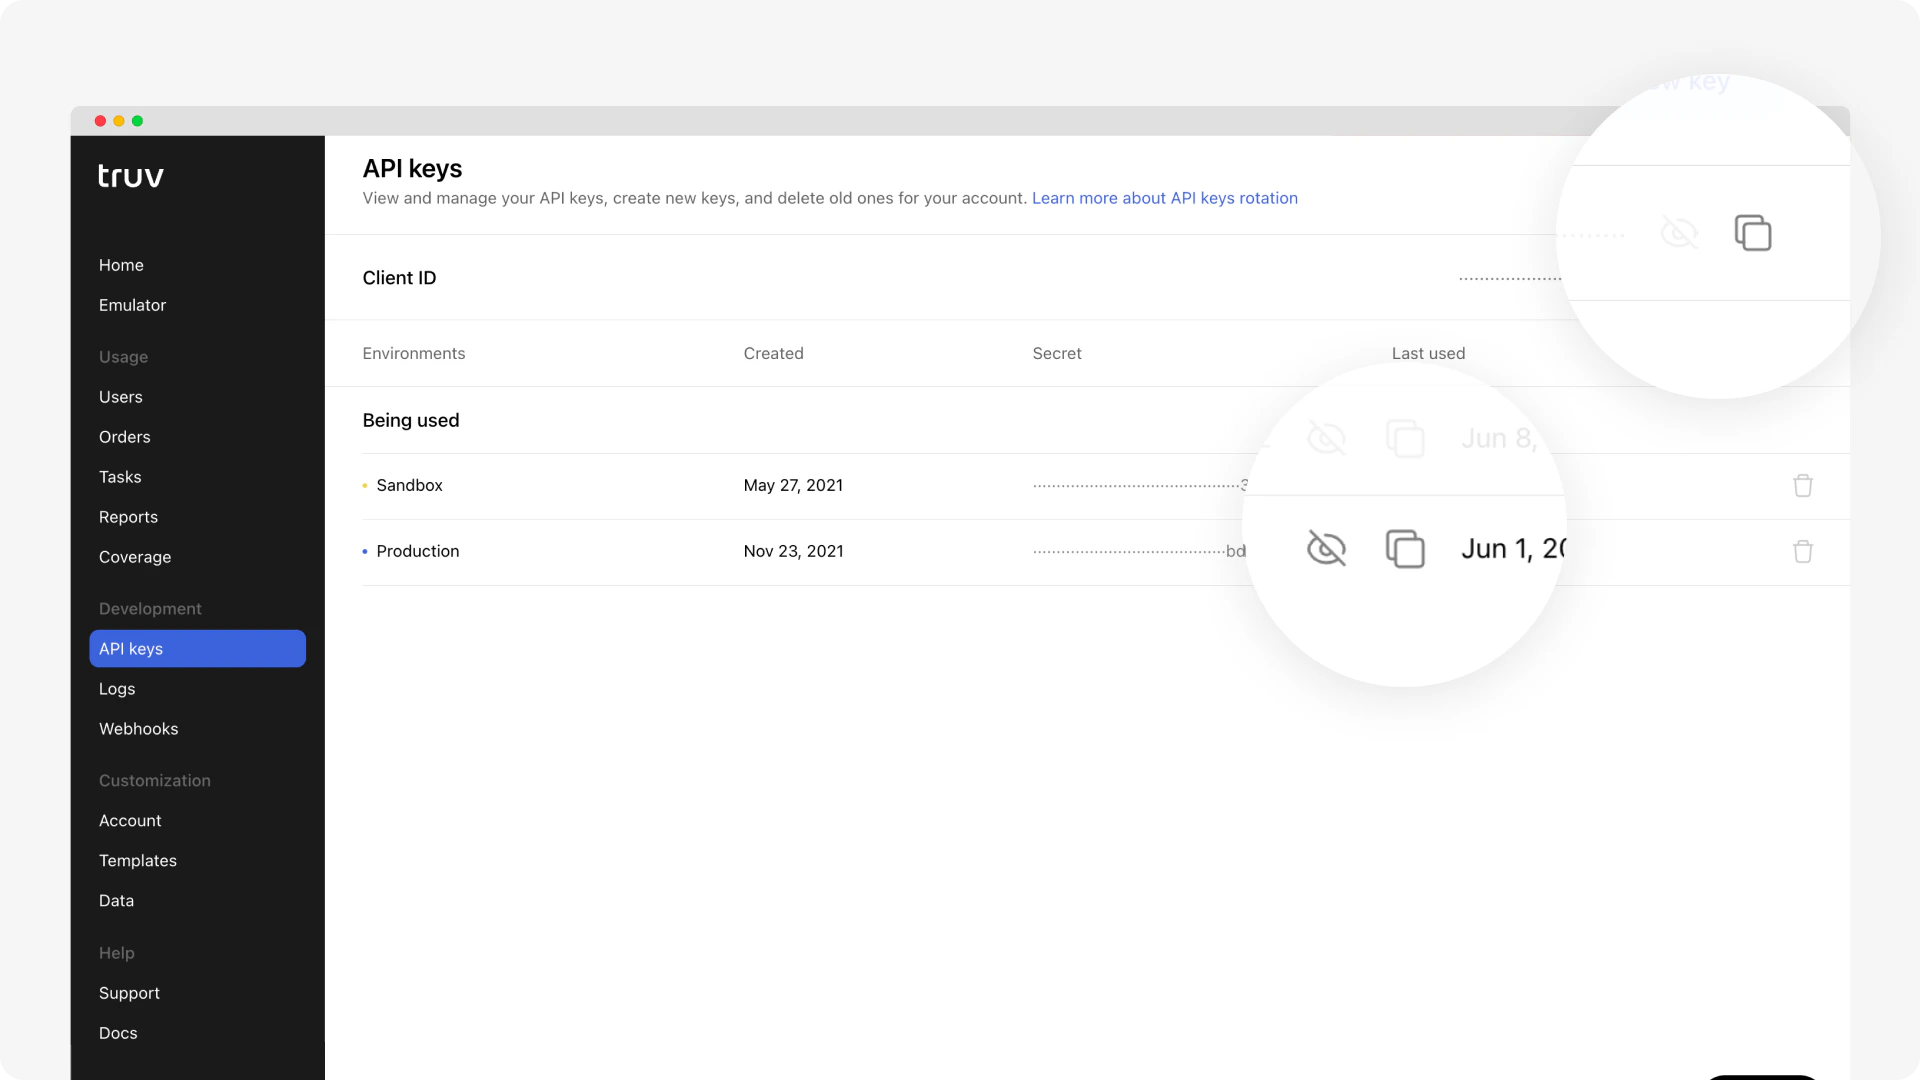
**Step 1:** Log in to BYTE Software and navigate to the **Settings** menu. Locate **Truv Integration** and select it.
**Step 2:** Retrieve your credentials from the [Truv Dashboard](https://dashboard.truv.com/app/home) under **API Keys**.
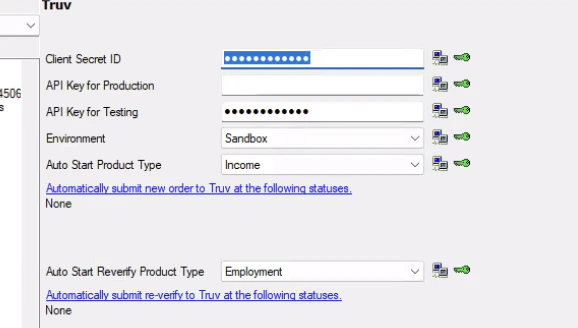
**Step 3:** Enter credentials in BYTE Software:
* **API Key for Testing** → paste your Truv **Client ID**
* **Client Secret ID** → paste your Truv **Sandbox Secret** (starts with `sandbox-…`)
* For production: add your **Production Secret** (starts with `prod-…`) to **Client Secret ID** and your **Client ID** to **API Key for Production**
**Step 4:** Save the settings and confirm the integration is enabled.
***
## Order Verifications
### Auto-Run
Configure BYTE to automatically trigger verifications when loan conditions are met.
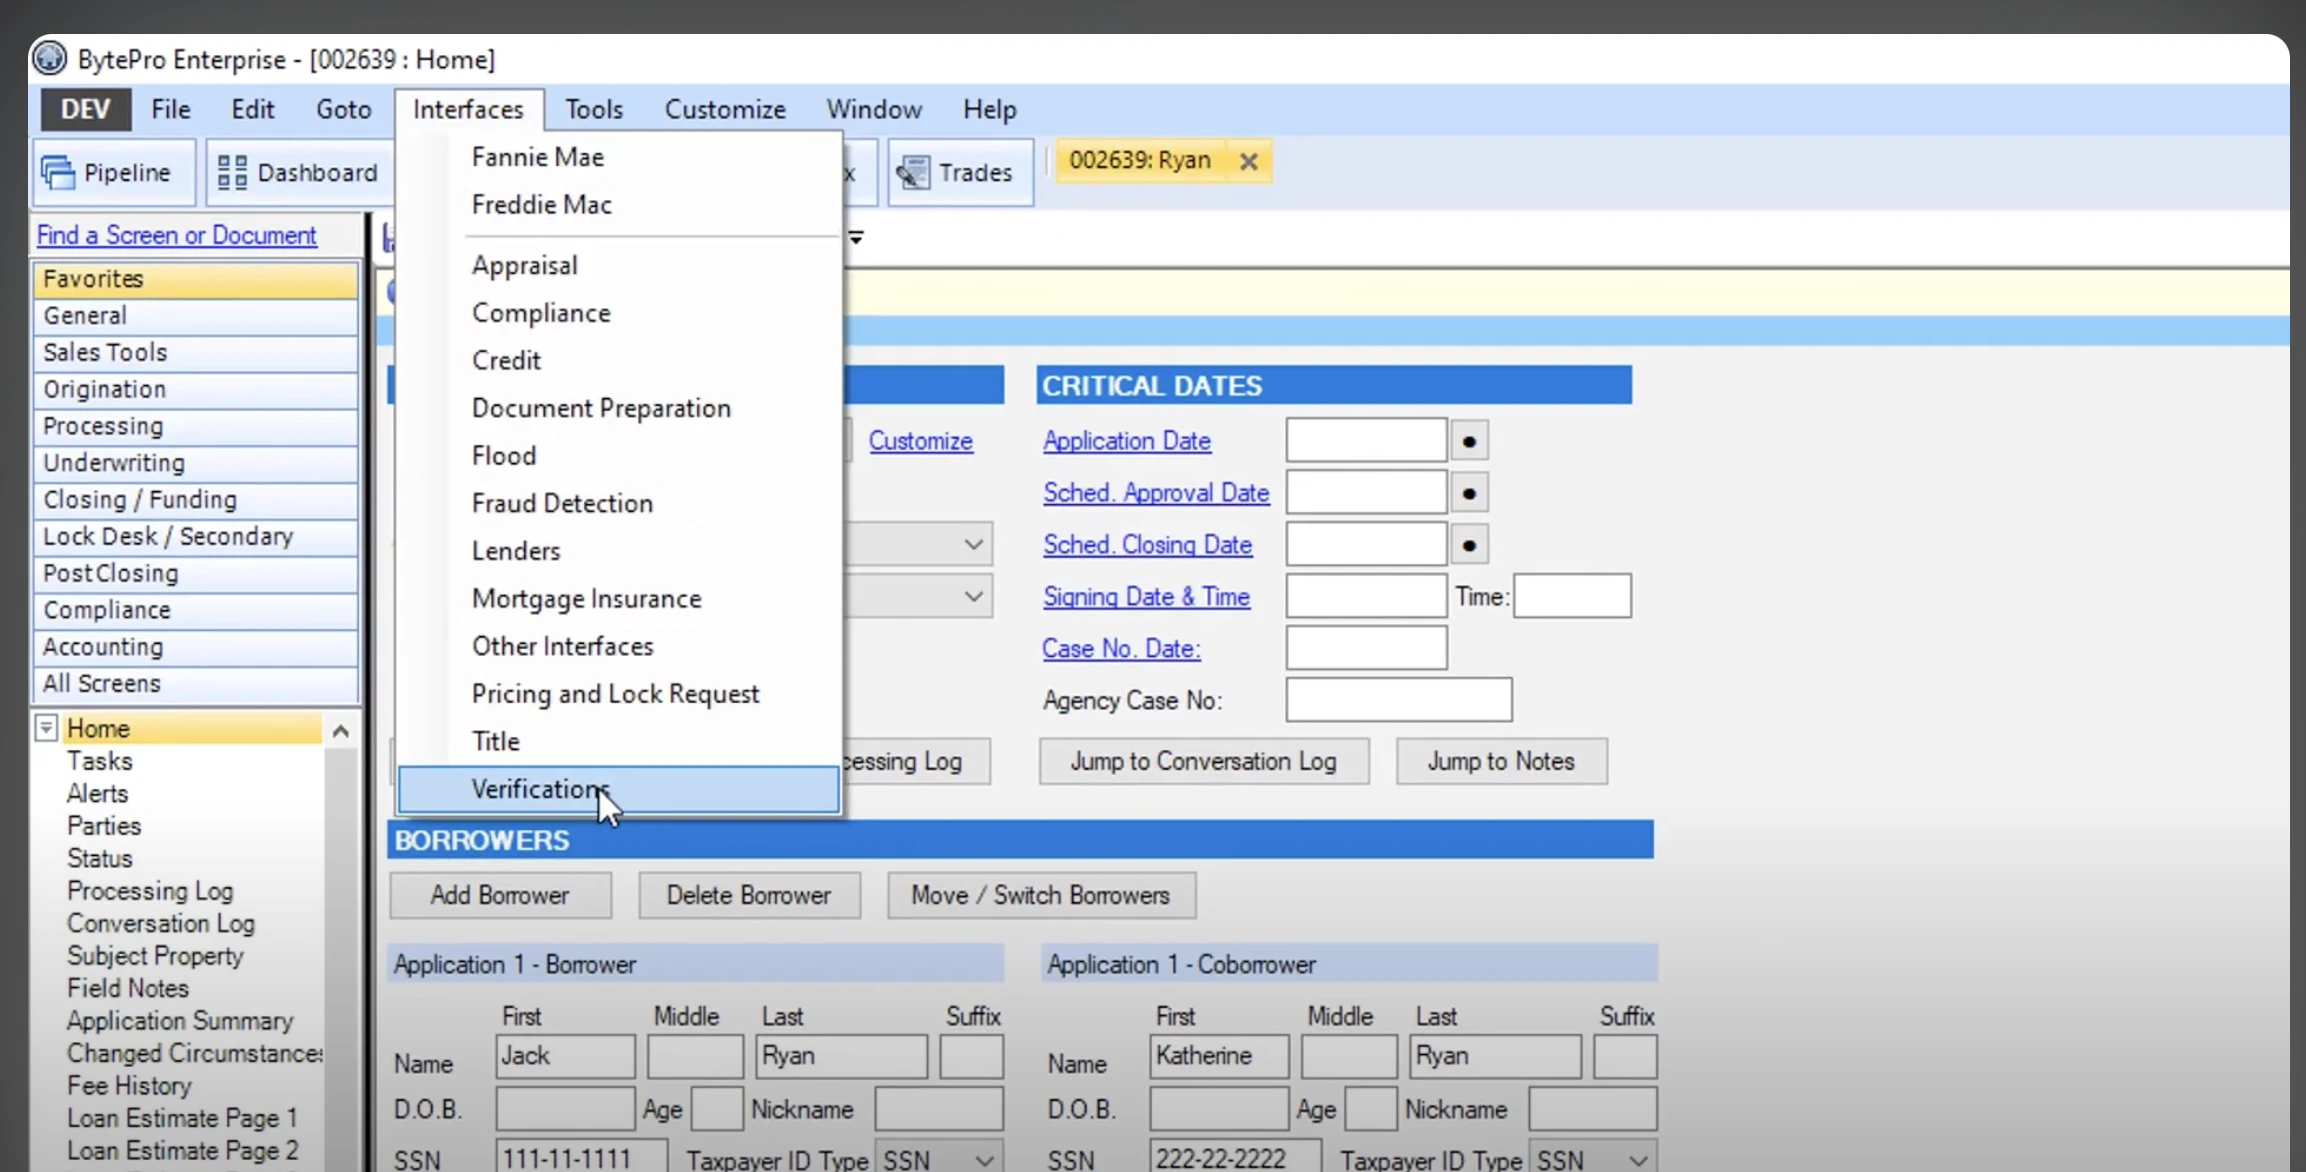
**Step 1:** Open a loan application and navigate to **Interfaces → Verifications**.
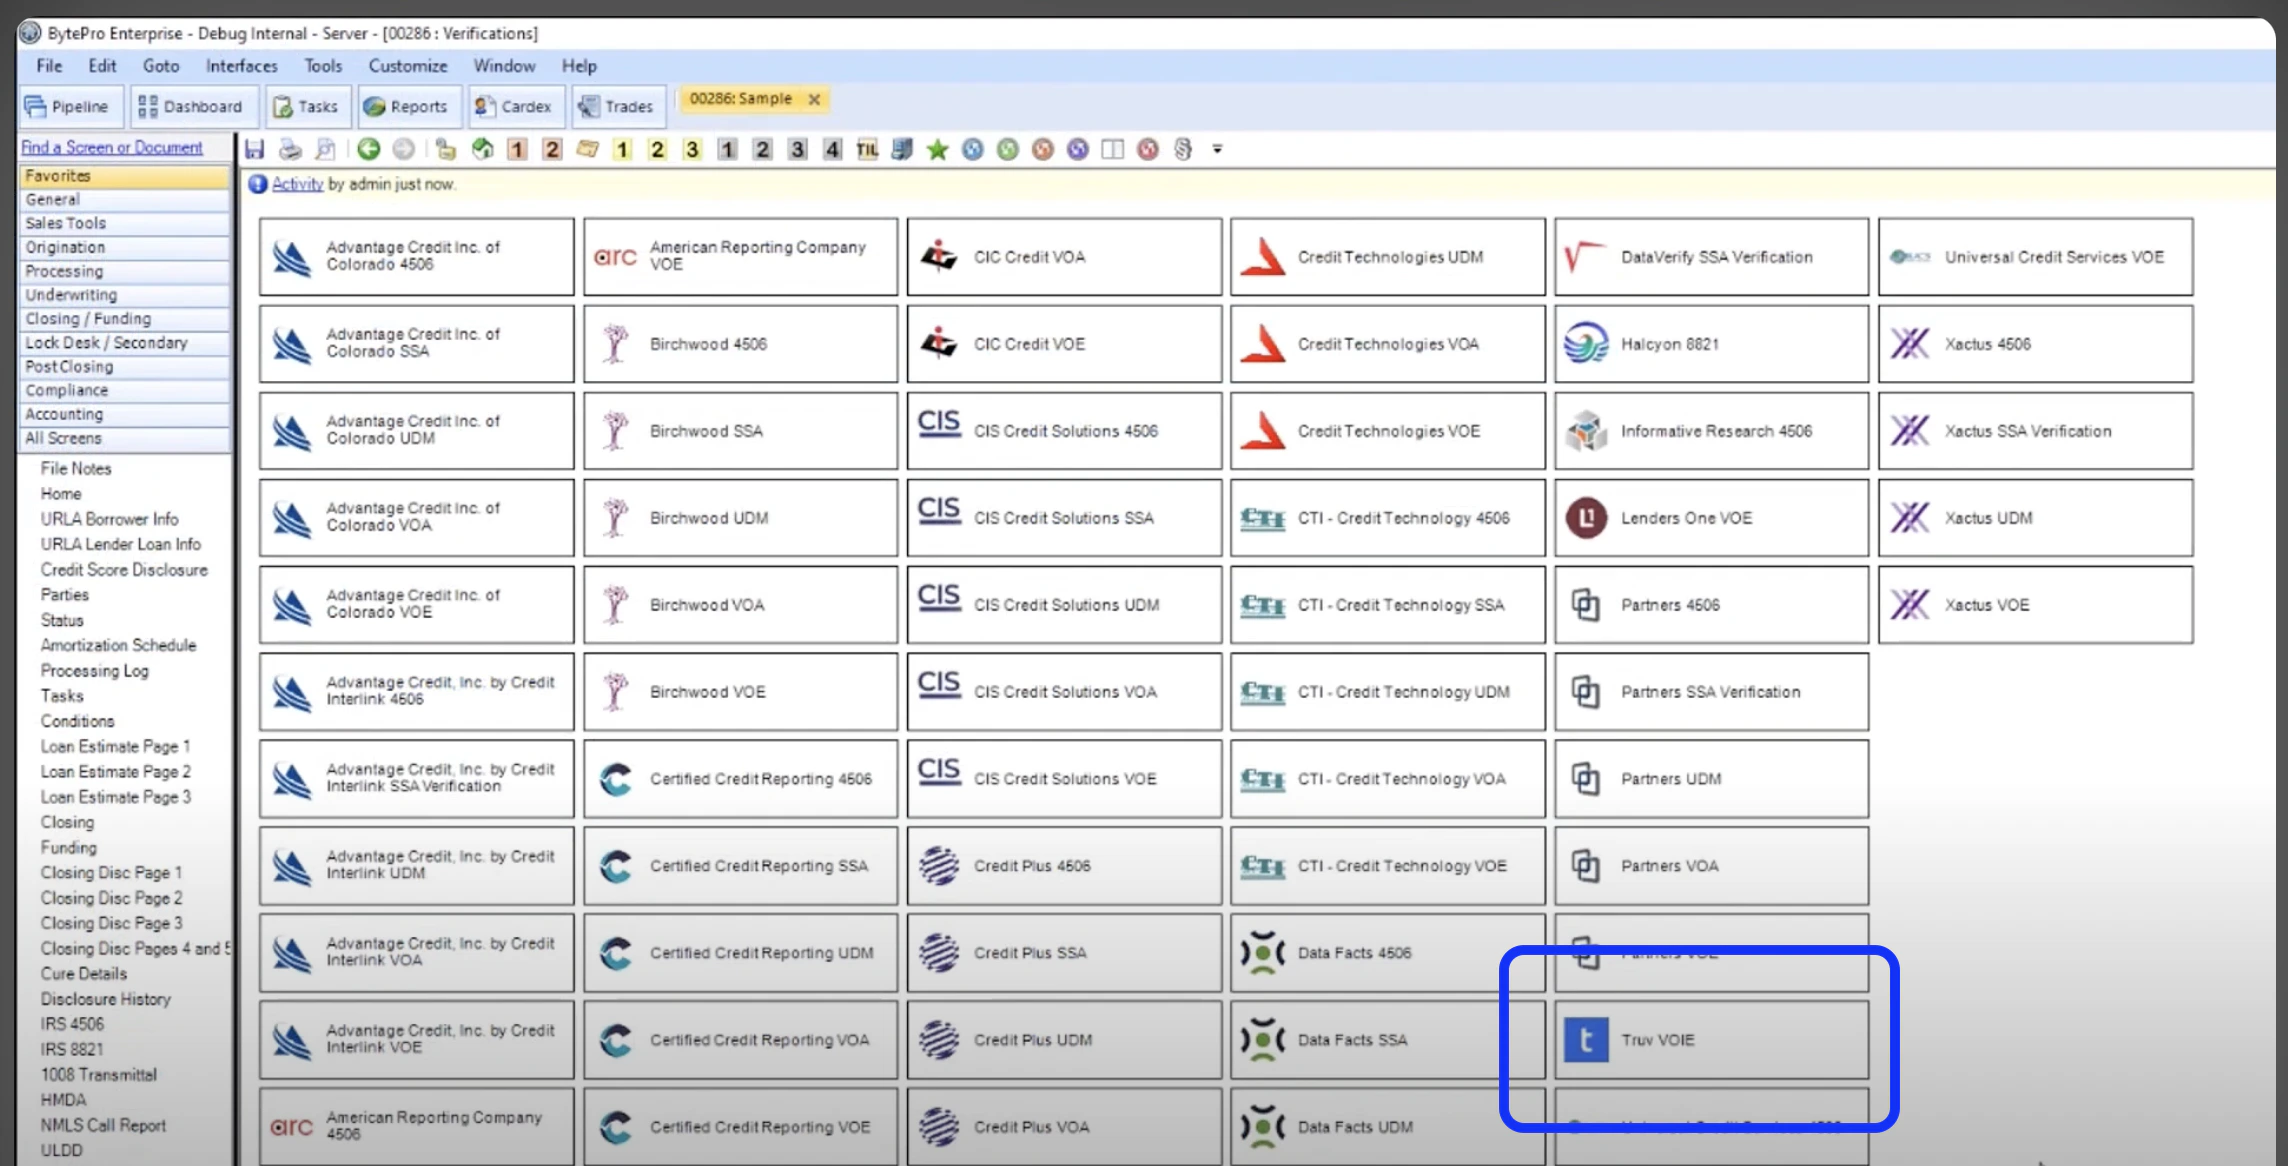
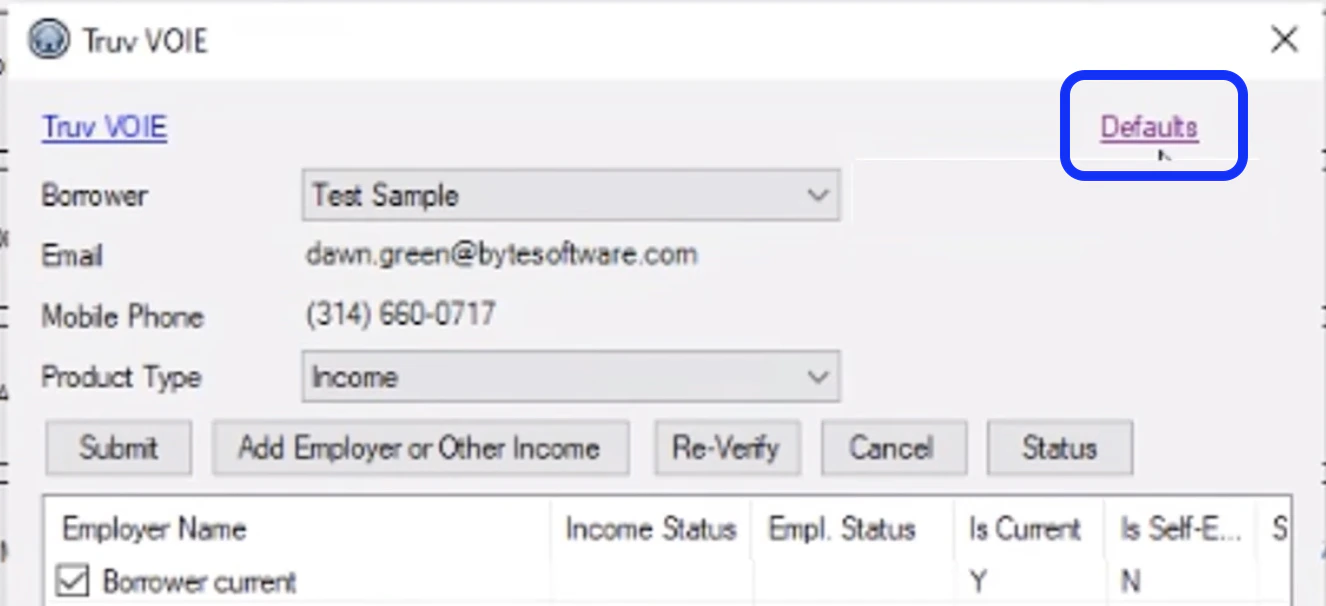
**Step 2:** Select **Truv** as the provider, then click **Defaults**.
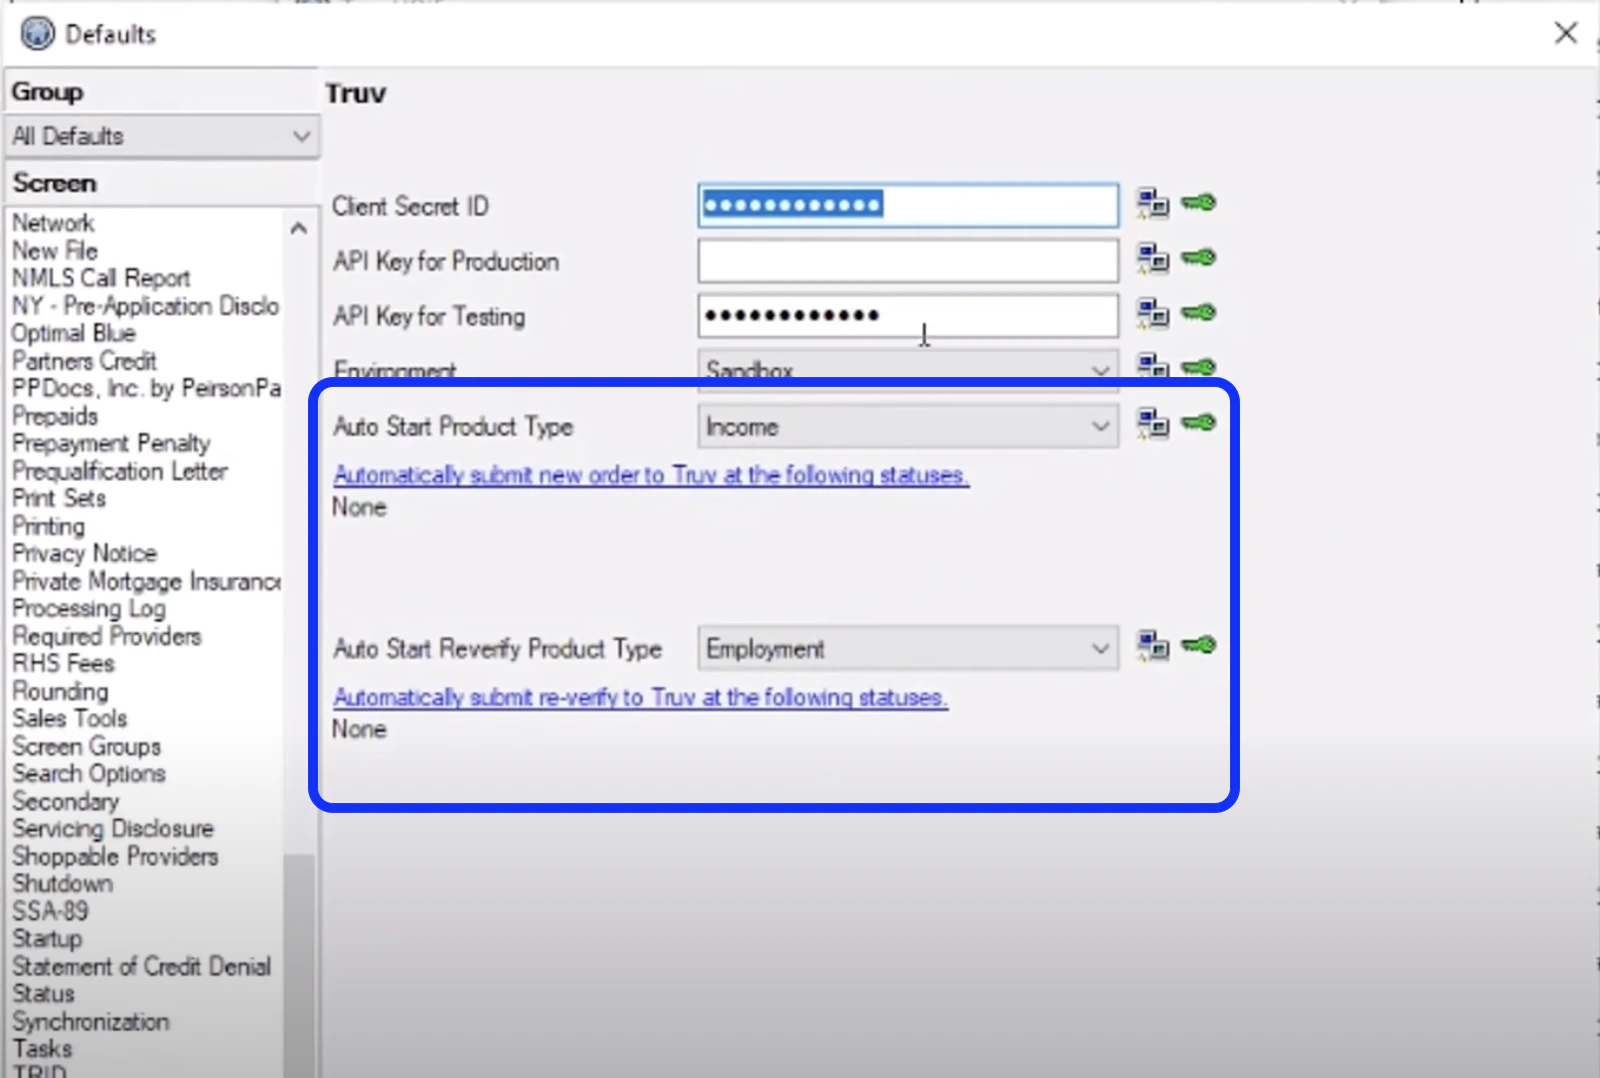
**Step 3:** Set the Auto-Run conditions:
* **Auto Start Product Type**: `Income` for full Income and Employment verification
* **Auto Start Reverify Product Type**: `Employment` for Employment-only or 10-day PCV
**Step 4:** Configure loan status triggers:
* **In Processing** — triggers the initial verification
* **Clear to Close** — triggers re-verification / 10-day PCV
### Manual Ordering
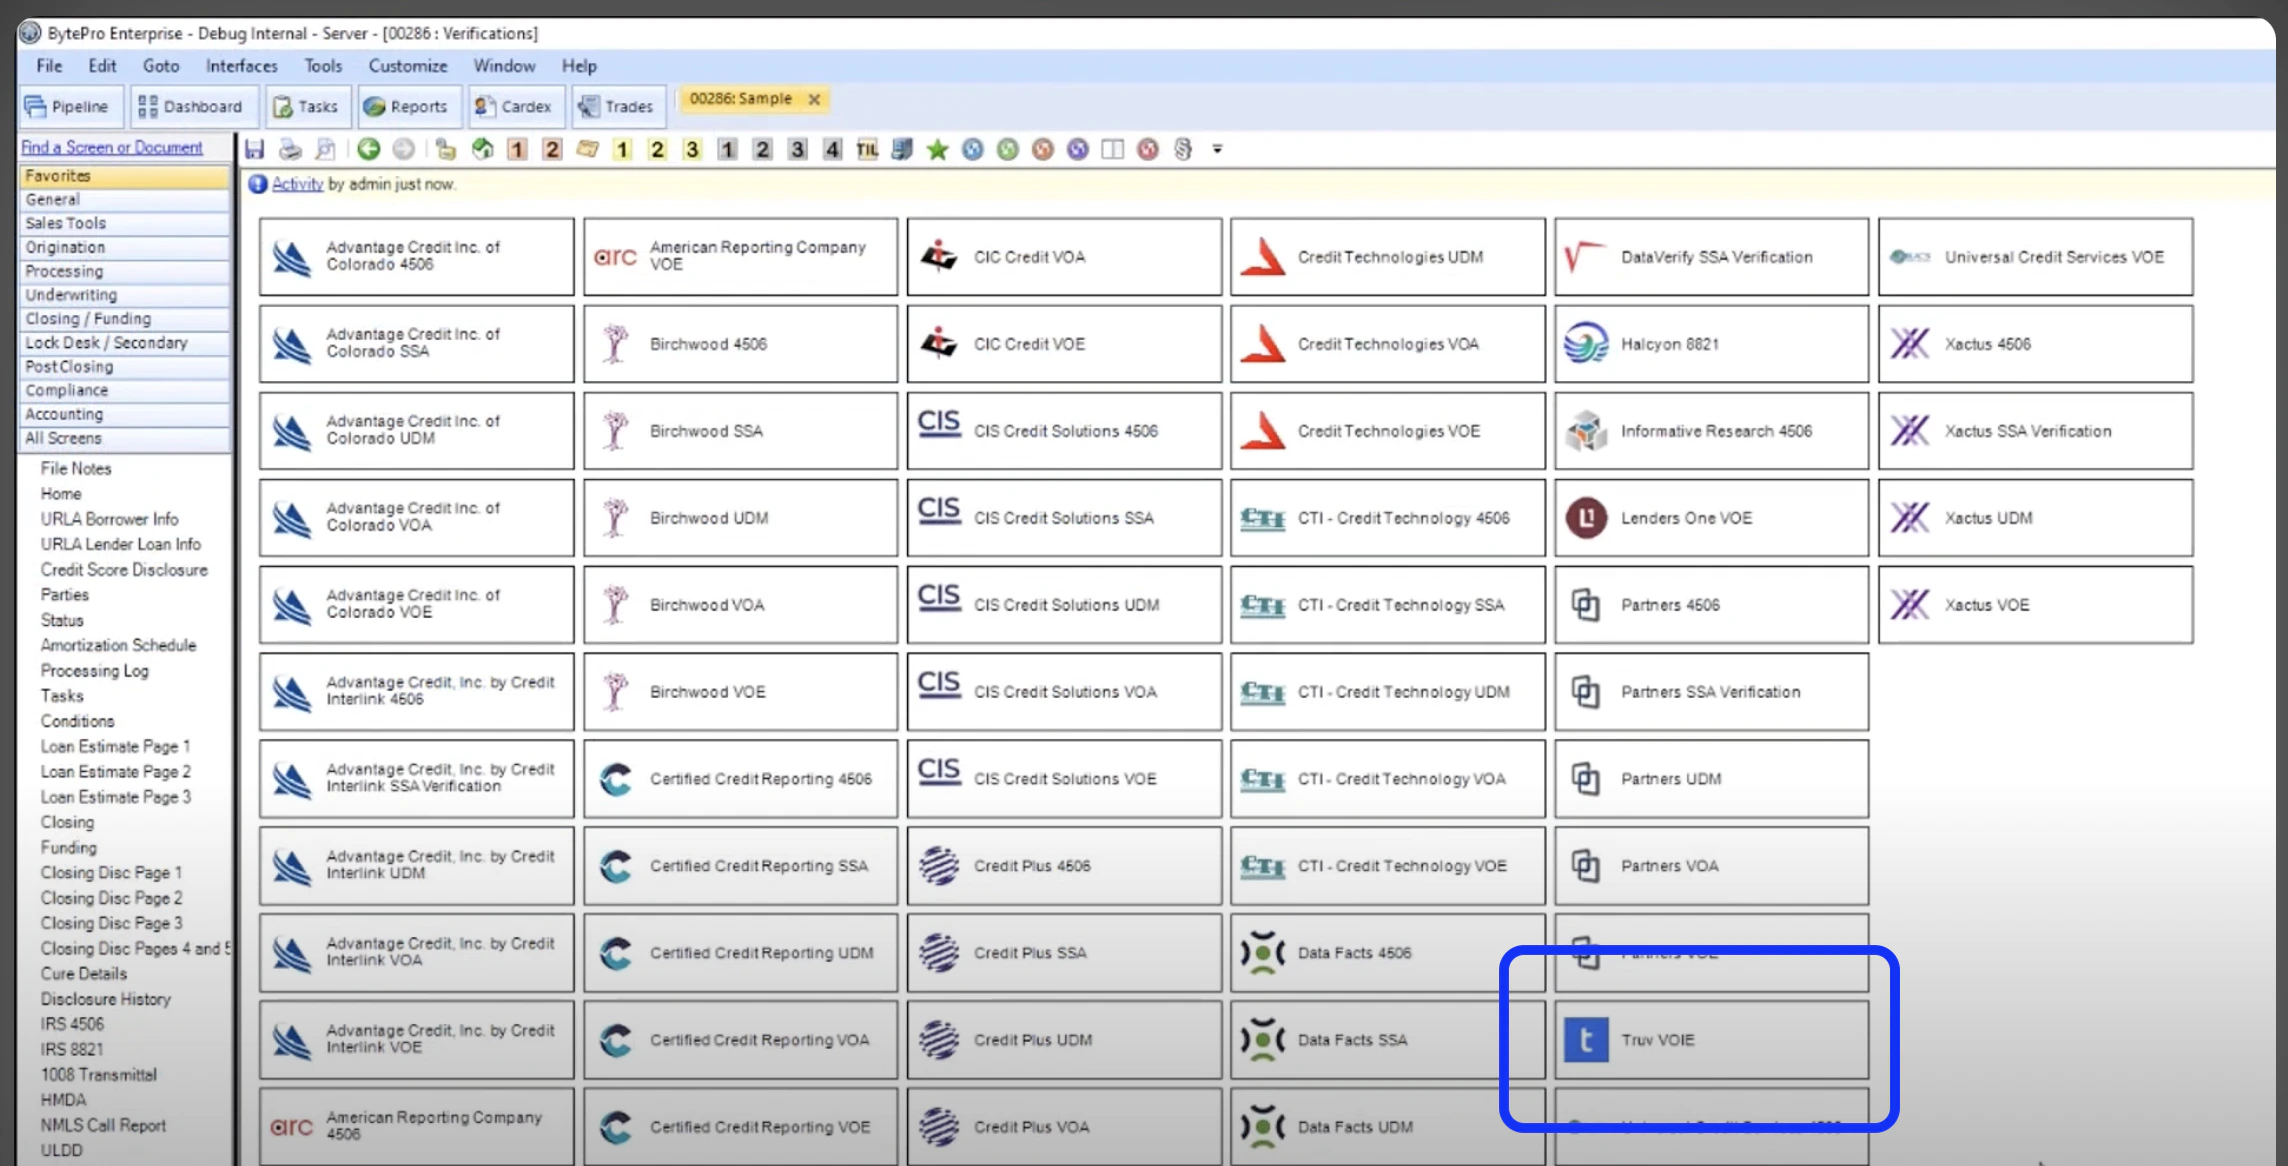
**Step 1:** Open the loan application and navigate to **Interfaces → Verifications**. Select **Truv** as the provider.
**Step 2:** Select the borrower or co-borrower from the dropdown and fill in applicant information.
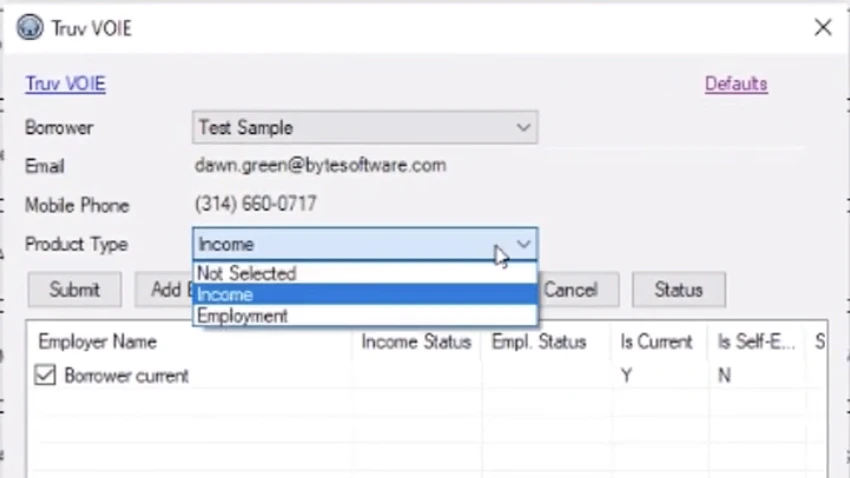
**Step 3:** Set the **Product Type**: `Income` for Income and Employment verification, or `Employment` for Employment-only / 10-day PCV.
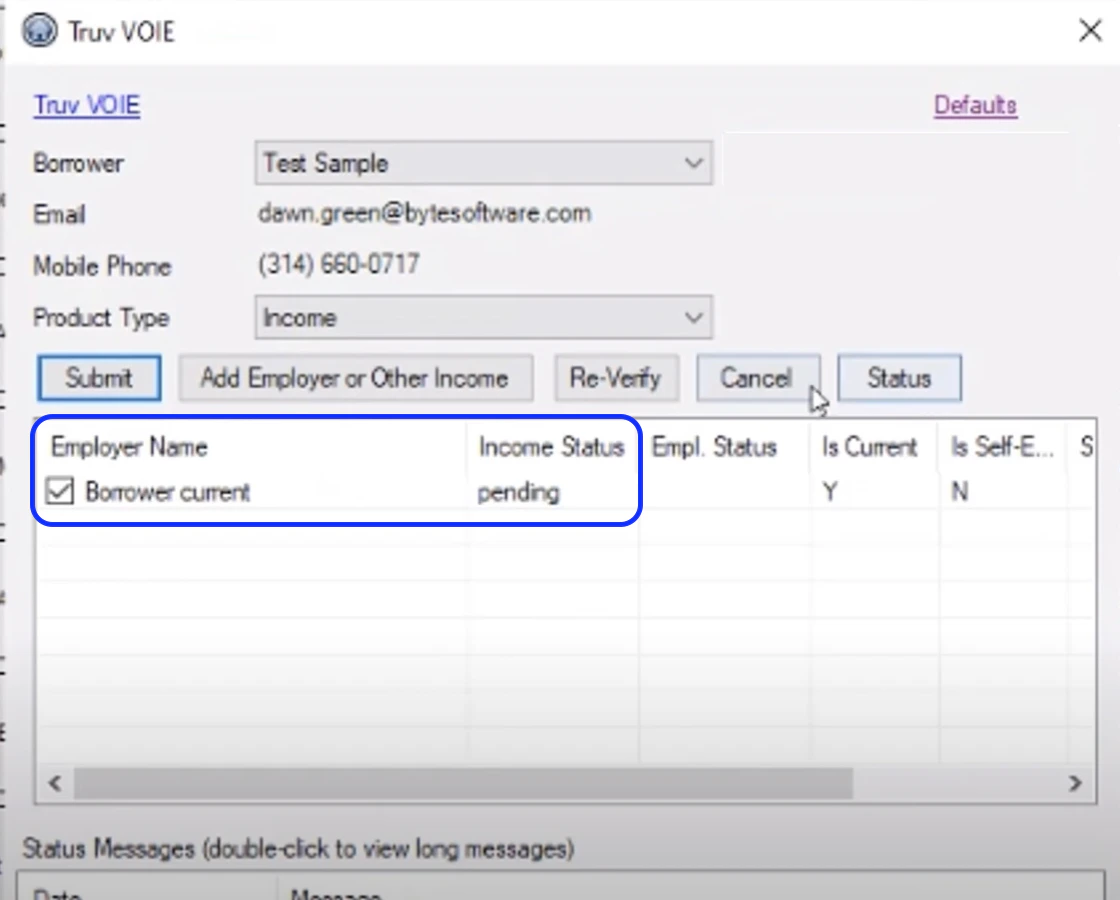
**Step 4:** Review the employer list. All employers from the loan application are listed with current employment status. Select or deselect as needed. If the order is **Pending**, the **Cancel** or **Add Employer / Other Income** buttons are available. Click **Submit** to place the order.
***
## Retrieve Reports and Documents
Once verification is complete:
1. Access the **Completed Verifications** section in the loan application
2. View verification details and download reports with detailed income and employment information
3. Attach reports directly to the loan application for underwriting access
***
## Video Overview
***
## Next steps
View all LOS integration options
Test your integration in sandbox
[support@truv.com](mailto:support@truv.com)
 **Step 3:** Enter credentials in BYTE Software:
* **API Key for Testing** → paste your Truv **Client ID**
* **Client Secret ID** → paste your Truv **Sandbox Secret** (starts with `sandbox-…`)
* For production: add your **Production Secret** (starts with `prod-…`) to **Client Secret ID** and your **Client ID** to **API Key for Production**
**Step 3:** Enter credentials in BYTE Software:
* **API Key for Testing** → paste your Truv **Client ID**
* **Client Secret ID** → paste your Truv **Sandbox Secret** (starts with `sandbox-…`)
* For production: add your **Production Secret** (starts with `prod-…`) to **Client Secret ID** and your **Client ID** to **API Key for Production**
 **Step 4:** Save the settings and confirm the integration is enabled.
***
## Order Verifications
### Auto-Run
Configure BYTE to automatically trigger verifications when loan conditions are met.
**Step 1:** Open a loan application and navigate to **Interfaces → Verifications**.
**Step 4:** Save the settings and confirm the integration is enabled.
***
## Order Verifications
### Auto-Run
Configure BYTE to automatically trigger verifications when loan conditions are met.
**Step 1:** Open a loan application and navigate to **Interfaces → Verifications**.
 **Step 2:** Select **Truv** as the provider, then click **Defaults**.
 **Step 3:** Set the Auto-Run conditions:
 * **Auto Start Product Type**: `Income` for full Income and Employment verification
* **Auto Start Reverify Product Type**: `Employment` for Employment-only or 10-day PCV
**Step 4:** Configure loan status triggers:
* **Auto Start Product Type**: `Income` for full Income and Employment verification
* **Auto Start Reverify Product Type**: `Employment` for Employment-only or 10-day PCV
**Step 4:** Configure loan status triggers:
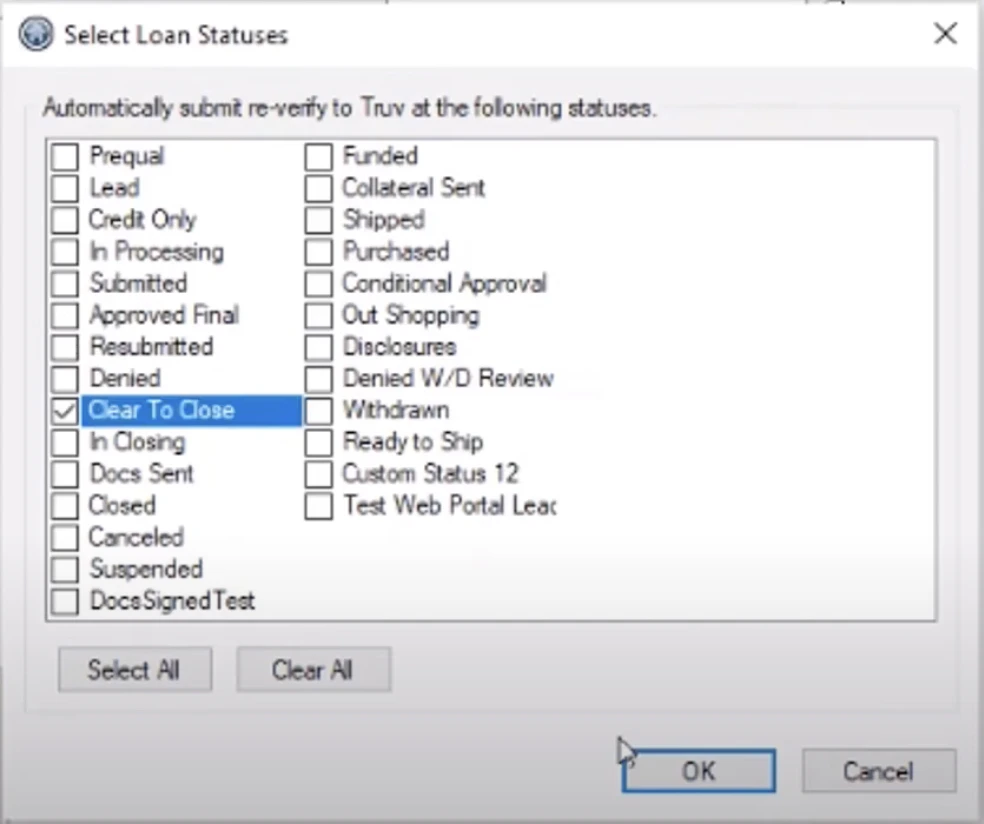 * **In Processing** — triggers the initial verification
* **Clear to Close** — triggers re-verification / 10-day PCV
### Manual Ordering
**Step 1:** Open the loan application and navigate to **Interfaces → Verifications**. Select **Truv** as the provider.
* **In Processing** — triggers the initial verification
* **Clear to Close** — triggers re-verification / 10-day PCV
### Manual Ordering
**Step 1:** Open the loan application and navigate to **Interfaces → Verifications**. Select **Truv** as the provider.
 **Step 2:** Select the borrower or co-borrower from the dropdown and fill in applicant information.
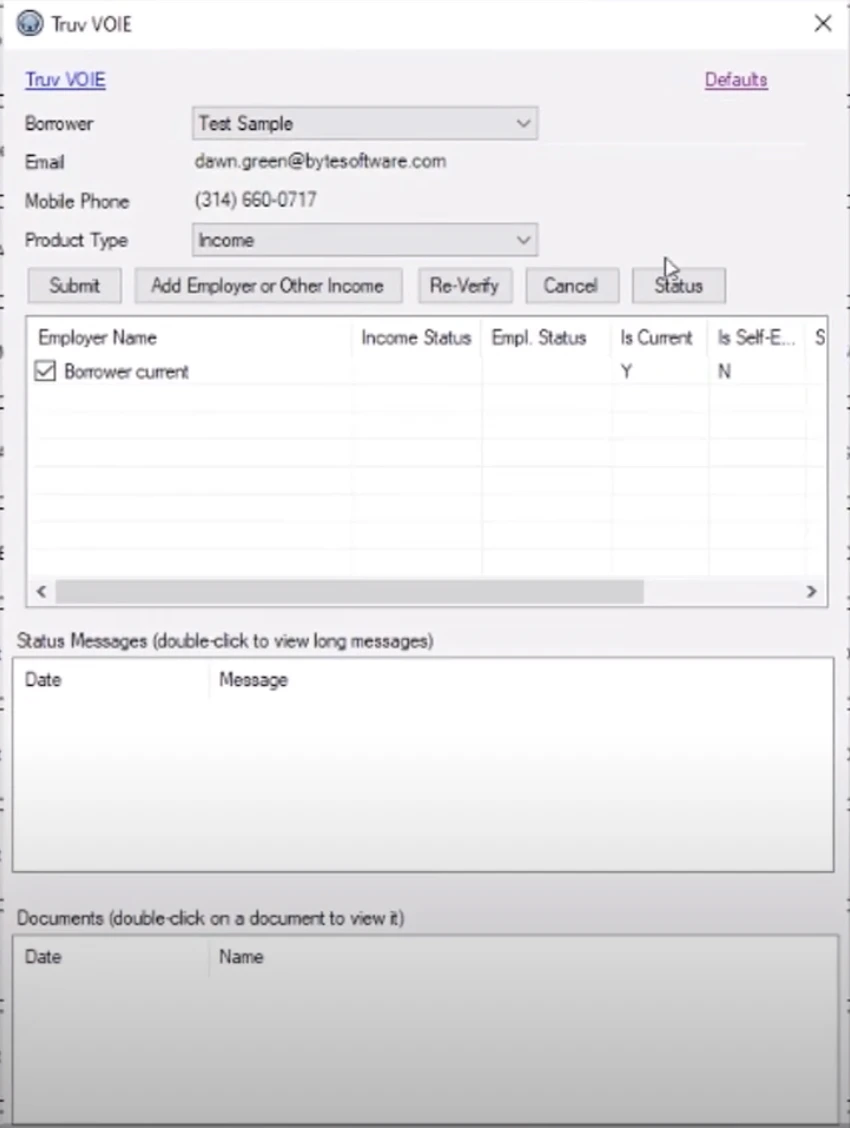 **Step 3:** Set the **Product Type**: `Income` for Income and Employment verification, or `Employment` for Employment-only / 10-day PCV.
 **Step 4:** Review the employer list. All employers from the loan application are listed with current employment status. Select or deselect as needed. If the order is **Pending**, the **Cancel** or **Add Employer / Other Income** buttons are available. Click **Submit** to place the order.
 ***
## Retrieve Reports and Documents
Once verification is complete:
1. Access the **Completed Verifications** section in the loan application
2. View verification details and download reports with detailed income and employment information
3. Attach reports directly to the loan application for underwriting access
***
## Video Overview
***
## Next steps
***
## Retrieve Reports and Documents
Once verification is complete:
1. Access the **Completed Verifications** section in the loan application
2. View verification details and download reports with detailed income and employment information
3. Attach reports directly to the loan application for underwriting access
***
## Video Overview
***
## Next steps