> ## Documentation Index
> Fetch the complete documentation index at: https://docs.truv.com/llms.txt
> Use this file to discover all available pages before exploring further.
# Embedded Orders
> Create an order when you don't know the user's employer or provider
Start here when you have a new user and don't know their employer, payroll provider, or bank upfront. Truv Bridge presents a search screen where the user finds and connects their accounts.
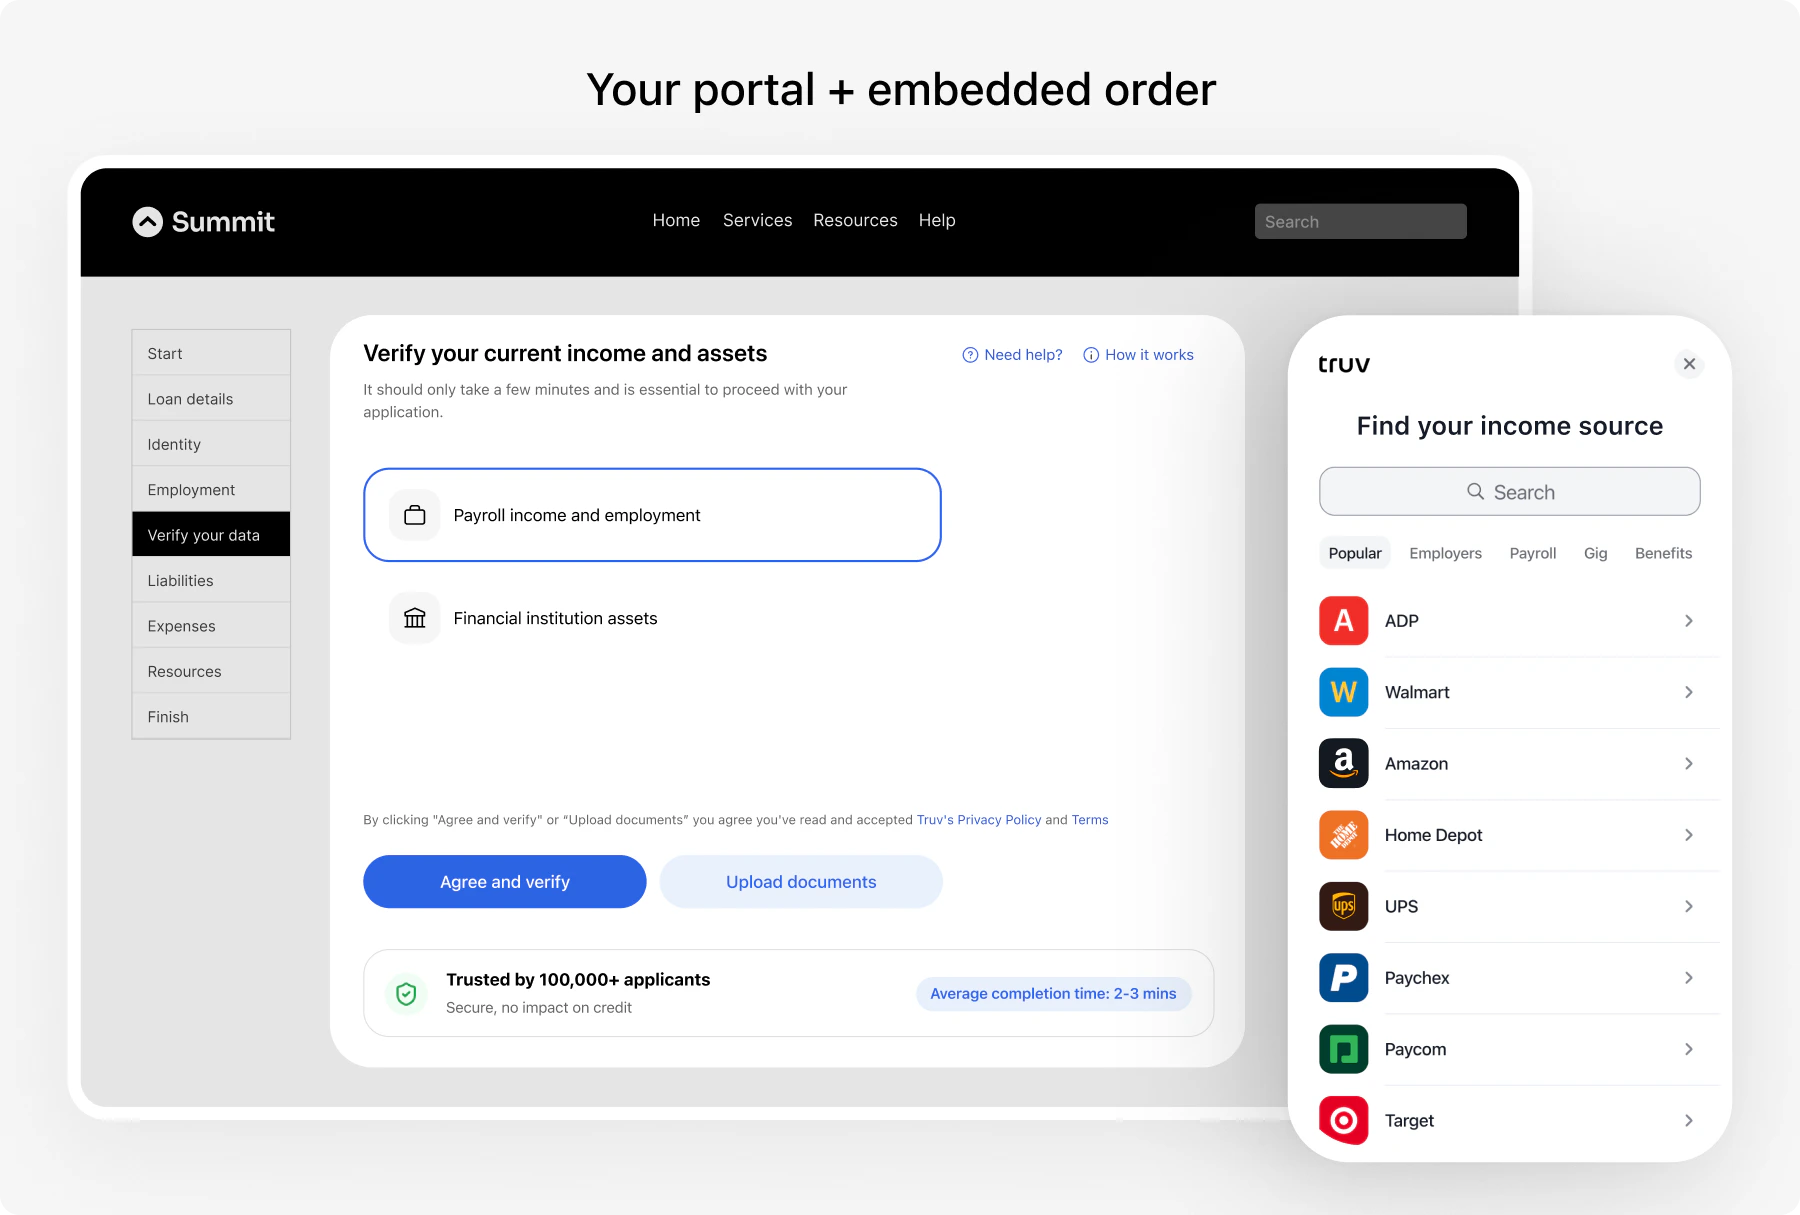 Embedded Orders support the following data source types:
| Data source | Products | Use case |
| ------------- | ------------------------ | -------------------------------------------------------------------------------------------------------------------------- |
| **Payroll** | `income`, `employment` | Income verification, employment history. **Note:** `income` auto-includes employment data. You don't need to request both. |
| **Bank** | `transactions`, `assets` | Asset verification, transaction history |
| **Documents** | `income`, `employment` | Document upload verification (pay stubs, W-2s, tax forms) |
| **Tax** | `income` | Tax return verification |
If you already know the user's employer or provider, use [deeplinking](/developers/integration/embedded-orders/deeplinking) to skip the search screen and go directly to the login flow.
```mermaid theme={null}
sequenceDiagram
participant Server as Your Server
participant API as Truv API
participant Browser as Your App
participant Bridge as Truv Bridge
Server->>API: 1. Create Order (POST /v1/orders/)
API-->>Server: order_id, bridge_token
Server->>Browser: 2. Pass bridge_token
Browser->>Bridge: 3. Initialize widget (TruvBridge.init)
Bridge->>Browser: User searches & connects accounts
Bridge-->>Browser: onSuccess / onClose callbacks
API-->>Server: 4. Webhook (task-status-updated)
Server->>API: 5. Retrieve data (GET /v1/orders/{id}/)
API-->>Server: Order with employer data, reports
```
***
## How it works
1. **Create an order** via API with desired products
2. **User opens the widget** using the bridge token
3. **User connects accounts** (payroll, banks)
4. **Receive data** via webhook notifications
5. **Retrieve results** using the order ID
***
## Implement
### Step 1: Create an order \[Server-side]
Create an [Order](/api-reference/orders/object) to link different data providers. The response includes a `bridge_token` to initialize Truv Bridge.
```bash theme={null}
curl -X POST https://prod.truv.com/v1/orders/ \
-H "X-Access-Client-Id: YOUR_TRUV_CLIENT_ID" \
-H "X-Access-Secret: YOUR_TRUV_CLIENT_SECRET" \
-H "Content-Type: application/json" \
-d '{
"products": ["income"],
"first_name": "John",
"last_name": "Doe"
}'
```
```bash theme={null}
curl -X POST https://prod.truv.com/v1/orders/ \
-H "X-Access-Client-Id: YOUR_TRUV_CLIENT_ID" \
-H "X-Access-Secret: YOUR_TRUV_CLIENT_SECRET" \
-H "Content-Type: application/json" \
-d '{
"products": ["assets"],
"first_name": "John",
"last_name": "Doe"
}'
```
```bash theme={null}
curl -X POST https://prod.truv.com/v1/orders/ \
-H "X-Access-Client-Id: YOUR_TRUV_CLIENT_ID" \
-H "X-Access-Secret: YOUR_TRUV_CLIENT_SECRET" \
-H "Content-Type: application/json" \
-d '{
"products": ["income", "assets"],
"first_name": "John",
"last_name": "Doe"
}'
```
When you include `income` in the products array, employment data is automatically included. You do not need to pass both `income` and `employment`.
**Best practice:** Include `email` and `phone` on the order along with `notification_settings` to send a delayed notification if the user doesn't complete verification during the embedded session:
```json theme={null}
{
"notification_settings": {
"suppress_user_notifications": false,
"first_notification_delay_hours": 6
}
}
```
This gives the user time to finish in-app, then sends a reminder if they haven't completed within 6 hours.
The create order endpoint accepts additional fields to customize the verification:
| Field | Description |
| ----------------------- | ------------------------------------------------------------------------------------------------------------------------------------------------ |
| `employers` | Pre-populate the employer in Bridge so the user doesn't have to search. Pass `company_name` and optionally `company_address`. |
| `notification_settings` | Suppress emails/SMS to the user with `suppress_user_notifications: true`, or delay the first notification with `first_notification_delay_hours`. |
| `loan` | Attach loan metadata: `loan_number` (required), `originator_name`, `originator_email`, `loan_processor_name`, `loan_processor_email`. |
| `external_user_id` | Your internal identifier for the user. |
| `order_number` | Your internal reference number for this order. |
| `ssn` | Last 4 or full 9 digits. Enables SSN matching on the verification. |
| `email` / `phone` | Contact info for sending the order link via email or SMS. |
| `template_id` | [Customization template](/developers/customization) to apply. |
[Explore the full request schema →](/api-reference/orders/orders_create)
Orders can be configured in two modes that control how users interact with pre-populated employers:
| Mode | Behavior | Best for |
| ---------------- | -------------------------------------------------------------------------------- | --------------------------------------------------------- |
| **Open order** | User can skip pre-populated employers and add new ones not on the original order | Flexible flows where users may have changed jobs |
| **Closed order** | User must attempt all pre-populated employers. Cannot add new ones. | Strict verification where specific employers are required |
Within open orders, two skip behaviors are available:
* **Require attempt, then allow skip** — User must try connecting before they can skip
* **Allow skip without attempting** — User can skip immediately
This is an account-level setting. Contact your Truv representative or [support@truv.com](mailto:support@truv.com) to configure.
Extract the `bridge_token` from the response.
```json theme={null}
{
"id": "39aa1486ccca4bc19cda071ffc1ba392",
"order_number": "truv-o-39aa1486",
// ... additional order fields
"user_id": "b1e24b60b8d84b9da11e13f46a830f41",
"bridge_token": "93be103a3ccd4d4fa38af0b1bfcf3be8"
// ... full response includes status, timestamps, share_url, and more
}
```
### Step 2: Initialize widget \[Client-side]
Load Truv Bridge and pass the `bridge_token` from Step 1.
`isOrder: true` is required for Embedded Orders. Initializing without it causes unexpected behavior.
```html theme={null}
```
Wait for the `COMPLETED` event with `source: "order"` before advancing the user in your application. This event fires when the order reaches its final state: all connections succeeded or were skipped. Do **not** use `onSuccess` or `onClose` to advance the user, as the order may still have pending connections.
#### Callbacks
| Callback | Description | Required |
| ----------- | ------------------------------------------------------------------------------------------------------------------------------------------------------------------------------------ | -------- |
| `onLoad` | Bridge finished loading the order page | Optional |
| `onSuccess` | User connected all accounts and clicked "I'm done" | Optional |
| `onClose` | Bridge closed the order page | Optional |
| `onEvent` | Receives events from the order page (`source: "order"`) and the connection widget (`source: "bridge"`). See [Bridge Events](/developers/sdks/bridge-events#callbacks) for all types. | Optional |
#### Display modes
By default the widget opens as a centered dialog. To embed it inline inside your own container, see [Display Modes](/developers/integration/embedded-orders/display-modes).
When the user picks an employer, the connection widget opens as a modal on top of the inline order page. To show your own modal (for example, a session-timeout dialog) without it being hidden behind that widget, call `bridge.close({ mode: 'onlyModal' })`. The inline order page stays mounted; only the modal connection widget is dismissed. See [Close options](/developers/integration/bridge-widget/overview#close-options).
### Step 3: Test in sandbox
Test your implementation with sandbox credentials.
| Username | Password | Description |
| ---------------------- | -------------- | ---------------------------- |
| `goodlogin` | `goodpassword` | Full-time current employment |
| `hourly.part-time` | `goodpassword` | Hourly part-time worker |
| `multiple.employments` | `goodpassword` | Multiple employers |
See [Test Credentials](/developers/testing/test-credentials) for all scenarios.
### Step 4: Monitor webhooks \[Server-side]
[Webhooks](/api-reference/webhooks) notify you when task and order statuses change. Use `user_id` to match events to a specific order.
```mermaid theme={null}
sequenceDiagram
participant User
participant Bridge as Truv Bridge
participant API as Truv API
participant Server as Your Server
User->>Bridge: Connects account
Bridge->>API: Creates task
API-->>Server: task-status-updated (login)
API-->>Server: task-status-updated (parse)
API-->>Server: task-status-updated (done)
User->>Bridge: Clicks "I'm done"
API-->>Server: order-status-updated (completed)
```
Task-level webhook, fires as each connection progresses.
```json theme={null}
{
"webhook_id": "17a80437ce23411dbfd656694d19a8c6",
"event_type": "task-status-updated",
"event_created_at": "2024-07-11T21:43:08.073930Z",
"product": "income",
"link_id": "d8a8945ee2b049b193110cfba643f5df",
"user_id": "adbe707dddee4334bffaeb5866272740",
"data_source": "payroll",
"task_id": "871fef2e79ea444ea2019c8845305d31",
"tracking_info": null,
"status": "done",
"template_id": null,
"updated_at": "2024-07-11T21:43:08.075540+00:00"
}
```
Order-level webhook, fires when the user finishes the order.
```json theme={null}
{
"webhook_id": "0aac461e7b774a38a72fd9c7c0eef8ee",
"event_type": "order-status-updated",
"event_created_at": "2024-07-11T21:40:48.424610Z",
"product": "income",
"link_id": "d8a8945ee2b049b193110cfba643f5df",
"user_id": "adbe707dddee4334bffaeb5866272740",
"data_source": "payroll",
"order_id": "ddd192646b3c48be96651a0ff25cef85",
"order_number": "4138538",
"employer_id": "d7166cffbfef4bd6a9e830cf5508e615",
"status": "completed",
"template_id": null,
"updated_at": "2024-07-11T21:40:48.424655+00:00"
}
```
See [Task lifecycle](/api-reference/tasks/lifecycle) for all status transitions.
### Step 5: Retrieve data \[Server-side]
Fetch order details using the `order_id`. The response includes employer data, employment history, income statements, and report IDs.
```bash theme={null}
curl https://prod.truv.com/v1/orders/{order_id}/ \
-H "X-Access-Client-Id: YOUR_TRUV_CLIENT_ID" \
-H "X-Access-Secret: YOUR_TRUV_CLIENT_SECRET"
```
See [Order object](/api-reference/orders/object) for the full response schema.
***
## Content Security Policy (CSP)
If your application uses a Content Security Policy, you must allow these domains for the embedded widget to load and function correctly:
| Domain | Purpose |
| -------------- | -------------------------- |
| `my.truv.com` | Truv Bridge application |
| `cdn.truv.com` | Truv Bridge JavaScript SDK |
```text theme={null}
Content-Security-Policy: frame-src my.truv.com; script-src cdn.truv.com;
```
Missing CSP configuration is one of the most common causes of the widget failing to load in embedded contexts. If the widget doesn't appear or shows a blank frame, check your CSP settings first.
***
## Demo apps
Applicant verifies income, employment, or assets through Bridge in a single session.
Applicant returns to complete multiple verification tasks tied to one file.
***
## Next steps
Add additional employers to an existing order
Pull updated data without user re-authentication
Skip employer search for higher conversion
Embedded Orders support the following data source types:
| Data source | Products | Use case |
| ------------- | ------------------------ | -------------------------------------------------------------------------------------------------------------------------- |
| **Payroll** | `income`, `employment` | Income verification, employment history. **Note:** `income` auto-includes employment data. You don't need to request both. |
| **Bank** | `transactions`, `assets` | Asset verification, transaction history |
| **Documents** | `income`, `employment` | Document upload verification (pay stubs, W-2s, tax forms) |
| **Tax** | `income` | Tax return verification |
If you already know the user's employer or provider, use [deeplinking](/developers/integration/embedded-orders/deeplinking) to skip the search screen and go directly to the login flow.
```mermaid theme={null}
sequenceDiagram
participant Server as Your Server
participant API as Truv API
participant Browser as Your App
participant Bridge as Truv Bridge
Server->>API: 1. Create Order (POST /v1/orders/)
API-->>Server: order_id, bridge_token
Server->>Browser: 2. Pass bridge_token
Browser->>Bridge: 3. Initialize widget (TruvBridge.init)
Bridge->>Browser: User searches & connects accounts
Bridge-->>Browser: onSuccess / onClose callbacks
API-->>Server: 4. Webhook (task-status-updated)
Server->>API: 5. Retrieve data (GET /v1/orders/{id}/)
API-->>Server: Order with employer data, reports
```
***
## How it works
1. **Create an order** via API with desired products
2. **User opens the widget** using the bridge token
3. **User connects accounts** (payroll, banks)
4. **Receive data** via webhook notifications
5. **Retrieve results** using the order ID
***
## Implement
### Step 1: Create an order \[Server-side]
Create an [Order](/api-reference/orders/object) to link different data providers. The response includes a `bridge_token` to initialize Truv Bridge.
```bash theme={null}
curl -X POST https://prod.truv.com/v1/orders/ \
-H "X-Access-Client-Id: YOUR_TRUV_CLIENT_ID" \
-H "X-Access-Secret: YOUR_TRUV_CLIENT_SECRET" \
-H "Content-Type: application/json" \
-d '{
"products": ["income"],
"first_name": "John",
"last_name": "Doe"
}'
```
```bash theme={null}
curl -X POST https://prod.truv.com/v1/orders/ \
-H "X-Access-Client-Id: YOUR_TRUV_CLIENT_ID" \
-H "X-Access-Secret: YOUR_TRUV_CLIENT_SECRET" \
-H "Content-Type: application/json" \
-d '{
"products": ["assets"],
"first_name": "John",
"last_name": "Doe"
}'
```
```bash theme={null}
curl -X POST https://prod.truv.com/v1/orders/ \
-H "X-Access-Client-Id: YOUR_TRUV_CLIENT_ID" \
-H "X-Access-Secret: YOUR_TRUV_CLIENT_SECRET" \
-H "Content-Type: application/json" \
-d '{
"products": ["income", "assets"],
"first_name": "John",
"last_name": "Doe"
}'
```
When you include `income` in the products array, employment data is automatically included. You do not need to pass both `income` and `employment`.
**Best practice:** Include `email` and `phone` on the order along with `notification_settings` to send a delayed notification if the user doesn't complete verification during the embedded session:
```json theme={null}
{
"notification_settings": {
"suppress_user_notifications": false,
"first_notification_delay_hours": 6
}
}
```
This gives the user time to finish in-app, then sends a reminder if they haven't completed within 6 hours.
The create order endpoint accepts additional fields to customize the verification:
| Field | Description |
| ----------------------- | ------------------------------------------------------------------------------------------------------------------------------------------------ |
| `employers` | Pre-populate the employer in Bridge so the user doesn't have to search. Pass `company_name` and optionally `company_address`. |
| `notification_settings` | Suppress emails/SMS to the user with `suppress_user_notifications: true`, or delay the first notification with `first_notification_delay_hours`. |
| `loan` | Attach loan metadata: `loan_number` (required), `originator_name`, `originator_email`, `loan_processor_name`, `loan_processor_email`. |
| `external_user_id` | Your internal identifier for the user. |
| `order_number` | Your internal reference number for this order. |
| `ssn` | Last 4 or full 9 digits. Enables SSN matching on the verification. |
| `email` / `phone` | Contact info for sending the order link via email or SMS. |
| `template_id` | [Customization template](/developers/customization) to apply. |
[Explore the full request schema →](/api-reference/orders/orders_create)
Orders can be configured in two modes that control how users interact with pre-populated employers:
| Mode | Behavior | Best for |
| ---------------- | -------------------------------------------------------------------------------- | --------------------------------------------------------- |
| **Open order** | User can skip pre-populated employers and add new ones not on the original order | Flexible flows where users may have changed jobs |
| **Closed order** | User must attempt all pre-populated employers. Cannot add new ones. | Strict verification where specific employers are required |
Within open orders, two skip behaviors are available:
* **Require attempt, then allow skip** — User must try connecting before they can skip
* **Allow skip without attempting** — User can skip immediately
This is an account-level setting. Contact your Truv representative or [support@truv.com](mailto:support@truv.com) to configure.
Extract the `bridge_token` from the response.
```json theme={null}
{
"id": "39aa1486ccca4bc19cda071ffc1ba392",
"order_number": "truv-o-39aa1486",
// ... additional order fields
"user_id": "b1e24b60b8d84b9da11e13f46a830f41",
"bridge_token": "93be103a3ccd4d4fa38af0b1bfcf3be8"
// ... full response includes status, timestamps, share_url, and more
}
```
### Step 2: Initialize widget \[Client-side]
Load Truv Bridge and pass the `bridge_token` from Step 1.
`isOrder: true` is required for Embedded Orders. Initializing without it causes unexpected behavior.
```html theme={null}
```
Wait for the `COMPLETED` event with `source: "order"` before advancing the user in your application. This event fires when the order reaches its final state: all connections succeeded or were skipped. Do **not** use `onSuccess` or `onClose` to advance the user, as the order may still have pending connections.
#### Callbacks
| Callback | Description | Required |
| ----------- | ------------------------------------------------------------------------------------------------------------------------------------------------------------------------------------ | -------- |
| `onLoad` | Bridge finished loading the order page | Optional |
| `onSuccess` | User connected all accounts and clicked "I'm done" | Optional |
| `onClose` | Bridge closed the order page | Optional |
| `onEvent` | Receives events from the order page (`source: "order"`) and the connection widget (`source: "bridge"`). See [Bridge Events](/developers/sdks/bridge-events#callbacks) for all types. | Optional |
#### Display modes
By default the widget opens as a centered dialog. To embed it inline inside your own container, see [Display Modes](/developers/integration/embedded-orders/display-modes).
When the user picks an employer, the connection widget opens as a modal on top of the inline order page. To show your own modal (for example, a session-timeout dialog) without it being hidden behind that widget, call `bridge.close({ mode: 'onlyModal' })`. The inline order page stays mounted; only the modal connection widget is dismissed. See [Close options](/developers/integration/bridge-widget/overview#close-options).
### Step 3: Test in sandbox
Test your implementation with sandbox credentials.
| Username | Password | Description |
| ---------------------- | -------------- | ---------------------------- |
| `goodlogin` | `goodpassword` | Full-time current employment |
| `hourly.part-time` | `goodpassword` | Hourly part-time worker |
| `multiple.employments` | `goodpassword` | Multiple employers |
See [Test Credentials](/developers/testing/test-credentials) for all scenarios.
### Step 4: Monitor webhooks \[Server-side]
[Webhooks](/api-reference/webhooks) notify you when task and order statuses change. Use `user_id` to match events to a specific order.
```mermaid theme={null}
sequenceDiagram
participant User
participant Bridge as Truv Bridge
participant API as Truv API
participant Server as Your Server
User->>Bridge: Connects account
Bridge->>API: Creates task
API-->>Server: task-status-updated (login)
API-->>Server: task-status-updated (parse)
API-->>Server: task-status-updated (done)
User->>Bridge: Clicks "I'm done"
API-->>Server: order-status-updated (completed)
```
Task-level webhook, fires as each connection progresses.
```json theme={null}
{
"webhook_id": "17a80437ce23411dbfd656694d19a8c6",
"event_type": "task-status-updated",
"event_created_at": "2024-07-11T21:43:08.073930Z",
"product": "income",
"link_id": "d8a8945ee2b049b193110cfba643f5df",
"user_id": "adbe707dddee4334bffaeb5866272740",
"data_source": "payroll",
"task_id": "871fef2e79ea444ea2019c8845305d31",
"tracking_info": null,
"status": "done",
"template_id": null,
"updated_at": "2024-07-11T21:43:08.075540+00:00"
}
```
Order-level webhook, fires when the user finishes the order.
```json theme={null}
{
"webhook_id": "0aac461e7b774a38a72fd9c7c0eef8ee",
"event_type": "order-status-updated",
"event_created_at": "2024-07-11T21:40:48.424610Z",
"product": "income",
"link_id": "d8a8945ee2b049b193110cfba643f5df",
"user_id": "adbe707dddee4334bffaeb5866272740",
"data_source": "payroll",
"order_id": "ddd192646b3c48be96651a0ff25cef85",
"order_number": "4138538",
"employer_id": "d7166cffbfef4bd6a9e830cf5508e615",
"status": "completed",
"template_id": null,
"updated_at": "2024-07-11T21:40:48.424655+00:00"
}
```
See [Task lifecycle](/api-reference/tasks/lifecycle) for all status transitions.
### Step 5: Retrieve data \[Server-side]
Fetch order details using the `order_id`. The response includes employer data, employment history, income statements, and report IDs.
```bash theme={null}
curl https://prod.truv.com/v1/orders/{order_id}/ \
-H "X-Access-Client-Id: YOUR_TRUV_CLIENT_ID" \
-H "X-Access-Secret: YOUR_TRUV_CLIENT_SECRET"
```
See [Order object](/api-reference/orders/object) for the full response schema.
***
## Content Security Policy (CSP)
If your application uses a Content Security Policy, you must allow these domains for the embedded widget to load and function correctly:
| Domain | Purpose |
| -------------- | -------------------------- |
| `my.truv.com` | Truv Bridge application |
| `cdn.truv.com` | Truv Bridge JavaScript SDK |
```text theme={null}
Content-Security-Policy: frame-src my.truv.com; script-src cdn.truv.com;
```
Missing CSP configuration is one of the most common causes of the widget failing to load in embedded contexts. If the widget doesn't appear or shows a blank frame, check your CSP settings first.
***
## Demo apps
Applicant verifies income, employment, or assets through Bridge in a single session.
Applicant returns to complete multiple verification tasks tied to one file.
***
## Next steps
Add additional employers to an existing order
Pull updated data without user re-authentication
Skip employer search for higher conversion